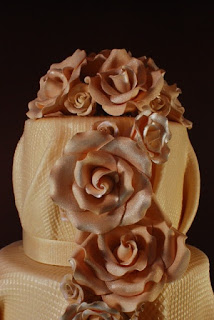
The pleating did not come naturally since we are all conditioned to not have pleats, but as you can imagine it wasn't had. I don't have room for a huge fondant sheeter, so I've found a GREAT alternative, "The Mat". I think that tool and Elite fondant are the key to covering cakes. We use many different brands of fondant for many different applications, but Elite is by far my favorite for covering cakes.
 |
| This picture better shows the burlap pattern |
I used two boxes of "Bloomed Garden Roses" from Caljavaonline.com as well as several smaller roses for "filler". I really love these roses because they come with four sizes and are very natural looking. The biggest challenge were trying to get the flowers to "match" for ivory fondant (straight from the tub ivory). I ordered them in ivory but they were very peach! I spent 5 hours airbrushing coats and coats of petal dust to get the color right. The bride wanted the entire cake and flowers to have luster dust airbrushed on also.
My real challenge on this cake was self inflicted. I keep letting brides pick their favorite cake stand regardless of the diameter of the cake. As you can see on the first picture, there wasn't a very big lip on the cake board. You really need a cake board at least 6" larger than the bottom tier, or the cake will be too top heavy and more likely to fall. When you are traveling with these tall guys the extra cake board act like "training wheels" so that it doesn't fall over. When we have done this in the past, we still put a larger board so that we can carry it and not put our fingers in the sides. This doesn't give you close to the stability, so don't use that as a solution. I'm not going to keep making that mistake!


That is a very cool technique - turned out fabulous. And thanks for the tip about the cake board.
ReplyDeleteI love this! Gorgeous!
ReplyDelete