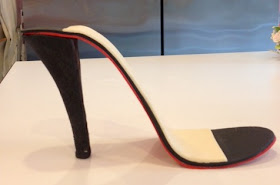
Tuesday, August 27, 2013

A Tale of Two Shoes....

There are a lot of shoe box cake tutorials out there, so I won't bore you with another.  I do want to give you a few helpful hints I learned on the first, wait...actually second shoe I have ever made.  How have we gone this long and never made a shoe cake?  Just lucky?  Nah....just kidding it was fun.  I was instructed by the buyer that I could change the shoe a little (thank goodness) and add a red sole to the shoe bottom.  Oh those pretty, sexy shoes!

Bad Shoe
My first attempt - Everything was way too thick!  Don't do this!!


 The first thing I did was to buy a shoe kit from Jennifer Dontz.  I guess that is pretty lazy or spoiled of me but it sure did make things a bit easier.  Really, the styrofoam form was the biggest help, but I'm sure it could be done with a posterboard form or something else the shoe tutorials advise.  The shoe in my inspiration  picture had a black sole and a cream insole.  Now I had to add a third layer to this and still make it look delicate.  My first attempt was bad, just bad (see below!).  It was too thick and looked silly when you look at it from the side.  I decided to get my pasta machine out to get things nice and thin.  I rolled all three layers of gumpaste (50/50 mix) as thin as I could on the cream and red, but a little thicker on the black.  I put the three layers together and gave it a little roll and cut out the sole.  I did go back and paint the little bit of red showing on the sides so it would look more seamless. Easy squeezy!
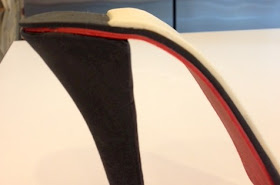
Bad Shoe 2
This is WAY too thick and not delicate at all.  The pasta roller helped!

The ankle strap in the inspiration picture was crazy!  It was sticking way up it the air!  I really could not make it happen and I hate that.  I told the customer up front that I probably could not duplicate the crazy straps so the pressure wasn't crazy like if he expected it.  I tried putting a wire in the straps, but thin wire was too wimpy and thick wire was too bulky for the look of the straps I needed.  In the end, my straps were just gumpaste with no wires.  I used some rhinestones from the scrap booking department that already had glue dots.  Handy!  No one was going to eat the shoe so why not?

To hold the straps in a gravity defying position, I poked two sets of skewers in either side of the styrofoam mold.  Then I took a long piece of scotch tape and wrapped around each set of skewers.  This gave the straps something to rest on while drying.  I let the shoe set up for a couple days before the straps and then for another six days with the straps installed.

For traveling with the shoe, I got a 10x10 box, cut the top off and put a 10" square cake board in the box for stability.  Since I use grippy/shelf liner under everything, I added a good piece on the cake board.  I left the shoe on the form and put it on the cake board/shelf liner and anchored it down by gently hammering (with my baby hammer) with 2" pieces of strong floral wire (Wal-Mart type).  I didn't want to ruin my expensive piece of styrofoam ;)

 A very sweet friend of ours gave us a glorious recommendation to his good friend.  Unfortunately he doesn't realize that we really only make wedding cakes.  I just felt like I had to make this shoe box cake.   We were given a picture to follow very closely.  I wish I knew the original cake artist.  If you do, please let me know so that I can credit them.

Tuesday, August 20, 2013

My First Shoe Box Cake


A very sweet friend of ours gave us a glorious recommendation to his good friend.  Unfortunately he didn't realize that we really only make wedding cakes.  But still I just felt like I had to make this shoe box cake.   We were given a picture to follow very closely.  I wish I knew the original cake artist.  If you do, please let me know so that I can credit her.

I know that prices can vary greatly by zip code and baker so I don't talk about it much.  For this cake, I charged $250, which is my minimum order price.  After I told him the price, the customer said he called the original cake artist and she wanted $850 for the cake and that a local bakery had quoted $150.  He said the $850 lady was "crazy" for wanting that much.  His words, not mine.  Even later he told me that he didn't think the $150 baker would be able to replicate it with great detail.  After looking at her previous work he didn't have confidence in her abilities.  So the extra $100 I was charging was for an "insurance policy" that he would not be disappointed.  As we all know, you get what you pay for!

I baked  three layers of 9 x 13" and cut a couple of inches off to make it more shoe boxy.  It was white/chocolate/white cake with raspberry buttercream.  Yum!  The whole cake was paneled with modeling chocolate.

For the signature on the side of the box, my client wanted the birthday girl's name in a very similar style of the original shoes.  I couldn't find a suitable Louboutin font online, but Chaddy did use an app to recreate it to the best of our abilities.  The app is called Adobe Ideas, and is a free app.

The font with the signature was so small there was no way I could pipe it and I didn't want to mix mediums, so we wound up printing out an edible image to cover the entire side of the box.  We did a lot of test swatches on paper to find a color that was an exact match to the box color.  BUT!  It darkened over night!  So let that be a lesson to us all!  Luckily, since I covered the entire side of the box with the image, you could hardly even tell!

Stop back in next week and I'm going to talk a little more about that sexy shoe and what went into the making of it!!

Tuesday, August 13, 2013

Texture on Buttercream Cakes

Almost all my customers say "I don't want fondant!" and they mean it, so I've worked hard at coming up with buttercream alternatives. Since we make a bunch of all white wedding cakes, texture seems to be a huge trend that I'm seeing.  Brides don't want very busy or piped cakes, but they do want some design.  They are bringing me pictures of rough iced cakes, stenciled cakes, combed cakes, and sugared cakes.  I want to go over a few options they you may want to consider when designing a cake for any occasion.
I've blogged about stencils before, so please give it a read.  It's a great option in all one color for texture or two different colors for more detail.  It's also a good idea to add pearls or extra piping on the stenciled design.


Buttercream ruffles are very trendy and you don't have to do the entire cake.  Just a few rows will give you lots of  femininity and texture.


Diamonds and lines are are classic and easy.  Use a bench scraper and blow torch or super hot water and melt the design into the cake.  Sanding sugar or pearl dragees are great on buttercream for sparkle and opulence.  Covering a cake in this material also keeps you from having to get a cake perfectly smooth.  If you a beginner, give it a shot.  Just keep in mind, it gets everywhere!


Lastly, buttercream combs are a great way to add a side design and it's super easy!  Wilton and many others sell all kinds of different designs.  Just get your cake level, basically smoothed and chilled.  Add another thick layer of buttercream and quickly run your comb through it and poof! You have a design.


Tell me about any great ideas you have for buttercream texture!


Happy caking!

Tuesday, August 6, 2013

Best Way to Sample at Bridal Shows

I posted a couple of weeks ago about my latest showing at the Chattanooga Bridal Show.  One of the comments on that post was about how I provide cake samples to the attendees of the bridal shows.

Now I've seen samples done several different ways.  The most common method I have seen is a sheet cake that is cut into small portions and handed out.  I don't like this method because not only is it messy, but it takes someone (maybe you) away from interacting with your customers.  There's not a lot of room in a 10 x 10 booth for employees - I would say no more than 3.  You don't want one of those people cutting cake.

 Then there's mini-cupcakes and cupcakes.  I have never tried mini cupcakes, just because I hate making them so much!! :-)  But I did try full-sized cupcakes at my first couple of bridal shows and it was a total disaster,  Some people thought it was too much cake and wouldn't even take a sample.  Some people were so enthralled by the cupcakes that they just wanted to know how many they could get and take home to kids, nieces, etc. And the people that did want cupcakes also wanted something to carry them in.  So I bought cups and lids.  That just increased my costs!

What I have found that works best for ME is using the Solo 2 ounce condiment cup with lid.  I will cut a small circle our of a sheet cake to fir in the cup and I still have room for icing and a filling, if necessary.  Then the lids go on.  I also put a small label on the lid with my business name, website, and phone number. The cup size offers the client a nice 2-bite sample; the lid allows the the client to pop it in their goodie bag to take home, and the label reminds them about who made that awesome cake later on.  The best part is that I make them up a couple of days before and just set them out in the booth.  They stack nicely and it allows people to take one and run if they want to.  And I'm available to talk flavors or otherwise discuss cake with my potential clients.

For those that have done bridal shows, how do you provide samples?