 |
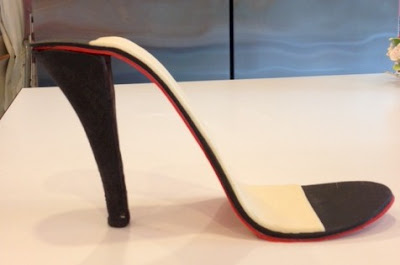
| My first attempt - Everything was way too thick! Don't do this!! |
The first thing I did was to buy a shoe kit from Jennifer Dontz. I guess that is pretty lazy or spoiled of me but it sure did make things a bit easier. Really, the styrofoam form was the biggest help, but I'm sure it could be done with a posterboard form or something else the shoe tutorials advise. The shoe in my inspiration picture had a black sole and a cream insole. Now I had to add a third layer to this and still make it look delicate. My first attempt was bad, just bad (see below!). It was too thick and looked silly when you look at it from the side. I decided to get my pasta machine out to get things nice and thin. I rolled all three layers of gumpaste (50/50 mix) as thin as I could on the cream and red, but a little thicker on the black. I put the three layers together and gave it a little roll and cut out the sole. I did go back and paint the little bit of red showing on the sides so it would look more seamless. Easy squeezy!
 |
| This is WAY too thick and not delicate at all. The pasta roller helped! |
The ankle strap in the inspiration picture was crazy! It was sticking way up it the air! I really could not make it happen and I hate that. I told the customer up front that I probably could not duplicate the crazy straps so the pressure wasn't crazy like if he expected it. I tried putting a wire in the straps, but thin wire was too wimpy and thick wire was too bulky for the look of the straps I needed. In the end, my straps were just gumpaste with no wires. I used some rhinestones from the scrap booking department that already had glue dots. Handy! No one was going to eat the shoe so why not?
To hold the straps in a gravity defying position, I poked two sets of skewers in either side of the styrofoam mold. Then I took a long piece of scotch tape and wrapped around each set of skewers. This gave the straps something to rest on while drying. I let the shoe set up for a couple days before the straps and then for another six days with the straps installed.
For traveling with the shoe, I got a 10x10 box, cut the top off and put a 10" square cake board in the box for stability. Since I use grippy/shelf liner under everything, I added a good piece on the cake board. I left the shoe on the form and put it on the cake board/shelf liner and anchored it down by gently hammering (with my baby hammer) with 2" pieces of strong floral wire (Wal-Mart type). I didn't want to ruin my expensive piece of styrofoam ;)
A very sweet friend of ours gave us a glorious recommendation to his good friend. Unfortunately he doesn't realize that we really only make wedding cakes. I just felt like I had to make this shoe box cake. We were given a picture to follow very closely. I wish I knew the original cake artist. If you do, please let me know so that I can credit them.


