Showing posts with label special edition. Show all posts

Tuesday, April 24, 2012

Les Miserables Cast Party Cake


I have to admit that I don't normally entertain last-minute orders.  My time off is just as precious as anyone else's, and lack of planning just doesn't cut it as an excuse.  But when I got in late from a Friday night wedding and listened to Paul's message, something pulled at my heart strings.  Paul had ordered a cake from another baker over a month ago, but on Friday he found out they had lost the order and would not be able (or willing) to provide him with his cake.  This cake was for the fine young men of the McCallie School and the girls of GPS (Girls Preparatory School).  They had worked hard all year on their production of Les Miserables, and this cake was supposed to be the centerpiece of their cast party.

I had already endured a very trying week, still had 2 weddings cakes to deliver on Saturday, and was REALLY looking forward to some rest and relaxation.  But that message kept haunting me - it made me angry that another baker would let down a client like that.  I discussed it with Chaddy and we both agreed that it would be a shame to let all those kids down after they had worked so hard.  I called Paul first thing Saturday morning and told him that we had limited time, but we would love to help out.  He gave us open reign on the cake, but said he would like the iconic girl from the poster, the McCallie and GPS logos, and something signifying the "barricade scene".  Alright, that's something we can work with!!

I did some quick reading on "Les Mis" and started baking.  Chaddy started getting graphics ready.  The top of the cake is mainly edible images (4 sheets pieced together to be exact) with the logo lettering cut out using the Cricut.  On the sides we used a blue, white, and red border to keep with the French theme.  We then made lots of modeling chocolate barrels, stools, planks and pallets to build up a barricade at each corner.  We didn't finish the cake under after 1:00 am on Sunday morning, but we had a blast making it! 

I know this was a long post, so as a bonus for sticking with me, here's a top-down shot of the cake, along with a little secret:  When I was baking, I made a blue layer, a white layer, and a red layer.  When the cast and crew cuts into the cake, they'll get another little piece of the French flag!


Monday, May 30, 2011

Memorial Day Quartermaster Groom's Cake


I am posting this week's post a day early in celebration of Memorial Day.  Memorial Day is more than just an extra day that we get off work to grill hamburgers and have picnics.  It is a day to honor, remember, and thank all the brave men and women who have sacrificed for us and our country.

This Quartermaster Groom's Cake that we delivered to the Lookout Mountain Golf Club this weekend couldn't have come at a more perfect time.  Our groom here was a member of the Quartermaster Corps, and this cake is a recreation of their insignia.  My research tells me that the Quartermaster Corps is a sustainment branch, meaning they supply troops with food, fuel, supplies, and other necessities.  Probably a good guy to befriend on the battlefield, huh?

Due to time and budget limitations, we opted for the majority of the decorations to be edible images.  I did make the sword and key out of gumpaste and used luster dusts to match the gold on the cake.  I was very pleased with how the cake turned out and hope the couple was also.

Have a great week and stop back in on Friday for out next installment!

Tuesday, April 12, 2011

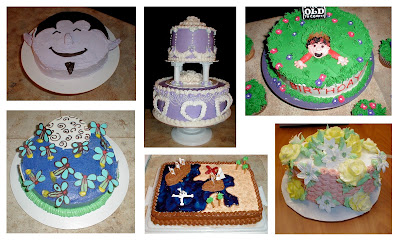
Some of my First Cakes

A few weeks back I blogged about how I got started into cake decorating and how I wound up where I am today making a living doing something I truly enjoy.  Your comments were all so sweet with many of you expressing that you shared the same dream.

Since I did my buttercream smoothing tutorial I get maybe an e-mail a week from someone who has tried my method and still not happy with the way their cakes look.  I always tell them to keep practicing and keep decorating.  Just like any other artist, you will develop your own methods and your own sense of style over time.  And your cakes WILL get better!

So why am I saying all of this?  Well... I was going through some old photos the other night when I ran across some of the cakes I did when I was first starting out.  Chad and I looked through them and snickered and giggled at each one.  But, I was doing the best I could do at the time and I was really proud of them.

So for the novice bakers out there that see my current cakes and think "Wow, I could never do that", I wanted you to see that I didn't start out doing 5-tiered cakes or flawless buttercream.  Everyone else can just sit back and laugh like Chad and I did!!

Click on the picture for an even better look!


I know the firefly cake was one I recreated (I use the term very loosely) from the Whimsical Bakehouse book.  The rest I probably saw in a Woman's Day magazine or some such place.  That purple two-tiered cake was my Wilton final cake!  These were all giveaways, so luckily none of them should ever wind up on Cake Wrecks!  LOL!

Thanks for visiting!!

Sunday, October 31, 2010

Halloween Special Edition - Meringue Cookies

A couple of weeks ago, I wrote this post and it was featured on Kathia's Pink Little Cake Blog. Just in case you missed it there, and because I'm in the Halloween spirit, I thought I would share the recipe for my regular readers.

MERINGUE BONES AND GHOSTS COOKIES

Meringue cookies are easy to make, but I think people are afraid of them because they appear complicated.  They are very inexpensive to make, and you can pipe them into almost any shape.  Also, they are gluten and peanut free, so there's a few more people that can enjoy them!

Let's start with the ingredient list.  Better get out your pencils! LOL!

INGREDIENTS
6 large egg whites
1 1/2 cups sugar

DIRECTIONS
   1. Preheat oven to 170 degrees. Put egg whites and sugar in the heatproof bowl. Set bowl over a pan of simmering water; whisk constantly until sugar is dissolved and mixture feels warm to the touch, about 5 minutes or until the mixture reaches 130 degrees.

   2. Transfer the hot mixture to your mixer with the whisk attachment.  Beat on high speed until very stiff peaks form, about 8 minutes.  The great thing about meringues is unlike plain egg whites or cream, it is almost impossible to overbeat or break it.


   3. Transfer meringue to a pastry bag fitted with a 1/2-inch plain round tip, I used a Wilton #1A.  You can fill a baggie and snip off a corner for piping too.  Pipe bone shapes, each 5 to 6 inches long, onto baking sheets lined with parchment paper.  For ghost shapes, start at the base with heavy pressure and lessen the pressure as you near the top of the ghost.  If you are unhappy with your shapes, just scoop them back up and re-pipe them! 


Bake until crisp throughout, about 90 minutes. Test one meringue to see if it is dry throughout.  If not, let it cook a little longer.  One they finish, turn off the oven and place a wooden spoon in the oven door so that it is still cracked a little.  Leave the meringue cookies in the oven.  This will allow the meringue to cool very slowly and prevent them from cracking.  Some of them will probably still crack though!  It will just make them spookier!

Once they are thoroughly cooled, use an edible image marker or gel color and small brush to draw faces on the ghosts.  This is what you end up with!


I hope you enjoy making these as much as I did!  Have a happy and safe Halloween!

ShareThis

Related Posts with Thumbnails