Showing posts with label cake photos. Show all posts

Tuesday, July 7, 2015

Cornhole Groom's Cake Photo Tutorial


Whether you call it cornhole, bean bag toss, or Baggo, people are playing this toss game everywhere - tailgate parties,family picnics, and even weddings.  So I guess when a client asked for one as a groom's cake I shouldn't have been surprised.  And since it's basically a sheet cake on an incline, they're actually pretty easy to make.


We'll start with a board to fit our cake (a 12x18), a larger board for the cake to rest on (17 1/2 x 25 1/2) and a small foam wedge to give us our height (8 1/4 x 9 - 2" high).  Start by using the 12x18 cake board to determine where you want your cake to land on the larger board.  I have marked mine on the image above with some temporary masking tape.


Dry fit all your pieces together to make sure they all fit the way you want.  Make sure to mark the placement of your styrofoam wedge.  It should hold the top board flush against the styrofoam, while being centered across the board.  Once we start securing things down there's no going back!!


Normally, styrofoam and hot glue don't mix very well, but I didn't have any extra "gluing chocolate"so I put some down on the board and gave it a couple of seconds to cool down before I plonked down the styrofoam wedge.  Let it dry and make sure the wedge is very secure on that bottom board.


We don't want that old foam wedge to be seen, so the next step is to cut some black modeling chocolate and put it on all 3 sides using piping gel.  We now have the base to place our cake on!


OK, so now the cake is on our 12x18 board and has been iced smooth.  Place it on the board using your masking tape guides and make sure everything is sitting nice and flush.  Once you like what you see, put a couple dowels through the cake, board, styrofoam,  and bottom board.  This will add stability and keep your cake firmly in place.


Now we just simply finish decorating the cake, and that part can be as simple or complex as you like.  I put modeling chocolate (MC) panels on all sides of the cake, but I put a thin layer of black MC on top.  then I covered that with a regular piece of modeling chocolate, making sure my top extended over the edge of the sides, just for a realistic effect.  Use a cookie cutter to gingerly cut out your bean bag hole, and the black from underneath will look just like a hole.  Now just decorate with your particular theme or team until you've got it just the way you want it.  Don't forget to make a bean bag!!

Tuesday, September 17, 2013

Art Deco / Gatsby Wedding Cake

This the other cake I made for the wedding photo shoot I was involved with a few weeks ago.  You see, when you have all these people together with their time invested, it really doesn't take that much more to get a second (or third) look and feel using mostly the same props.  The bride changes dresses and makeup, switch out the flowers, and voilĂ !  Different (looking) photo shoot!

One of the "looks" we were going for was a Great Gatsby / Art Deco wedding look.  I could have used the bird cage cake I made, but I had some extra time and I wanted to some great pictures of another cake for my portfolio as well.

I didn't really get to finish this cake like I wanted to, but I wasn't ashamed to bring it either.

I really liked the way the white stenciling over the gold tier turned out.  The tier being entirely gold was just too much!  Stenciling white over still left a very impactful statement. And I thought it went very well with Amanda's bridal bouquet, don't you?

My favorite part of this cake were the edible feathers we made!  What's that you say?  Edible Feathers??  Yep!  And they're actually easier than you would think to make them.

Drop back in next week and I'll have a tutorial ready for you on how you can make your own edible feathers.

Tuesday, September 10, 2013

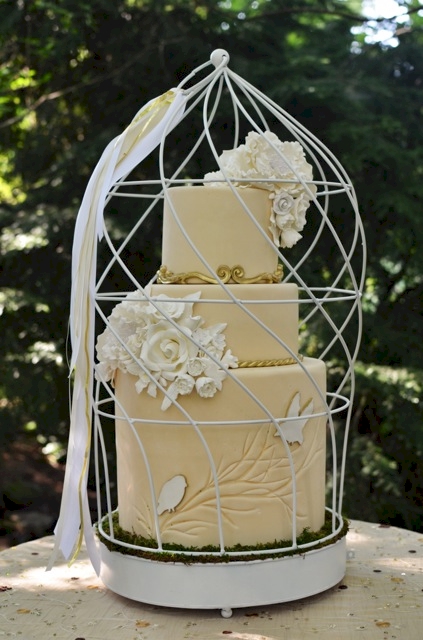
Bird Cage Woodland Wedding Cake

I have always been obsessed with birds.  I have have had them as pets and I spend a small fortune keeping food for almost every type of bird in my yard at home.  So it shouldn't be terribly surprising that I have and idea in my head for a cake inside a bird cage.  I don't know if it's something I have seen somewhere before, (I'm sure someone has done it) but it has always just been an image that struck me as... romantic.

When my friend Daisy Moffatt was designing her "Garden Fantasy Wedding" photo shoot I really had full control on what the cake looked like.  And it just so happened that the weekend before the shoot I ran across this bird cage at Home Goods (that store gets me into SO much trouble).  I immediately texted a picture of the cage to my friend (and florist for the shoot) Amanda and said "What do you think of a cake inside here?"  Her response was "Go for it!"

The cage was initially colored a silver/black metallic color and as I played with my dummy tiers inside the cage I decided that it would need a coat of paint to better go with my vision.  Krylon spray paint to the rescue!

I cut some birdie silhouettes using my Cricut and made sure they were thicker so that I could edge them in metallic gold luster dust.  The rest of the cake is just covered in fondant with branches that I carved into the fondant using my sculpting knife, some gumpaste flowers, and some scroll molds painted metallic gold.

Once it was put together i thought that it still needed a punch of color so I covered the bottom of the cage (which was leveled with a piece of foam with some moss.

I was very pleased with it once the whole vision came together.  Above is a picture that Chaddy took during the shoot while Daisy was off photographing the bride - I'm sure her pictures came out better!

Tuesday, September 3, 2013

Photo Shoot for ...

I was reading a blog a while back and the author said that if you want to be part of a photo shoot then you should make it happen.  Pick your favorite vendors, a great concept, and a great location.  This has been a slower year for wedding vendors in my area, so there have been a few of these shoots taking place.  A great couple of friends of ours decided to come up with a concept and I was lucky enough to be invited.  They gave us plenty of time and lots of artistic freedom.  I think that was a big plus because no artist wants to be given a big list of rules when they are making something for fun.  Our theme was to be "garden" so that was pretty easy.   Amanda, with Divine Designs by Amanda, did all the flowers and the table setting.  She worked with White Table on the linens and chair sashes.  Chad took these pictures but Daisy Moffatt was the official photographer.  And it all went down at the lovely Black Fox Farms.  The plan is to submit the pictures to blogs, magazines, websites and to add to our portfolio.  I am really fortunate to get to work with such a great group of people.  I can't wait to show you more pictures in the weeks to come.


Tuesday, September 18, 2012

I was featured in Cake Central Magazine!


I have been holding on to this little secret for several weeks and it has just about burned a hole in me!!  Several weeks ago I received an e-mail from Jackie at Jackie at Cake Central.  They wanted me to submit a cake for publication in Cake Central magazine.  I answered her back so fast I think the e-mail caught on fire!!

The theme I was asked to submit for was "Minimally Decorated with a Splash of Red".  Now, that's a hard theme for any decorator that wants to showcase their skills to the rest of the decorating community.  But I vowed that I would do my best to keep the design simple.

I was really happy with the way this design turned out.  I have read Cake Wrecks too many times and seen too many balloon cakes that turned out looking like something... less sophisticated.

I actually made 2 cakes to submit, and Cake Central put both in the magazine.  I was worried that they wouldn't one cake or the other, so I submitted a second cake.

This was the other cake I submitted.  I had conceived this design a while back, but with different colors.

I only had a couple of weeks from initial request to submission to get these cakes ready.  I wished I had more time to work on them.

How many of you receive Cake Central?  I wished it was still a real live printed magazine, but I'm still glad to be published in a leading industry magazine.

Special Thanks go out to Mike Houston of Houston Studios for taking such great photos to submit to the magazine.

Y'all have a great week!

Tuesday, September 4, 2012

Crawfish Boil Birthday Cake

We had such a fun time making this cake.  My friend Amanda, that owns Divine Designs called me up recently and wanted a birthday cake for her husband James' 40th birthday.  When she mentioned that they had planned a crawfish boil, I immediately had a design in mind.

This is a 2-tier cake, with the entire top tier being an edible cooking pot.  The cake was wrapped in modeling chocolate and then painted with silver luster dust.  The lid and handles were also made from modeling chocolate.  The effect was really nice; people at the party thought it was actually a mini pot!

When we got ready to take our pictures, I was looking for a suitable cake stand, when Chaddy came into the kitchen with one of our big Calphalon pots.  I thought it made for the perfect cake stand to take our pictures on!


Friday, April 8, 2011

Better Cake Photos using the iPad

Screen shot from Shuttersnitch
(click picture to see details)
I have blogged before about how we are always striving to take better pictures of the cakes we make.  The problem a lot of times is the picture in the little mini viewer looks fine, but when you see it on the big screen something is off - too dark, too bright... too something!  This past weekend we found a really cool app for the iPad that allows us to see our pictures on the iPad as we take them on our camera.  The process is called camera tethering, and while it's not the most straightforward solution, it was neat enough that I thought it was worth sharing with you here.

Things you'll need to make this work:
Apple iPad (or iPhone if you don't mind a smaller screen)
Camera that accepts SD memory cards
A Wi-Fi network
Shuttersnitch App ($16)
Eye-Fi SD Memory card (about $40 at Walmart or Amazon)

Eye-Fi is like a regular SD memory card that contains a mini Wi-Fi adapter inside.  It's very cool in itself.  As you take pictures, the Eye-Fi can transmit your pictures to your computer or to sharing sites like Photobucket.  The Wi-Fi capabilities are what allow Shuttersnitch on your iPad to grab the photos.

Shuttersnitch is a an app you get from the Apple App Store.  Once you load it you will configure it with your Eye-Fi account settings so it can communicate with the Eye-Fi card in your camera.

As you take pictures, the app automatically downloads them to your iPad so you can see a large preview (or full size even).  And best of all it only takes about 15 seconds per photo.  Shuttersnitch even tells you all your camera settings (ISO, aperture, shutter speed, etc.)   If you don't like the picture, just adjust your settings or your lighting and take again.

The biggest problem with this solution is taking pictures outside of your Wi-Fi zone.  If you want this to all work anywhere you go, you'll have to invest in a battery operated portable router.  That's just more than I need at this point.  I take most of my photos in the kitchen (or just outside).

It seemed pretty technical, but Chaddy set it up without any issues.  There are several places on the Internet that walk you through the setup, but Chad said that he used the directions at Rob Galbraith's site.

I realize that many of you might not have an iPad.  But if you do, pairing it with the Eye-Fi card and the ShutterSnitch app will definitely help you take better pictures by allowing you to see them on the fly.

Question for today...  Do you like reading articles about how technology can be used in the baking business?  Do you want to see more articles like this?   Tell us what you think in the Comments section!

UPDATE: May 2011 - Just a month or so after publishing this article, Eye-Fi has came out with a firmware upgrade to the Eye-Fi cards that will allow them to create their own wireless networks!  This means that we can now carry our iPad on deliveries and get real time pictures without any additional hardware (the battery operated router mentioned above).  We have been out several times now and it works like a charm!!

Tuesday, September 21, 2010

Smash, Smush or Baby Cake?

Chaddy and I don't have kids (except furry ones!), so it was perplexing to me the first time someone ordered a small cake just for the one year old.  My mom just cut me a slice and that's all the mess I was allowed to make, but times have changed.  People call these baby cakes all kinds of names but the most popular is smash or smush cake.  I guess it's named after it's purpose in life.  (So why aren't the rest of my cakes called eating cakes or devouring cakes?) I get some of the greatest pictures back from my customers and they always make me smile.  This one is of little Jack and the photo was taken by Houston Photography.  I just love the simple but eye catching balloons in the background, not to mention that adorable baby!
 
If you're looking to make cakes for a living, don't be surprised when you make one cake for a photo session several weeks ahead of the actual party.  The pictures make a great invitation to the big party!  I try really hard to make these cakes mostly buttercream because the fondant covered ones are just not as fun for the pictures.  Also, keep in mind any toothpicks or wire you may normally use in keeping say a fondant monkey together cannot be used for these cakes.  That would not make for a happy baby! More and more customers are asking for smash cakes or just a "personal" cake for older kids.  Sometimes it's to give them their favorite flavor or just to make their birthday more special.  Why didn't my Mommy do that?  I'd love to hear from you guys what your friends and customers are calling these baby cakes! 

ShareThis

Related Posts with Thumbnails