Showing posts with label vendor spotlight. Show all posts

Tuesday, August 11, 2015

Fairyland Club Wedding

This is such a simple, elegant cake that there isn't much to say but it's pretty eye candy. The texture was done just with a small offset spatula. It's not hard but not easy, so practice ahead of time. We delivered this cake to the Fairlyland Club on Lookout Mountain near Chattanooga TN. The florist was The Clay Pot, and they did some WONDERFUL arrangements for this wedding. He gave me these roses, ranunculus, peonies and some rosemary and I arranged them. He was so busy and I was very happy to help. I asked him to check my work and I got a thumbs up which meant a bunch considering the source!
Great florals from The Clay Pot
Now, enjoy more awesome cake photos!


Tuesday, June 23, 2015

Our Cross Country Cake Adventures

 A few months ago I was approached with a rather odd request... make my nephew's wedding cake.  Now I know that upon first read that doesn't seem terribly odd, but let me finish... his wedding was going to be in New Hampshire, and I live WAYYY down south in GA.  Yeah, see?  But Sean and his fiance Kirsten were such a cute couple that I just couldn't turn them down.

Delivering a fully decorated wedding cake 17 hours and and little over a 1000 miles away can be a daunting task and honestly one that I didn't feel I (nor my cake) was up to.  So several months ago I started formulating a plan to actually make the cake there.  The venue where the wedding was held was an absolutely gorgeous working orchard named Allyson's Orchard.  I spoke to Fran, the venue manager about my dilemma, and she graciously offered me their kitchen space to work on the cake all week long.  The kitchen had the essentials, oven, sink, and refrigeration, but any other tools I needed I had to bring with me!  GULP!

So I went back to the drawing board, because everything we were bringing (Chaddy and I, a weeks+ supply of clothing, and all the components we needed to make a cake had to fit in our Honda CRV.  It's not a compact car mind you, but it's no stretch limo either!  So I made the decision to bake the cakes and make the icing before we left and freeze them.  That way, the only "major" appliance I would need to bring would be a Kitchenaid mixer to re-whip the icing.  I would place all the wrapped frozen layers in our big marine cooler along with some disposable ice packs (the kind I get when I order chocolate) and we would just stack, fill, ice, and decorate on site.  Theo couple had chosen a mud cake, which is very dense, so I really did feel that the frozen layers would hold up to the drive.  I also began the process of making the gumpaste flowers and wrapping them to thwart the nastiest, kickiest delivery driver.


Well, Sunday morning came and we packed everything up in the cooler, along with our 2 suitcases, and our Rubbermaid tote of kitchen goodies and we left the sweltering Georgia heat on our way to New Hampshire.  We left late because we were up late the night before, so we made it to Frederick, MD (my sister and the groom's Mom's home) really late Sunday night.  I was somewhat worried about the contents of the cooler, but the outside felt cold, so I decided to not risk opening the lid and letting any cold out and just let it ride.  We visited with my sister for a few minutes and hopped in bed.

We awoke (late) the next morning and after a quick shower and breakfast, we were back on the road to New Hampshire.  We drove at a good clip, made a few stops for food anf fuel along the way, and reached our hotel late Monday evening.  I thought I had never been SO tired of being in the car!  We stayed in Keene, NH and was a pleasant surprise it was!  We were within walking distance to downtown and we explored it pretty extensively during our off times.  But I digress...

Tuesday I called Fran at Allyson's orchard and she agreed to meet us and show us the kitchen.  It was a very nice catering space and I knew it would work well, as long as everything had fared well in the cooler (which had STILL not been opened since Sunday morning at this point).  We got the cooler inside, opened it, and believe it or not, everything was still VERY cold.  Those disposable ice packs were still mostly frozen.  The cake gods had indeed smiled upon the work I was trying to do.

I made gumpaste blueberries!
We pulled out the layers and let them thaw a little more while we unpacked our kitchen and got setup for the week.  Over the course of the next few days we worked on the cake a little each day, just like normal, stacking, filling, making the textured bands, and coloring those gumpaste flowers.  When we left the orchard on Thursday the cake was all done and we had the whole day Friday to spend with the rest of the family. who had now joined us at the same hotel in Keene.  It was like a mini family reunion.

I made an extra trip over to the venue on Saturday to set the cake out in the venue space (just a few steps away from the kitchen space I had been using) so that the caterer's would have all the cooler / kitchen space they needed.  A quick trip back to the hotel for a freshen and a change and it was ceremony time!

Now I go to a lot of weddings, but we're there while the linens are going on and the DJ is setting up; We rarely get to see ANY of the wedding, and especially not the ceremony.  It was nice to get to witness all the love and all the pieces of the puzzle fit together so nicely.  Sean and Kirsten had a beautiful ceremony outside by the lake and then the reception with a crazy good BBQ dinner.

When you start adding up gas, mileage, and all the other expenses, this was definitely the "most expensive" wedding cake I have ever made, but I wouldn't have changed it for the world. The new Mr. and Mrs. Seymour loved it, and I loved seeing the smiles on their faces all throughout the night.

And even though I like to preach that other decorators shouldn't take orders they don't know how to do, the lesson to be learned is that it's OK to stretch your wings and go outside your comfort zone on some occasions, just as long as you have a good game plan!

A very special Thanks to Fran and the entire staff at Alyson's Orchard for extending their hospitality, sharing their beautiful facility, and making my task much easier!

Tuesday, November 11, 2014

Best Deals on Buying Cake Supplies

Photo borrowed from Yelp, because I forgot to take one!
Buying supplies for a small business is a part time job in itself, especially if you are watching your pennies. I have spent hours comparing prices, shipping charges and finding new vendors. For today's blog post I'm going to tell you where I have found the best deals for me. Keep in mind that I live in Georgia so my shipping charges my vary widely from yours.

http://sweetwise.com
FondX, Elite, candy melts, meringue powder, some cake boards and boxes. They have a lot of other tools and such that are equally priced as their competitors. I love "the Mat" and don't think I could cover cakes without it! They also carry Satin Ice but I don't like it so I don't buy it anywhere.

http://www.ckproducts.com
This is for wholesale and you must have a business license but the prices are worth the trouble. There is a $150 minimum but that's pretty easy to spend. I get my cake boards and all sorts of CK products here. My hint, do not get their brand of fondant. It is horrible!

http://www.sugardelites.com
They have so great and unique molds and a nice variety of decorating tools. I also love they special way of wrapping all their packages in a
personal way.

http://www.discountsugarflowers.com. (Wholesale Sugar Flowers)
Cheap and Nice gum paste and royal icing flowers. They have a big selection but sometimes you will need to order ahead a bit. Don't wait to buy peonies you need in June when you need them the next week. They will be out of stock.

Sam's Club and Costco
We buy butter, sugar, eggs, and all the other food staples. We also get aprons and paper towels here. The fresh fruit is so much cheaper than local grocery stores and even wholesale produce companies! Sam's has let me down many times by being out of a staple that I needed. I like having the Costco as a backup.

Local Restaurant Supply Shop
They don't have to see your business license unless you want to be tax exempt. I only buy large quantities of boxes from these guys. They are more expensive until you factor in shipping from the other guys. It's a killer on boxes!

http://caljavaonline.com
Specialty gum paste flowers. These are way more expensive than Wholesale Sugar Flowers, but sometimes that is what you need.

http://www.cakedeco.com  (Pfeil & Holing)
Very lard containers of sanding sugar, jimmies and quinn's. Quinn's are the little circles sprinkles that people are putting a ton on a cake and painting them to look like sequins.

http://sugarartstudio.com
These people have the prettiest gum paste flowers pictured to drool over! They only sell the cutter to make them, but they are great tools! I love all their other cutters for Art Deco, repeating patterns and well everything! Their stuff is great and I don't care how much it costs!

http://www.dallas-foam.com/store/cakedummies.html
Cake styrofoam dummies and separator pieces. They are already cheap, but if you buy $200, you can get a 40% discount, but then you have to buy more!

http://www.polymerclayexpress.com/products/artway-tools
Best and biggest extruded guns and various dies. Love mine!

http://www.globalsugarart.com/index.php
Full disclosure, I used to buy a lot from these guys. I have been finding better prices, shipping and products on the first two sites listed above.

http://www.firstimpressionsmolds.com
Silicone molds with a huge selection! There are sites above that carry these molds, but they don't have the full selection or good sales with nice discounts.

http://www.designerstencils.com
Favorite stencils ever! Just like the molds above, you can get them elsewhere but not with as big of a selection.

Fondarific on Fondarific.com vs. Amazon.com
I use Fondarific for making lots of decorations like bead borders because the chill up hard very quickly so they don't distort when unfolding. A WHOLESALE account with shipping factored in is almost the same price as what I can buy the same thing on Amazon for a few dollars more. I have a Prime membership so I get free two day shipping and that is factored in here. It's kind of a pain buying from Fondarific Wholesale so I'm going to stick with Amazon for this.

I know this was a long post, but we buy from a lot of places. If you have a favorite place to buy supplies, please let us know so we can learn from your experiences too!

Tuesday, September 23, 2014

Cookie Groom's Cake

Weddings are huge productions where many tiny (or not-so-tiny) pieces all fit together seamlessly to make one huge elegant event.  Weddings are all about collaboration and coordination.

Recently, I met with a couple and the groom was a bonafide cookie connoisseur - he loved them and wanted them to be a big part of his groom's cake.

But how do you do that and still keep things classy?  Enter Mama Wilson from Mama Wilson's Cookies.  She made these delicious, deep dish cookies to act as tier separators between each cake tier.


Initially I was just a little nervous about this collaboration.  I know my cake and my icing.  I know how it reacts when it's carved, it's like my baby.  I made it and I know it's strengths and it's weaknesses..  But I'm so glad I agreed to do it and I was very pleased with the outcome.  I did use a small cake board beneath each cookie just in case it needed some extra support.  And this cake fit in just fine at the venue, Mason's Farm a River's Edge.

I think the "worst" thing about this whole collaboration was that I didn't get to eat any of that delicious cookie, so I'll just have to imagine how that cookie tasted with the chocolate butercream and dark chocolate ganache! I hope they had plenty of milk on hand!! ;-)

Tuesday, June 24, 2014

Raspberry / Blackberry / Succulent Wedding

Sometimes a bride enjoys picking out her wedding cake so much that she does it three times.  Luckily the final choice was one that I really wanted to make.   This cake is very different and "natural".  I was given the picture and asked to make a few minor adjustments like the colors on the succulents, vanilla bean specks in the fondant, and two layer had a royal icing texture that was very subtle with a bit of gray to lightly mimic river birch.  I went very light on the gray because I didn't want it to stand out and take away from the focal point.  To keep things clean and simple, I put a little bean specks in some royal icing and "caulked" the tiers together instead of any kind of a border. 

For the "Hens and Chicks" or succulents, I really didn't have the time to make them since the bride changed the design fairly close to the wedding date and I was too busy to learn and try (or maybe just tired...).  I ordered them all from "A Cake To Remember VA".  Kara was absolutely great to work with on these!  She changed the color to just a pale grey and I used petal dust to make them match the wedding colors.  She was so helpful and VERY quick in getting them to me.  If you ever need pre-made decorations, molds, supplies or great tutorials check out her Etsy store. 

We made 80 raspberries using silicone molds that I also found on Etsy. I bought six kinds of raspberry molds but I think this is the one I used the most,

We started out by using a little tool and making the natural indentation on the top but then there wasn't enough to poke my wire into!  So no hole!  Ron Ben-Israel would not be proud of me :)
The most realistic raspberry mold that I purchased was this one. 

The reason I didn't use it is because it is impossible to get the berry out without distortion unless you use a material that will get hard in the freezer, like Fondarific or modeling chocolate.  I did not have time to do that 80 times!  If you are making five, cool, but not 80!

The "blackberries" that were "purpleberries" to match the wedding colors were much more challenging even though there was only ten!  They are not hard, just require some patience.  Make a grape size piece of gumpaste/fondant mixture, dip your wire in tylose glue and insert.  Let these sit up a few hours.  Now make a TON of tiny, varied sized, balls and let the dry.  When you are ready to make them, make a few fresh balls so they will squish and make a more natural look overall.  paint the "grape" with tylose glue and stick all the balls on it.  I tried rolling it and that will just get you a few and then fill in all the spaces.  Poof!  You have a blackberry!  I enlisted my friends to help me and it took four of us 90 minutes to roll all of the tiny balls.   That's six hours!   I was glad there was only a few!

If anyone knows the original artist for this cake, please list them in the comments.  I would love to give them credit for the beautiful design!  Now go cover a cake with summer berries! 


TIEREDCAKER GIVEAWAY WINNERS!


OK folks, we a A LOT of people register to win the Tiered Caker app giveaway.  I can tell that there's lots of interest in the product.  Special thanks to Calculated Cakes for sponsoring the prizes.  Chaddy put all the comments into the randomizer and picked out 2 names:


I have heard from Thelma already, but we are still waiting to hear back from Judith.  Once we have proper contact info from both we will get the information sent to Calculated cakes for your prize!  Congratulations!

Tuesday, June 17, 2014

TieredCaker App and Giveaway

Full Disclosure Time: This post includes a giveaway sponsored by Calculated Cakes.  They are providing the prizes, but the opinions are mine alone.  I will not receive any compensation for this post.

I love my gadgets - I'm usually not very far way from my iPad or iPhone; I just like the way programs seem to work!  There's always some little something going on with my desktop computer, but my tablet is rock-solid!

I have found myself using my iPad a lot during consultations.  I can pull up images, look through a bride's Pinterest board, etc.  A few months ago I found out about the TieredCaker app by Calculated Cakes and agreed to help beta test the product.  Now I've been at this cake game a while and I know most of the standard cake tiers and how many they feed.  But this app makes it really easy, and they offer lots of customization options!

Just start out by entering how many servings you need and instantly it will pop up a multitude of configurations.  So if you want a cake to feed 120 the app will return that a 14" and an 11" cake will do the trick perfectly.  And then the client says "But I want something that really makes an impact - can't we make it taller?  Like 4 tiers?"  Well, just scroll on down and the app will tell you that a 13 / 10 / 7 / 6" will do the job.  But you don't keep odd size pans... then the 12 / 10 / 8 / 6 will be the way to go.  You can even tell the app which pans you own, so it won't suggest combinations you can't deliver.  And since you enter your price per serving in the app ($3.75 in my case), you already know you're talking about a base price of $476.25.


Once you have chosen your configuration you are presented with a visual representation of your cake.  This is where things get neat!  Let's say that we want that 2 tier to be a squatty tier.  We'll just drag the size down to a 2 inch tier.  And they want some color on that squatty tier?  Just click it with your finger and you can change the color to light pink.  If you want a double-barrel design, you can extend the tier and make it twice the size.  Note that at the current time changing the tier height in the app will not alter the number of servings.  It is my understanding that this feature is being worked on for a future update.  It's easy enough to account for though.   I can also use a 2-finger swipe to rotate and tilt the cake.  If my design will have lots of things on the top tier it's nice so I can print it out with a good view of the top.

Once I get the cake looking like I want it, I can then print that out and get all artsy on it.  Before this app I used Microsoft Powerpoint's drawing tools to make my standard cake tier sizes and I drew on them.  This is better because I get any custom design on the fly, with the base colors, and it's shaded so that it has a dimensional 3D look to it. Not to mention that tilt / rotate feature.  And it's SO much easier.

And this app will even take the cake you have just created in literally minutes and it also offers you a cutting guide - for that exact cake!  It even allows you to choose between straight and classic cutting guides.  Once the cake has been settled on I just print out that cutting guide and add it to the client's folder.  One less thing I have to worry about!

This app has seriously changed the way I do my consultations.  It saves me from remembering wrong and from fussing about with a lot of paper during the consultation.  And the client gets to get a pretty close representation of their cake on the spot.  It has saved me from stacking pans so the client would know how certain sizes look together.  The product has been developed by fellow baker Jennifer Flesner and her husband Chris.  They are very open to suggestions and have made many great enhancements to the product since I began beta testing way back when!

Now for the best part!  Are you ready to try out the TieredCaker app?  Well the good folks at Calculated Cakes are offering not one but TWO free copies of the TierCaker app to the winners of this giveaway.  Just leave a comment here on the blog and just for fun why not tell me who your favorite cake artist is right now.  Any comments left between now and Sunday June 22nd will be included in a random drawing..  Winners will be announced next Tuesday!  Good Luck!

Tuesday, April 1, 2014

The Caped Crusader vs The Evil Cake Genius

Most of us have heard of Robin Martin and the amazing cakes she makes at Gateaux... But have you seen some of the awesome cake toys she offers over at Evil Cake Genius?

They make some of the most awesome stencils I have ever seen!  They are a little expensive, but they are really nice!  Some are standard stencils, but some are printed on a ribbon type material and works a lot like a silk screen.  I haven't tried the silk screen types yet, but I used the Skyscraper Windows stencil to make this birthday cake for a huge fan of the Caped Crusader.

Everything else on this cake is either buttercream or modeling chocolate.  Speaking of modeling chocolate, you guys know that I love the stuff, but lately I have been having some pretty fierce condensation issues with my modeling chocolate.  Anybody else experience this?  If so, let's talk through it in the comments! 


Tuesday, September 10, 2013

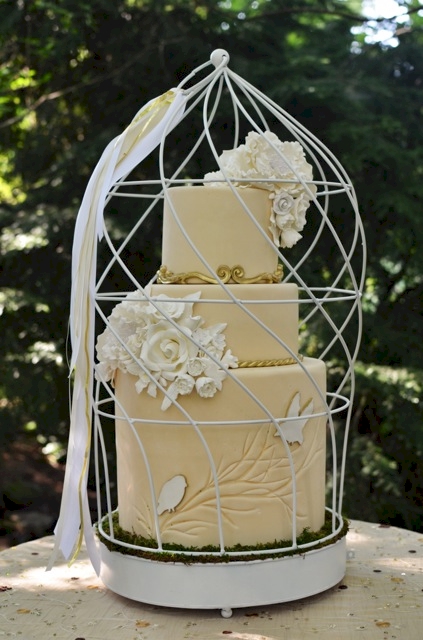
Bird Cage Woodland Wedding Cake

I have always been obsessed with birds.  I have have had them as pets and I spend a small fortune keeping food for almost every type of bird in my yard at home.  So it shouldn't be terribly surprising that I have and idea in my head for a cake inside a bird cage.  I don't know if it's something I have seen somewhere before, (I'm sure someone has done it) but it has always just been an image that struck me as... romantic.

When my friend Daisy Moffatt was designing her "Garden Fantasy Wedding" photo shoot I really had full control on what the cake looked like.  And it just so happened that the weekend before the shoot I ran across this bird cage at Home Goods (that store gets me into SO much trouble).  I immediately texted a picture of the cage to my friend (and florist for the shoot) Amanda and said "What do you think of a cake inside here?"  Her response was "Go for it!"

The cage was initially colored a silver/black metallic color and as I played with my dummy tiers inside the cage I decided that it would need a coat of paint to better go with my vision.  Krylon spray paint to the rescue!

I cut some birdie silhouettes using my Cricut and made sure they were thicker so that I could edge them in metallic gold luster dust.  The rest of the cake is just covered in fondant with branches that I carved into the fondant using my sculpting knife, some gumpaste flowers, and some scroll molds painted metallic gold.

Once it was put together i thought that it still needed a punch of color so I covered the bottom of the cage (which was leveled with a piece of foam with some moss.

I was very pleased with it once the whole vision came together.  Above is a picture that Chaddy took during the shoot while Daisy was off photographing the bride - I'm sure her pictures came out better!

Tuesday, September 3, 2013

Photo Shoot for ...

I was reading a blog a while back and the author said that if you want to be part of a photo shoot then you should make it happen.  Pick your favorite vendors, a great concept, and a great location.  This has been a slower year for wedding vendors in my area, so there have been a few of these shoots taking place.  A great couple of friends of ours decided to come up with a concept and I was lucky enough to be invited.  They gave us plenty of time and lots of artistic freedom.  I think that was a big plus because no artist wants to be given a big list of rules when they are making something for fun.  Our theme was to be "garden" so that was pretty easy.   Amanda, with Divine Designs by Amanda, did all the flowers and the table setting.  She worked with White Table on the linens and chair sashes.  Chad took these pictures but Daisy Moffatt was the official photographer.  And it all went down at the lovely Black Fox Farms.  The plan is to submit the pictures to blogs, magazines, websites and to add to our portfolio.  I am really fortunate to get to work with such a great group of people.  I can't wait to show you more pictures in the weeks to come.


Tuesday, July 23, 2013

Bridal Show Booths Revisited


This weekend Chad and I participated in the Pink Bridal Show.  It was sort of a last minute decision; I didn't have any cakes booked for the weekend and I really do think they help promote not only customer relations, but vendor relations as well.  Here are some tips I have learned from my previous shows.  I may have touched on some of these topics before, but it bears repeating.

If the event allows you to setup your booth the day before, then you should do it.  The actual day of the show is very tiring, you'll need to start the day with all the energy you can muster.  Setting up the day before also allows you a "second chance" if you accidentally forget something.

Don't be afraid to rearrange your booth.  The show promoter will generally give you an 8-foot table with 2 chairs and a small sign with your business name on it.  If you want different tables, let the promoter know or bring your own.  Look at other vendors' booths, see what they are doing.  Don't copy them, but use them as inspiration.  In the photo above I have used none of the items that am with my booth.  I ditched the sign, the chairs, and replaced the 8-foot table with 2 6-foot tables and 4 highboy tables.

Don't sit in your booth.  The reason I ditch my chairs is that I want to be on my feet and energetic when potential customers walk by.  I'm very interested in their business and I want to look that way.  If you're sitting, customers will walk by without engaging you or when you start to get up they will say "No, don't get up, we're just looking".  Don't believe me?  Find a booth where someone is sitting behind a table and watch the action.  Odds are the only thing you will see going through it are tumbleweeds.  Or better yet, go by a booth where people are packed in like sardines.  I bet they're not sitting.

The aftermath of standing all day and booth teardown is that you will be tired.  Give yourself some time the following day to recoup.  But you want to be near your phone too.  These brides have spent all day searching for the perfect vendor.  They are excited and they want to iron out details.  Monday morning they will start calling.  Make sure you are there to answer the phone!

The last thing I'll mention is that while you are in that booth, make sure to have your patience pants on.  You might get the same question 100 times in that 5-6 hour span, make sure you answer with last as eagerly and energetically as the first.  Remember why you're in the room... Brides are there to find information, but it's also a job interview for you as a vendor.  Your cakes can taste delicious, look amazing, but if you give the customer an eye roll over a "silly" question the customer may just decide to pick your competition over you. 

So stay positive and have an awesome week!!

Tuesday, July 2, 2013

Guest Blogger: Beata from My Sweet Passion Cakes

Even though I have made it my mission to help out cake decorators just getting their start, it can still be a daunting task to find help online.  I frequent more than one cake forum and lots of times I see a a basic question turn into a heated debate over some minute detail that has nothing to do with the poster's question.

But sometimes the planets align perfectly and two people thousands of miles apart connect to make something special.  That's how I met Beata Khoo from My Sweet Passion Cakes in Brighton, UK.  She posted a question on CakesDecor asking for assistance on how to make a cake like a dragon sculpture she had a picture of.  It seemed like a daunting and ambitious task, but I answered and what unfolded was a really satisfying month-long collaboration.  Even though Beata says she's just a hobbyist, she took instruction well and learned to work with modeling chocolate and make her own structure, something she had not done before.  I was so impressed with the work that Beata did that I asked her if she would like to write up a post about her experience making this awesome cake.  And now without further ado, here's Beata!

My name is Beata Khoo and I started to decorate cakes about a year ago. I have always loved to bake cakes, but never really decorated any cakes.  I was always so busy in y everyday life and never had the time, until last year someone gave me the most gorgeous cupcakes. And I thought -this is what I can do... and rest is history ;) I am hooked! All I want to do is bake and decorate cakes.

I have been doing a few cakes since then but I really crave a challenge to see how much more I can do. Then one day this lady calls and asks me if i can do this Amazing Dragon.  I really wanted to do it too, but I wasn't sure where to start, so I decided to write into Cake Central and CakesDecor.  I also wrote a private message to Liz Marek on Facebook, hoping someone will have some idea on how to make it.

Unfortunately i didn't get anywhere with Cake Central, but very lucky on CakesDecor.  Jenniffer from Cup a Dee Cakes wrote to me and gave me advice how to build the structure and the best way to use modelling chocolate. On top of that Liz Marek gave same idea and was kind enough to answer my message. In that moment I felt so happy that there was someone giving me guidance and I knew that I could do it ;)

And this is the way I did it...

1. First I bought a wooden board and copper tubing. Drilled seven holes (size of the copper tubes) in the base, not too close to one another.


2. Then I made modeling chocolate white and colored it. (I have never worked with chocolate before and thanks to Jenniffer - I love it now)

3. I applied the chocolate on to the copper and created his skin with scissors


4. Next, I made the heads, which was a little tricky, but with a lots of determination they came out lovely. After finishing modeling, I put them in the fridge for 10 minutes to set.


5. The body of the dragon i made it with a chocolate cake and the wings I made with rice crispy treats.

6.Then I wanted to paint the MC so again I was asking Jenniffer and Liz Marek, then I thought best to try on little test MC before I painted the dragon.  I tried mixing petal dust with vodka and then vegetable oil. Vegetable oil looked the best so my decision was made. I painted my dragon with petal dust and vegetable oil, it took 2 days to dry but it looked fantastic!


So before i put it together - I covered my wooden base to look like wood and then put my heads together and held it all together with dark modelling chocolate. I then created the body and wings and painted them last. Hope you like the way I finished it off with the Enchantica book and message on each side of the dragon. Most of all I would like to thank Jenniffer and Liz Marek for all their help.


Didn't Beata's cake turn out great!?
Beata can pass out all the thanks she wants, but in the end, she was the only person in that kitchen doing all the work.  And she she did an exceptional job, didn't she?!?  I was super glad to provide her with some assistance; I was excited every morning to get online and see what progress she had made.  It's this type to collaboration that the Internet was invented for.  Please stop by Beata's Facebook page at: www.facebook.com/mysweetpassion, LIKE her page, and let her know what great job she did!  Lastly, I want to thank Beata for guest blogging here today!

For more pictures please visit www.facebook.com/mysweetpassion

Tuesday, May 21, 2013

Beautiful Roses Can Make the Cake

We delivered a wedding cake to Lindsay Street Hall in Chattanooga this weekend.  It was one of those simple pearl dotted wedding cakes.  I've done many like it before.  In fact, before leaving the shop I didn't even take a picture of it.  I just had to drop it off at the venue and put some fresh flowers on it.

When I got to Lindsay Street Hall I found the flowers that the florist had left for me.  Before I could even remove them from the container I couldn't help but notice that these were the largest, most beautiful pink and peach colored roses I had ever seen!  As I started putting these gigantic roses on the cake I began to really fall in love with it.  I checked the label on the container and saw that Humphreys Flowers had provided the florals.  I don't know the names of these roses YET!, but I will be speaking with someone from Humphreys soon to find out more about them!

It just goes to show that sometimes you can take something perfectly elegant and with just a simple addition turn it into something spectacular.

Tuesday, April 9, 2013

Review of Mike McCarey's Advanced Cake Sculpting Craftsy Class

Full Disclosure:  The review of the following Craftsy class is purely my own.  I am not being paid or compensated for my review, but Craftsy is offering my readers a chance to win a free class.  Read on to find out how!


MY HISTORY WITH MIKE
There is all levels of skill for cake artists.  People that are just trying the Wilton Courses, some that have been to culinary school, and some that learn "on the job".  I  started with Wilton Courses, then self taught using great books, then on the job as an Assistant Pastry Chef.   I still have a lot to learn and a great desire to learn more.  However, I might want to know how to make a botanically correct garden rose, but my customers don't ask for or want to pay for them, so I focus on learning things that I can actually use in my business. 

Like every other cake person, I used to love Food Network's "Cake Challenge".  There were many great competitors, but my favorite by far was Mike McCarey.  His work was always flawless, well thought out, and perfectly executed.  He was one of the few contestants that would make the cake BEFORE the show and work out all the kinks.   There was no drama or stressing, just perfect execution.  Can you tell that he is my cake idol? 

When I saw that he was teaching a two day modeling chocolate class in Atlanta, I came up with $1000 (give or take, it's been 3 years) and took that course.  I learned so much!  It was worth every penny!  So when he came back to teach a cake structure class/Big Bird, I scraped the money up, again around $1000 (OK, I charged it and dealt with it later...) and skipped down to Atlanta.  Again!  The most-best-awesome class I have taken.  The things I learned help me every week.   I also bought his car making video and it's awesome too!  On the downside, I had to "close" my business while I went to school, had to get accommodations, food, travel and the cost is a lot.  I still think those classes were worth every single penny! 

So when I saw that Mike McCarey was offering a class on Craftsy, don't you know that I jumped right on it!  He is my cake hero and favorite teacher!  That being said, I'll try to be objective and give you a little review on the class. 

THE REVIEW
I think this is truly an advanced class.  This is a hard cake for most people with a lot of techniques.  If you are just a cake hobbyist and Wilton Classes are your current skill level, then this is maybe not the class for you, just yet!  You should have carved some cake in your life, worked with real butter-buttercream, have some ability to use tools.  Mike doesn't go over basics, like how to cover fondant.  Thank God, because some of that "filler" has put me to sleep on other classes.  If you have never done a cake with structure in it, this is a great place to learn.  He does this great thing where he blows up the picture to the size that the cake will be and draws in the exact size hardware that he needs.  It's a great learning tool, and it makes the sculpting SO much easier!  I have brought a blown up picture with me to Lowe's and sat in the aisle of the plumbing department trying to find the exact right pieces. 

Mike goes over everything you need to know to make a great Bobble Head Style cake.  It's the most entertaining Craftsy class I have seen.  He is just so comfortable in front of the camera and talks just like he does in person.  I didn't get bored at all, even though I have been taught a lot of the information before.  I still picked up some great new tips and refreshed my memory on structure building.  When someone teaches me something, I'm that type that wants to know "why" and not just how you do it.  Mike helps me truly understand so that I can carry those lessons on to other situations.  His bobble head cake strategy can be used for making so many things.  If you learn these techniques of planning, blueprints, patterns, structure, refining, and finishing you can use them on every cake that isn't a traditional stacked shape. 

My favorite thing about Mike's style of making cakes is that it's very well planned, which will lead to good execution.  Carving cake is very scary, but when you have an exact blueprint that will get you 75% done, it becomes less scary.  He doesn't take chances with a cake structure and that's a really good thing.  I would hate to have 4 days worth of work fall over during the delivery.  Learning his methods are like having "cake insurance". 

I've heard of a little complaining because the head doesn't actually "bobble".  He does go over how you could make that happen if it was important to you.  But, if people aren't impressed that you made a birthday boy into a bobble head "style" cake then a extra spring isn't going to impress them either.  A cake doesn't have to move or shoot sparks to be awesome!  Please!

I am not bitter....but this class will pretty much teach you what I learned in a two day/$1000 hands on class....only it's not $1000!!!  It will take 292 minutes to watch it all!  It's a long time, but it's a lot of fantastic, non repetitive material.  After watching the entire video, I can't find one thing that it's missing compared to the Big Bird class I took (other than his awesome assistant, also named Mike.  I missed him!).

Mike does recommend that you take Lauren Kitchens "Modeling Chocolate" class.  I haven't taken it yet, but since they are big buddies, I'm sure that it's similar to what he taught me in the two day/$1000 class.  So, run and take it!  Modeling chocolate knowledge is the single most important thing I've learned for making sculpted cakes.  I could NOT make a clean, well executed sculpted cake without it.  Learn about modeling chocolate! 

As with any video, please watch the whole thing before you leave a comment or questions.  I don't know how the man is so patient with some pretty crazy questions.  I'm sorry to be harsh, but man,  if you can only ask "The great and powerful CAKE OZ" one question, do you really want to waste it on something silly or that has already been answered three questions up?

As you can tell, I highly recommend this Craftsy class.  I am so excited for all of you to be able to learn from Mike McCarey.  His is the BEST at what he does and is a FANTASTIC teacher.  I cannot wait for more classes!

The best of of all this is that the fine folks at Craftsy have generously offered to gift Mike McCarey's Advanced Cake Sculpting class absolutely free to one of my readers!  How cool is that? Use the link below to register for the giveaway.  In order to give everyone time to enter, we are going to run the giveaway from now through  Sunday April 21st.


 Don't forget to enter and have an awesome week!

Tuesday, March 13, 2012

This Ain't Your Mama's Review

Cake decorators get very few perks... Occasionally we get a better parking spot while delivering cakes, and I guess we get all the free cake scraps we want!  But this weekend we were invited to visit the This Ain't Your Mama's Wedding and Party Expo.  We love working with brides that think outside the box, so we really wanted to be a vendor, but all the available vendor spots were already taken.  But the coordinator of this event, Ayesha from Homespun Parties and Events was nice enough to invite us to the show as her guests.  And I'm SO glad we attended.

This was really unlike any bridal show we have attended and in a good way.  There were some traditional wedding vendors, but there were lots of artists there actually selling their wares onsite.

We ran into some old friends:
Meghan and Eric from Soli Photography

Rich Smith from Rich Smith Photography

But we also met some new friends too!

The Button Florist
These "floral" arrangements were SO cute!  They were made from antique buttons and upcycled materials, and if the artist, Celia will pardon the pun, were as cute as a button.  These would be so great for a bride that wants to keep her bouquet as a keepsake or maybe even some cool boutonnieres for a steampunk wedding!

Large Kusudamas by The Paper Pimpernel
I have known about Darcee, the artist behind The Paper Pimpernel for some time, but this is the first time we have met.  Darcee takes origami to a whole 'notha level with these beautiful, delicate, paper flowers.  I have a couple of upcoming brides that plan on using her paper flowers and one is looking to have matching edible versions on her cake!  Maybe Darcee can give me some pointers!  Photo appears courtesy of The Paper Pimpernel.

White Lace Headband from Judith Lauren Designs
I knew I would like Jill from Judith Lauren Designs the minute I saw her cute little booth and her awesomely glittered high heel shoes.  Jill makes very affordable bridal jewelry and accessories and they are all available on her Etsy Shop, or she can custom make pieces to suit your needs.  She was very passionate and energetic about her work and I'm sure we'll all be seeing great things for her in the future! 
Picture appears courtesy of Judith Lauren Designs.

If you're in the Chattanooga area look for this show again next year and make plans to attend.  If we're not there as vendors, we'll certainly be back as guests!!

Tuesday, January 10, 2012

Vendor Spotlight: Marco's Italian Bistro

This past Sunday, Marco's Italian Bistro hosted a wedding vendor mixer where local area photographers, florists, DJs, event coordinators, and (yay!) bakers got to sample of Marco's best offerings.

This is the second time we have been to Marco's and each time the food and service has been excellent!  And they make some great desserts too!  Their tiramisu and creme brulee are some of the best I have had, and believe me, I've had my share of desserts!!

Owner Kevin Cummings and Executive Chef Roger Burrows have a real passion for food and the pedigrees to back it up.  We met with and spoke to both of them about their passion for food.  Chef Burrows said "I get paid paid everyday to do what most of you got into trouble as kids doing - playing with your food."

And Marco's is now on the cusp of offering catering for weddings and other outside clients.

Marco's is located at 417 Frazier Avenue in Chattanooga (North Shore Area) in the old Jet Stream Grill location.  If you're in the area stop by and enjoy a delicious, authentic Italian meal!  Tell'em we said "Hi!"

In the interest of full disclosure, our meal sampling on Sunday was provided free of charge, but it was not provided as payment for this posting.  As foodies, we just love great food and want to share it with you.

Friday, May 13, 2011

Vendor Spolight: Imagine That! Playhouses

I have blogged about my brother the woodworker before and all of the creative cake stands he makes.  He has his shop setup in a mini warehouse close to his home.  It's nice for him to have all his tools and materials in one place. The new news I have about him is that he is now offering cake boards as part of his product line.  Check out his Etsy Shop, you may be able to save some money!

I stopped by his shop the other day to pick up some cake boards and he wanted to introduce me to his shop neighbor, Joshua Bartlett.  Joshua owns Imagine That! Playhouses and More.  They make uber cool playhouses like the one to the left.  They also make playhouses like pirate ships too.  And while most children's playhouses are built rather shoddily, Joshua builds his playhouses to the same specs as real houses!  While this product certainly isn't cake or even wedding related, I was so smitten with these playhouses that I just had to feature them here on my blog!

Tuesday, November 9, 2010

Custom Cake Stands Now Available!

For a while now I have been regaling you with tales of the cakes I do and some of the awesome custom cake stands that my awesome brother has been making for me!

And since he made the first one I have been nagging him to start a blog and start selling his wares.  I am so proud to announce that I have infected my brother with the blogging bug!  Not only that, but he also setup an Etsy shop to sell some of his cake stands!!

His Etsy Shop:
My Woodworking Solutions

His Blog:
MyWoodWorkingSolutions Blog

Please check out his site and check out some of his great designs.  I'm SO proud of him!!

Tuesday, December 8, 2009

Vendor Spotlight: Lindsay Street Hall

Last night Chad and I visited Lindsay Street Hall in Chattanooga, TN. It's located right beside Bessie Smith Hall at 901 Lindsay Street. The Crisps have spent the last 3 years renovating the 100 year old church and it is absolutely gorgeous. It would make a wonderfully sweet location to get married!!

Besides hosting traditional events, they also feature musicians several times throughout the week. Last night was jazz night and they were really swingin'! Thursdays are singer-songwriter nights and every other Sunday they host "Pickin' in the Pulpit". $15 gets you brunch and some great local bluegrass talent. They even have a cash bar. The next one is on December 20. starting at Noon. Don't be surprised if you see us there!

For more information give them a call at 423-755-9111 or check out their Facebook page.

ShareThis

Related Posts with Thumbnails