Showing posts with label buttercream. Show all posts

Tuesday, September 1, 2015

Bottle Cap Cake Tutorial

A bottle cap is a really good place to start working with carved cake.  You don't have to use a pound cake, but if your cake is not firm then you need to use a buttercream that is all butter or ganache.  Those will firm up nicely and make the carving easy.   For this cake,  we baked three layers, a 14", 16" and 18".  I didn't carve much to get to this point.  I really just filled in with a lot of buttercream (as you can see below).  It's easier this way because you don't have all of the soft cut edges to deal with.

I've used a piece of cardboard that is covered on both sides with packing tape.  This will allow you to wipe it off a keep it from getting soaked with buttercream.  I just make a shape by folding a piece of paper in half and draw a J shape.  When you cut it, it should be a mirror of your J, therefore being even and identical on both sides.  Don't get the "caves" to close together.  The thin piece of cake that will separate them will be weaker the smaller you make it. You can spend hours figuring out the exact space in between each indention so they are all equally spaced or you can wing it and end up with a backside, as we see here.  Just remember where the back is so you don't accidently put it in the front. 


It's a little hard to see, but I've wrapped a piece of masking tape around my knife as a guide so I don't cut too deep. It's not going to stop you from cutting too deep, it's just there as a visual reference. Now this is the deepest you are going to cut only at the bottom layer and then taper up from there. You want the back wall to be straight-ish.


You have some room for boo boos here.  You are going to fill in with a coat of buttercream so if you cut too deep, fill it up with buttercream.  You are going to want to use a bag of buttercream and pipe some icing into these caves.  Your fingers are going to be the best tools here, but you can also cut a small piece of flexible material like stencil plastic.  Don't drive yourself too crazy filling these into be perfect.  Get a crumb coat on and chill.  Then add a second coat so that your fondant has a nice base to go onto.  Icing inside of the caves will take you longer than carving them out.  If you can, use some Elite  or Fondarific fondant for this project.  You need a long time work time to get the fondant into the caves and you need a lot of stretch.

Once you get your fondant applied, you can airbrush or dry brush as darker shade of the fondant inside of the caves to give the illusion of more shadow.  Create a template of your favorite brand of soda or beer.  Print two copies, one to cut up and one for spacing.  Use modeling chocolate and cut out your logo.  Arrange all of the cut pieces on top of a print out of the logo so the spacing is perfect.  Put Crisco on one side of a piece of wax paper and press it to the front (top) of the cut letters.  You should be able to transport the letters from the table onto the top of the bottle cap ensuring the spacing is perfect.   I like to use a wet brush a attach the pieces individually, but you could dampen your top side before you place the cut logo pieces on it.  cover the top of your cap.  Press the pieces down and slowly peal away the wax paper.  Poof!  Bottle cap!


Tuesday, August 25, 2015

Oscar Bat Mitzvah Party Cake

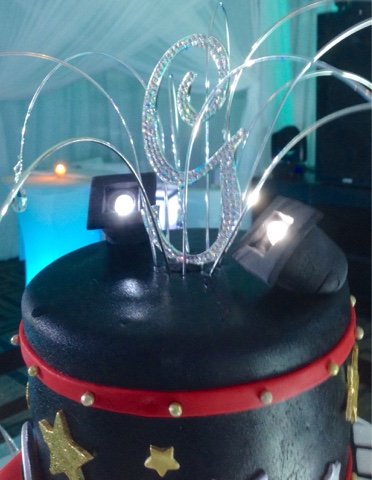
We love a good Bat Mitzvah!  We were lucky enough to make a Hollywood style cake for this great birthday event.  We decided to make a simple cake stand just to make the cake a little more festive.  We used a couple of  24" covered cake drums.  We spray painted the area that were going to show with silver spray paint to cover some of the embossed print.  We would have recovered them but there isn't a material that I know that is 26" wide, so we would have had a seam and I thought that was worse than the little bit of a pattern.  The cake was on another board, so it never touched the spray paint.  We used a large circle punch from the scrapbook department and cut black contact paper.   We used a 5" tall Styrofoam cake dummy and covered it with a printed film strip (on cardstock, but paper would have worked).  We used spray adhesive to attach this to the dummy.  We hot glued a couple of strips of rhinestones to the top and bottom cake boards and the boards to the dummy.  Be sure to line up the back sides (where things start/stop) all together like you would a tiered cake.  


Enough about the stand, look at this cake! We love the way it came out.  Lots of dripping sparkles, glitter and lights!  We did use a few more rhinestone on the cake for the borders here and there because you can't get to much sparkle!  We attach ours with acrylic/diamond topped pins. 


Lastly, I did want to share how we did the "spotlights".  Very simply, we used those lights that twist to turn on and made a large hunk of modeling chocolate that would house them.  We then cut off a piece on the bottom so they would angle in the right direction.  Lastly we made a square frame to make them look more finished.  We did not twist on and insert the lights until the last minute as they are hard to get out once they are inserted.  Make sure to leave enough wiggle room to get them in but not enough that they are loose. 


The "best" part of this cake?  We found out later that they never cut it!!!!  We did have some kitchen cakes for the back of house, so there was cake served along with every other dessert know to man.  The family had the cake moved to the hotel's restaurant for Sunday brunch with their family.  They ate a little of it and gave the rest away to the hotel staff (that love us now!). 


Tuesday, August 11, 2015

Fairyland Club Wedding

This is such a simple, elegant cake that there isn't much to say but it's pretty eye candy. The texture was done just with a small offset spatula. It's not hard but not easy, so practice ahead of time. We delivered this cake to the Fairlyland Club on Lookout Mountain near Chattanooga TN. The florist was The Clay Pot, and they did some WONDERFUL arrangements for this wedding. He gave me these roses, ranunculus, peonies and some rosemary and I arranged them. He was so busy and I was very happy to help. I asked him to check my work and I got a thumbs up which meant a bunch considering the source!
Great florals from The Clay Pot
Now, enjoy more awesome cake photos!


Tuesday, July 21, 2015

Art Party Birthday

Birthday parties now are fancy! Kids get to have all kinds of parties! Art, laser, pottery, cupcake, bouncy houses, and paint ball just to name a few. We were lucky to have pin the tail on the donkey! We did a little cake to go along with a fun painting party. It was colorful and pretty easy to create. We made a letter template on the computer and just free formed the splatters and drips. The paint tube was a bit more time consuming, but you could skip it to save a little time. I hope we all get a super fun birthday party this year with a matching theme cake!


Tuesday, June 30, 2015

Golden Inspiration Wedding Cake

Edible sequins are one of the new big trends in cake design, at least with Chattanooga wedding cakes  We shared one a few weeks ago that had "large" sequins but now we have one with tiny sequins.  I'm just going to say it, I used A LOT of gold! But it's SO pretty! We baked and iced a 6/8/10/12" combination in all buttercream.  We created the lines with a little pairing knife dipped in warm water every few minutes.  The borders were fondant and the sequins were colored quinns painted gold.


You can get a five pound container at Pfeil and  Holing.  Don't kid yourself, 5 pounds is a big container; it should last you a while!

We bought a bunch of these flowers to make the cake more economical for the bride.  As usual, my favorite flowers are the big pretty garden roses from Cal-Java.  They are SO big and pretty and they really popped against those gold sequins!  I hope you get a little bit of golden inspiration from this pretty cake!

Tuesday, May 26, 2015

Rose Column Wedding Cake

We made a cake recently that the bride wanted the top tier to float on top of flowers. That's a nice way of saying that she wanted a 2" space in between the tiers. In the olden days, seeing white plastic columns was expected, but today it's considered tacky or old fashioned. I have found that the "hidden pillar" system from Wilton is great for this application (only one or two tier separated at the most.). You will need to buy a plastic plate that has stubs on the underside. I hot glue my cake board to the plastic board and flip the cake upside to cover the plastic edge with buttercream. In almost all instances, you want to use a ribbon border to hide the Union of the two boards.

You can still see the columns here
The next teams you need is a set of "hidden pillars". After you put one in you can measure the height of the space you will need. Mark it, remove it and cut the rest all the same height. Learn from me, if your cake is less than 8" in size, install all the pillars BEFORE you decorate the cake. They are so big and can displace so much cake that you might have a blowout. We had that happen at the venue one time. The cake was completely covered in piping and it was hard to fix. Lesson learned.

Extra petals will make the columns disappear
A few more helpful hints for these types of cakes. To transfer the cake that is hot glued to the plate, before you add the cake find a piece of styrofoam (a 1" tall disc that is a couple inches bigger than the cake) works well. Make sure you have plenty of flowers and preferably different sizes. This cake had over two dozen roses. Install all or most of the flowers before you put the next tier on. Also before you install that tier, glue (with buttercream) a few rose petals to the plastic pillars. You have to sacrifice a rose but I means that none of the plastic will be seen. After you install your next tier, you will need use some of those sacrificial petals to fill in black holes. Just fold them and insert them or put on top of flowers to make them bigger. You can really see the difference in the pictures where I've added extra petals.

As an added bonus here is a topper tip. If you need a toppers stub to be longer (always when they are 1" long) then floral tape some skewers to them. It will make it more secure. If you have long stubs but need the topper to NOT sink down (like this one that needs to float above the flowers) we hid a straw under the topper and then his it with flower petals glued with buttercream to a straw. Ha! I'm a wizard!

Tuesday, April 28, 2015

Piped Lace Wedding Cake

I'm going to post a little quick entry today.  It's the first week of May and I have a BUNCH of cakes to work on!  We are getting a lot more requests for colored wedding cakes and I think that's great!  This a khaki color which isn't always the easiest color to achieve.  I sure wish I had one of the paint color mixing machines at Home Depot!

I used an Evil Cake Genius lace stencil and the piped an outline with a #1 tip.  I really like the look of the lace with that extra step.  The people at Evil Cake suggest putting a piece of tulle fabric  on the cake with the stencil.  I guess it's just to have a more realistic texture.  I personally don't think it's worth the effort, but that's just my taste.  My tip for the week is to add your edible pearls and silver dragees to your cake a few house before the cake is due.  If you put them on the day before they will break down and not be pretty.  OK, bonus tip!  Only make your pearl borders with Fondarific or modeling chocolate (or add 50% to your fondant).  The fat in those products will let you put the pearls in the freezer for just a couple of minutes and they will harden.  Then unmold them and they won't get all stretched out and disfigure.  When you see a really pretty cake with stretched pearls, it makes me a little sad that the decorator didn't know this tiny thing that makes a big difference.

Chattanooga Lace Wedding Cake!

Tuesday, April 14, 2015

Gold Sequin Wedding Cake

I'm so glad to make a cake that is new and not made from someone else's design.  I can't even tell you how this design came about.  I think the bride liked so many popular wedding cake trends that we just used them all.  All tiers were buttercream and about 5" high except for the gold tier which was about 3.5". We used an Evil Cake Genius lace cake stencil and outlined each piece with a #2 tip.  We then added some pearls and silver dragees on top.  The bottom tier was buttercream with fondant "fabric ruffle" look.  We didn't want to  cover the entire tier because it would have been too heavy looking.  It was a 20" tier, so it took a long time!  We made the fantasy flowers with gold button centers and the fondant teardrop shapes. 


I'm sure you have seen lots of tutorials on how to do a tier with a sequin-like look.  There are so many ways of doing this and since I've only done it once, I can't speak to the other techniques.  I used some very large quins.  I highly recommend buying them from  cakedeco.com because the 5 lb carton is a LOT and cheap!  These were 1/2" big and I tried to push a handful into the buttercream covered cake and it was just a mess!  I ended up having to put them on one at a time and that was big fun......not!!  So I then chilled the cake really well.  Some people use a paint brush to get these completely covered.   I then airbrushed this old gold and bronze over the entire tier.  I had to cover the neon colors and it took a while.  You want to do this is several coats and not in a couple because you will have drips.  Now, my complaints.  It looks a bit like scales, probably somewhat because I'd been looking at it a long time.  I may do it in smaller quins next time, but I've got 4 lbs of the giant ones left!   I was happy with the look of the cake, but I couldn't stop wondering what people must have thought of "the baker" if the were served a piece of the gold tier.   The quins were NEON COLORED on the backsides!  They aren't very tasty either.  I'm just saying, the more I thought about it, the more embarrassed I was.  I am not judging anyone that does this technique.  I am not saying I won't do it again if time is a factor.  Next time  I really want to make my own sequins out of fondant or something else.  I just don't want the wedding guests to think that the baker is crazy when they bite into the cake :) 

Tuesday, April 7, 2015

Naked Cakes

We were asked to make a "naked"cake last year.  I was pretty excited until we actually did it.  So I had a culinary student as an intern for 11 weeks.  The cake was a 6/8/10/12" combination.  The first time it was baked, I think the oven was opened way too much, cakes were jiggled and batter wasn't whipped enough.  So Friday afternoon, I decided to bake it again, only doing it myself this time.  The picture above is the exact same size cakes and number of layers, they were just fluffier on the cake I baked.  I thinkshe learned a big lesson that day!

I had a lot of holes and inconsistencies that I wanted to "fill" on the skim coated cake.  Is that a term?  If not, what do you call these different styles of naked cakes?  Maybe the skim coated cake has her undergarments on?  I wanted the look on the left, but I worked with the cake too much and once you have that skim coat of buttercream on, it is on.  After baking the layers again, I put my buttercream in a piping bag with a #12 tip and piped the ooze onto the side of the layers before I stacked the next tier on top.  It wasn't a real "organic" ooze of buttercream, but I was happier than the first attempt and there would not be another!
 
 We did brush all the layers with simple syrup to try and keep them moist.  The family said it was yummy!  I wouldn't bake it or put in together until as close to the event as you can comfortably stand it to help it not drying out.
 
Once at the venue, we had to put on the fresh flowers and it took no less than an hour!  I guess it felt so unfinished to me that I needed to keep adding flowers.  The bride wanted lots of flowers and the florist left me a big bucket of gorgeous blooms so I had to use them, right?  I don't know where I stand on this trend yet, but maybe it will be out of style by the time I decide.

Y'all have a great week!

Tuesday, March 31, 2015

Easter Cakes and Spending Time with Family

When I was very young I knew an older lady that made cute chocolates by painting those plastic molds with colored chocolate and then filling them up. They were so "fancy"!

She got me so interested in it and it really sparked my love of pretty sweets. We have a very sweet niece that came to visit from Portland, Oregon. She wanted to make a cake and I found a simple design that a 14 year old and I could make in a few hours. I baked some layers and made the buttercream early that morning. We tried some different fillings, made fruity pebbles treats for the little stumps, made chocolate icing, filled, iced, and airbrushed. We made some grass, flowers, butterflies, a bunny and a cute fluffy bunny butt!

We had a great time and made a bunch of dishes. This would be a really cute design for someone that is learning and wants to try a cake with lots of wiggle room for error. I hope you are inspired to try even part of this Springtime cake with a special younger family member. You never know what desire you may spark in them!

HAPPY EASTER!

Tuesday, March 17, 2015

Libby Swirl Birthday

Every baker is given pictures from their customers and asked to reproduce them and it happen most of the time.  It happens to the most famous cake people!  It's not a knock on your abilities, so don't take it that way.  Customers get on Pintrest and Google to start their wheels turning but get their hearts set on a certain design.  It stinks because if they are willing to give you some freedom they may get a better cake.  All cake designers are sitting on a pile of designs that really want to create.  Sometimes my job is trying to convince someone that I can take their ideas and customize it to fit the event even better.  Some cake designers just say "no, I won't reproduce another bakers work".  I don't get that since almost no design is an "original" and is certainly not copyrighted.  I do try hard to mention the person or company IF I KNOW IT, but often I don't and I don't have hours to research.  

Some customers will not let you change anything from the picture they provide you.  If you were to really push them to change the cake, you may lose the sale.  If you are a baker, my advice is to make sure you advise them, especially on the contract, that anytime two people make the same thing, they will not come out the same.  Even when I am supposed to make a cake that I've already made before it will come out different.  If you are a customer, be sure you understand that we are not "copy machines".  Your baker may not have the same abilities as your picture from a magazine.  It's not wrong to ask your baker to see a picture of a cake similar to the cake you are wanting.  If you want a stadium cake, you should look at other cakes that would require the use of blueprints and need to be to scale.  It's not apples to apples but it's better than blindly trusting.

   As you may have guessed, a customer asked me to make an exact copy of another bakers work.  I did just that but a made a "cleaner" and more finished version of the original.  This design is super simple so if you haven't tried it, Google a tutorial and give it a try!

Tuesday, February 10, 2015

Worley Rustic Wedding


Barn weddings are everywhere!  If they are not as popular in your area, you are a little lucky.  Don't get me wrong, they are pretty in a rustic or fancy rustic (trademark pending) and make for nice pictures.  Most are not air conditioned, which means fondant icing is the best idea so that sawdust doesn't stick to the buttercream.  Some brides just won't do fondant, so here we have a buttercream cake in a barn. Pretty!  We added the little gold dots with a paint brush that I cut to be a flat circle. I know it's super hard to tell, but the bottom tier had lines scored in it, a little like a tree pattern.  The pendent banners were purchased on Etsy and the flowers were real.  The result was rustic, pretty and tasty!  


Tuesday, January 27, 2015

3D Acoustic Guitar Groom's Cake


     We have made three musical instruments to date.  A simple acoustic guitar, a fantastic banjo, and this cake.  The bride was limited on her budget, so to cut costs/labor we didn't make any type of armature for this cake.  The neck is entirely made out of cereal treats and then "faked out" by using black fondant to represent the underside of the neck.  I like the look of it, especially since I didn't have to do a bunch of woodworking that isn't much fun to me.  The sides of the guitar are buttercream.  The top and neck are all covered in modeling chocolate.


     For the cake board, I did use a power tool and cut 1" thick Gatorboard with a rotozip tool.  Gatorboard is a lot like foamboard, but instead of paper on the outside, it's this really hard surface.  You can't cut it with a box cutter.  I used to use it all the time when I was in visual merchandising.  Look at the letters in a department store and you will see this material.   It was not my most brilliant plan :(  It was messy, bumpy, and not a good structural idea.  I was moving the cake from the cooler to the table and hit the neck cake board on the side of the table.  It was heavier than I expected and I was just trying to hurry too much.  My accident caused the neck of the cake board to break but not come off.  At this point, the cake was carved and iced smooth so moving it to another board would have turned it into a pile of crumbs.  For a solution, we cut a 1/4" piece of plywood about the size of the cake and glued it underneath to brace the original cake board.  It gave me a lot more structural integrity. 


For the strings, well my husband is a damn genius!  We were so running out of time to finish this cake and I was going to do something that would not have been so pretty.  I'll give you the short version and we can follow it up with a little tutorial.  Since the Gatorboard cake board we could stab wooden skewers into it and they would hold in tight.  Chad drilled the tiniest of holes in the skewer and tied fishing line in a knot.  Then with both of us holding it so as to not damage my fancy paint job (heaven forbid we try this before the cake is otherwise done-silly baker).  We used a tall piece of modeling chocolate at the top of the neck to hold the string up so they didn't lay flat on the neck and it held them in the proper order without wiggling around.   We then put the line through another tiny hole in a wooden skewer and hammered it into the cake and board.  The tension was good and the line didn't move.  We then put some trim pieces over the top skewer to hide the skewers. We ran out of time to figure out camouflage for the bottom skewers.  We used real guitar string on the banjo, but know that we have figured this out, it will be our go to method.  I will say that when we moved the cake the strings got looser because the flex of the very long cake board but then got tight again as soon as we laid it on the display table.  I'm lucky the saggy, traveling strings didn't mess up my paint. 

Lastly, my lesson of the day is to paint with colored cocoa butter onto modeling chocolate.  Chef Rubber (http://www.shopchefrubber.com/Cocoa-Butter-Painting-Kit/) has a great kit that will last for a while.  ANYTIME I use an edible marker on modeling chocolate, once the cake comes out of the fridge and has a little condensation, all the details run like Alice Coopers mascara!  Cocoa butter painting takes a little practice, which is what I'm still doing, but once it firms up, the details won't move or get smudged by anything.  I hope you take something helpful away from this because one day you may have to figure out guitar strings on a cake!


Tuesday, December 30, 2014

Monster Truck Birthday Cake


We were asked to make a cake for a vendor's grandson and we were given free reign on the design.  I love that, but sometimes it stresses me out!

Anything I want!?! Oh. I have to consider how
Much the I have left in the week? Well that happens with lots things doesn't it!

The final cake only had one tier that was all fondant and that was the tire.  The tan tiers are all buttercream and the "dirt" is graham cracker crumbs.  We striped the bag for the flames and used a leaf tip.  We cheated and used a chocolate mold for the truck and card stock for the flags.  We used part of our cake scraps (the hump we cut off to level the layer) to make a hill for the truck.  I like the way it came out and am glad it didn't get too busy like a lot of cakes.  I think Landon loved it too!

I hope that 2015 brings us all much success and plenty of cakes to decorate!

Tuesday, December 2, 2014

Calvin & Hobbes First Birthday

We love Calvin and Hobbes, but we can't recreate those sweet characters in 3-D unless we had lots of time and the customer had lots of money to spend.  We have learned over the years to do our level best not to say "no" to a design.  You have to offer options that fit your skill set and their budget.  I don't feel it's right to agree to make a cake that a baker doesn't know IF they can do it.  Almost every cake is unique in my situation, but most aren't made with unfamiliar techniques.  When you are asking a baker to create something you have not seen in their portfolio, offer to pay for a small cake in the same technique before you sign the contract for the larger cake. Please trust me, it will be money well spent, a lot like cake insurance.


Part of the awesomeness of the Calvin and Hobbes cartoon is their font, so we made a stencil for the verbiage.  We printed the characters out with edible images and cut them out. For some reason, I wanted the bubble/non flat image so I tried something new. It was not without challenges, mainly trying not to tear or stretch the images. We used the cut images to cut a piece of modeling chocolate out and thinned down the edges.  Then we dry fitted the image again and trimmed again, repeating the process.


“You know, Hobbes, some days even my
lucky rocket ship underpants don't help.”

ShareThis

Related Posts with Thumbnails