|
| Congratulations Chris & Nancy! |
For many years Chad and I have had a very special friend. We treasure the time we get to hang out and chat because he's a fancy lawyer and works a million hours a week. Luckily he found love in his own office and married his paralegal of fourteen years! Some say that it was a long time coming! We really didn't know his bride, Nancy, and had only met her briefly a couple of times. She's fantastic though! It's been especially challenging trying to help since they live an hour away. When he told us they were engaged, I begged him to bring her up early and let me guide her in the planning process. They did not come until a month before the wedding so that they could have a cake consultation. At that point there was a plan in place, just incomplete. That day, she was so overwhelmed with all she had to do that she almost didn't come. By the end of the night, she had a good plan in place and finally started looking forward to the wedding. I volunteered to help find some decorations, make the cakes as our gift, help decorate the tents the day before, to help figure how the food was going to be placed and to cut the cakes. They had no decorations for the tents, so I talked to my favorite florist for some ideas and started ordering goodies. Luckily Nancy was very easy to please and was so grateful for the help that there wasn't a lot of back and forth. I'd send her some pictures and she would say, "great! buy them!"
I wish that I could say everything was smooth and easy. People just don't understand how much is involved in throwing the most expensive "party" of your life. The world sells this "magical time" kind of thing when it's NOT. It's stressful and expensive and stressful. There are power struggles between families, friends and bridesmaids. There are vendors that forget orders and don't deliver what you had in your head. The weather does not care that you are getting married, nor do the bugs!
For this wedding we had a special view of the process. I hope that if you are getting married or know someone that is walking down the aisle soon, this may help in some small way. Here is SOME of what we learned.
The first challenge in helping the couple was the wedding was in a town that I don't have vendor friends and don't know who is good or bad. Anyone can have a good website or fake good reviews, but word of mouth from fellow vendors is truly priceless. Read online reviews on Facebook and WeddingWire.com. They can be a great resource.
The second challenge was that they were holding the wedding at their home. It wasn't necessarily a money saving decision, but partly so everyone could see their new home and so they could make memories there. Chad and I also got married at our home only a month after we moved in. I cannot stress this enough, don't do it. You can't get a minute of peace, the house is a wreck and it's hard to get people to leave when all you want to do it go to bed. It's a crazy time in your life and you just added the stress of cleaning the house and presenting it to everyone you know. If you pick a hotel, for example, you can get a room to get ready in and get away from all the family. Also, most of the extras are already there. Tables, cloths, food, drinks, and rooms for out of town guests are a "given" instead of an "unknown"
The third challenge was that I didn't know anyone that Nancy was relying on to complete wedding tasks. I didn't know if these people were dependable, had good taste, or if they had egos that I didn't want to step on. I admit, I'm an "alpha" and have no problem taking lead on projects. That is my default way, but when you come into a situation where you don't know anyone and really don't want to peeve anyone off that you just met, it's a little tricky. Chad and I just did our thing, decorating our little buns off, and if people asked us if they could help, we gave them a task. It wasn't my place to boss their people but after about eight hours with no break, I really wanted to, but I didn't...mostly. There were several people that were fantastic and it was great to have them help!
The fourth challenge was having no wedding planner. I advised the couple to get a "day of" planner and sent a few names that I found. I never asked why they didn't hire one, but let me tell you how it would have helped. The day before, while everyone was gathering for a rehearsal one family member was late and it held everyone else up. The DJ was running things and needed to leave thirty minutes before he did. A planner could have been the "bad guy" and said we need to go ahead without her and fill her in on the details later. The planner would also have a crew that could have helped with all the last minute set up details, like how to place tables. The day of the wedding, a planner would have organized everyone and kept things on schedule. Ten minutes before the wedding, the punch concentrate was still frozen and the food wasn't out. I think a planner keeps things running on time, but not too fast also.
The fifth challenge was that all the major "helpers" they were counting on were in the wedding party. They were all dressed up and had places to be and stand. Getting the dark purple punch out was not what they needed to be doing. If you are getting married, your friends are there to enjoy the day with you, especially your close friends. Do not make them work. Hire people through the caterer or a planner. Even just to pick up trash and refresh the food. Who do you think is going to do that? The day of was extra hard for these reasons. Guests are busy being guests.
As a baker, I was sad that the couple didn't get 30 seconds to look at their cakes before they cut them. They didn't get to eat either, but I didn't make the food :) It's just one of those things that happens on the wedding day that I'm glad I don't normally witness. I'm glad they have pictures afterwards. My advice is to not have an outdoor wedding, too many variables and hot weather stinks! This wedding was fine, but it rained the morning of and things were squishy and muddy. The wedding cakes we delivered this weekend were at a "fancy" barn. It was a beautiful OVEN. My poor cakes and those poor guests. How is that a fairytale?
After all was done and we were unbelievably tired, we were glad that we could help make their special day better. I want any bride and groom to be able to enjoy the day while soaking in the love from everyone that wishes them well.


 Enough about the stand, look at this cake! We love the way it came out. Lots of dripping sparkles, glitter and lights! We did use a few more rhinestone on the cake for the borders here and there because you can't get to much sparkle! We attach ours with acrylic/diamond topped pins.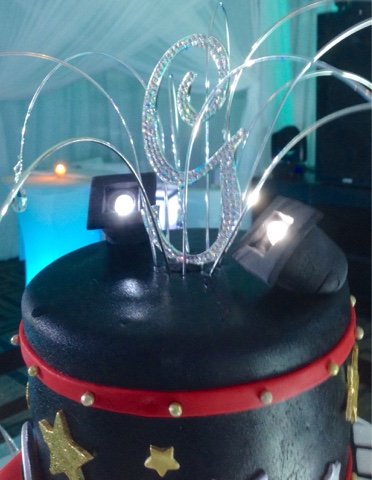
 The "best" part of this cake? We found out later that they never cut it!!!! We did have some kitchen cakes for the back of house, so there was cake served along with every other dessert know to man. The family had the cake moved to the hotel's restaurant for Sunday brunch with their family. They ate a little of it and gave the rest away to the hotel staff (that love us now!).