Showing posts with label Chattanooga. Show all posts

Tuesday, August 18, 2015

Tip Toe Through the Trees TUTORIAL

Why is making really pretty trees out of sugar so hard?  I'm not judging others efforts at all because it's hard!  My advice is to make evergreens/Christmas trees!  They are really easy!  Our friends were making a cake for a charity and they needed trees of  a tall variety.  This is a picture tutorial of our efforts.  Some were better than others but I hope you can take something away from my experiments.


We always started with a center support and heavy floral wire from Wal-Mart.  We twisted them all around and then hot glued the crap out of the joints so they are secured and won't slide down and have more stability.

We added lots of brown modeling chocolate for the trunks and branches.  You can score lines with a knife to get some texture. For the tree above we piped tiny leaves all over the branches.   Don't try to pipe all the leaves on a particular branch at one time.  Do a couple of rows and let them dry before the next bunch.  This will keep all the icing from just falling off the wire due to the weight.  

We have a lot of branches to begin with but once we covered them all with leaves, the tree still looked very sparse.  We decided to try to make some additional branches and attach them, once dried, by inserting into the modeling chocolate.  This didn't work very well :(  We did add some of them once the trees were in place and weren't going to move around at all. 

Next we attempted a weeping willow type tree.  We learned on the first tree that it's best to cover the wire branches with brown floral tape.  This was good to give the leaves a thicker branch to hold on to and also if some brown shows through the leaves that's way better than silver wire. 
Same leaf application as before, just pipe a lot of leaves over and over.....an over.  There is still a really weird trunk ending up top.  I should figure a better trunk structure going forward for this odd look.
This tree reminded me of the twisting tree called "the womping willow" in the Harry Potter movies.  Here I tried to fix the weird top trunk problem by tapering the tree into large branches.  I also added a few more since adding branches after doesn't work so well.
Believe it or not, this is a tiny leaf cutter I used here.  I did not like the look so I gave up pretty quickly.
So in the interest of not loosing my mind, I tried this "look".  If I made large balls of fondant instead of these flat blobs, they would have been much to heavy for the structure I built.  I could make the structure much heavier and try that look next time.  For texture, I banded several toothpicks together with the floral tape and twisted it all over for lots of leaf fluff!

These trees took me hours to make and I want to emphasize that in case you decide to make a forest!  I hope you have picked up a trick or two for your trees!


Tuesday, August 11, 2015

Fairyland Club Wedding

This is such a simple, elegant cake that there isn't much to say but it's pretty eye candy. The texture was done just with a small offset spatula. It's not hard but not easy, so practice ahead of time. We delivered this cake to the Fairlyland Club on Lookout Mountain near Chattanooga TN. The florist was The Clay Pot, and they did some WONDERFUL arrangements for this wedding. He gave me these roses, ranunculus, peonies and some rosemary and I arranged them. He was so busy and I was very happy to help. I asked him to check my work and I got a thumbs up which meant a bunch considering the source!
Great florals from The Clay Pot
Now, enjoy more awesome cake photos!


Tuesday, May 19, 2015

McCallie Graduation Cake

Well, it's that time again... summer is just around the corner and millions of high school students across the US are closing one huge chapter in their lives and starting a new one.  Yes, it's graduation time!

This graduation celebration cake was made for a young man who went to The McCallie School in Chattanooga.  He was very into football and baseball and will begin his new chapter in life at Auburn University in the fall.


The bottom tier was all about his high school experience, his school's logo along with their team logo.  The sports memorabilia sits around and atop the first tier, as the great memories he'll carry into college.  The top tier contains the Auburn paw prints along with their battle cry "War Eagle!"  On top of the cake we made an Auburn University topper from modeling chocolate.  The graduate's favorite treat, peanut butter cups, adorn the entire cake.


The footballs, were made using chocolate molds, and I made the baseballs using a cakepop (cake and icing) mixture.  It was pretty firm and I thought it held its shape reasonably well, although after sitting for a while I got a little droopage.  The Tornado logo was printed on edible image, and that was really just because it didn't lend itself well to any other method.  All the other logos and text were cut from modeling chocolate using the cutting machine.

Tuesday, April 28, 2015

Piped Lace Wedding Cake

I'm going to post a little quick entry today.  It's the first week of May and I have a BUNCH of cakes to work on!  We are getting a lot more requests for colored wedding cakes and I think that's great!  This a khaki color which isn't always the easiest color to achieve.  I sure wish I had one of the paint color mixing machines at Home Depot!

I used an Evil Cake Genius lace stencil and the piped an outline with a #1 tip.  I really like the look of the lace with that extra step.  The people at Evil Cake suggest putting a piece of tulle fabric  on the cake with the stencil.  I guess it's just to have a more realistic texture.  I personally don't think it's worth the effort, but that's just my taste.  My tip for the week is to add your edible pearls and silver dragees to your cake a few house before the cake is due.  If you put them on the day before they will break down and not be pretty.  OK, bonus tip!  Only make your pearl borders with Fondarific or modeling chocolate (or add 50% to your fondant).  The fat in those products will let you put the pearls in the freezer for just a couple of minutes and they will harden.  Then unmold them and they won't get all stretched out and disfigure.  When you see a really pretty cake with stretched pearls, it makes me a little sad that the decorator didn't know this tiny thing that makes a big difference.

Chattanooga Lace Wedding Cake!

Tuesday, April 8, 2014

Collaborations Can Be A Blast!

I have talked before about the importance of having cake friends.  It's nice to have someone to complain to and to bounce ideas off of, but sometimes you get to collaborate on really cool projects.

Our friends Kimberly and Andrew of Couture Cakes were asked by country music super-station US 101 to do a cake for the Heartstrings for Hope concert benefiting St. Jude.  On these types of cakes there is SO much to do, and they asked us if we would like to help out.  In return, we would be their guests at the concert.


They know of our (OK, Chaddy's) prowess with logos and the cutting machine, so they gave us a list of words and the US 101 logo and we started rolling out modeling chocolate.  I came up with a really cool trick while working on all these millions of letters.  I used strips of parchment paper with some vegetable shortening on it an used that to adhere the paper to the FRONT of the letters.  The spacing is kept in tact.  They were easy to apply to the cake too - just apply a little tylose glue to the back of the letters and place them against the cake.  Hold your hand over the paper and the heat from your hand will release the shortening.  Easy peasy!


We ONLY did the words & logos on this cake...

So here's the cake and it turned out amazingly, don't you think?  Andrew did an absolutely perfect job sculpting each of the artists Which included Randy Houser, Tyler Farr, Kelly Lovelace, Jared Neimann, and Sheryl Crow!  We were also treated to a backstage meet and greet - getting to meet all of those talented artists was almost as much fun as helping out our friends!


Tuesday, December 17, 2013

Peony Curl Wedding

This past weekend I delivered this beautiful wedding cake to the The Mill in Chattanooga.  I have made a cake similar to this one a long time ago, but the bride brought in a photo of a cake she likes.  The petals on the tiers were curlier and a little less sparse than the one I did previously.  I knew that making the cake wouldn't be a problem. what I was really interested in was making those beautiful sugar peonies.


I have confessed on numerous occasions that I normally buy my sugar flowers.  But the peonies the bride wanted were extra full and  pretty and she also wanted a blingy rhinestone center.  Well, I could find anything like that online, so I set out to make my own.


I used gumpaste with a little fondant mixed in so I could get a little extra work time and so I could get those petals really REALLY thin.  They took longer to make than I expected, but I think that the extra time was worth it, don't you?

Well, it's almost Christmas time, are there any cake goodies you hope that Santa brings you this year?  If so, let me know what it is in the comments!

Tuesday, June 25, 2013

Cake Stencils are Awesome!

I love "Designer Stencils" a bunch. My current favorite is the mod flower because it gives the cake a sophisticated texture which seems to be a hot button with my brides. There is a display cake in my shop with this stencil and I swear that is why it keeps being picked. Here are a couple of my  "pearls of  wisdom" on stencils. First, you can absolutely use them on buttercream IF you use butter based icing that you can get cold/hard in the fridge. Sometimes I even but the tier in the freezer for 15 minutes so that it's super cold. Just go straight to the work when you take it out of the cold so that it doesn't get a layer of condensation because then the icing won't stick. I have bought some stencil holding "kit" but it was just two book clamps and some stretchy gauze. I found that it did more harm than good, so I don't use it. I sometimes use a corsage pin through the hanging hole and hold the other end with my fingers. Using a small angled spatula, I put on a clump of buttercream and spread it down the stencil. Once you get icing on the end your hand is holding you won't have to keep holding it down. I then used a plastic, cheap, dough scraper and take of most of the icing. You have to be consistent with the "thickness" or "depth" of the stencil icing or you will have really high sections and some barely there at all. That looks bad so it's a good habit to chose how you like the depth and be consistent. While the stencil is still attached, I airbrush the entire stencil with luster dust. Remove the stencil from one side first, scrape off the leftover airbrushed icing to throw away, wash and dry the stencil for the next section. Sometimes you are going to have some areas that "bleed" under the stencil. Just clean them up with a stiff paint brush (and soft to blend) after you have chilled the cake back up.

My next tip is to stencil the tiers before you stack them. If you want the design at the top of the cake you can raise the cake by placing cake boards/drums under the cake until you get the perfect height. That's a good reason to keep cardboard singles for just the right height. Don't forget to use shelf liner/grip so the doesn't slip when you are stenciling. When doing the cake pictured, I saved the bottom tier until last and then I had to trim the "extra" off the bottom so that it could be flush. I think the hardest part of this cake was the caulking the tiers so that there was no borders. I took out some of the stenciling, but I couldn't help it. The very best idea is to talk the customer into a ribbon border (fondant or real). It gives you lots of material to hide the union of the tiers.


Closeup of Stencil...  It adds so much detail and texture!

Just remember that every cake is going to have a backside. Seams won't match up perfectly. Just blend and love on it so that it's not so apparent. That's all you can do, so don't worry about it. It's just cake :)

Don't forget about the height. Lots of stencils are only 4" tall and I make 5" tall or taller cakes. Luckily some stencils are taller, so focus on those to buy if you make tall tiers too! If you really want to use a skinny stencil, allow for the width of your ribbon border and measure. Cut the cake shorter so that the stencil isn't a weird band looking thing, unless that's the look you are going for :)

One note about the cake featured above.  When I got to the venue, the "florist" left me a bucket of flowers the looked like the trash at the bottom of the boxes. Real Junk! I had to make it work but I don't have to be happy about it. The poppies were squished and mostly closed. The blue things were prickly! Sorry, had to get that jewel off my chest.

Do you have any tips on cake stenciling? Please share them with us in the comments so we can all be better decorators!

Tuesday, May 28, 2013

Banjo Groom's Cake

I met with Rachel and Daniel several months ago and as soon as they mentioned they were interested in a banjo cake, my eyes lit up.  This is the kind of cake that I rarely get to do, but always look forward to making.  Almost immediately, I called our good friend Jim Pankey, who is a professional banjo player.  He was kind enough to lend us a banjo for a couple of weeks.  Chaddy went to work taking measurements, making cardboard templates, and taking pictures and detailed notes.  He even made some silicone molds of the tuning pegs!

Details on a cake like this is what can take it from great to incredible, but none of it will come together without a proper structure.

In instruments I have made from cake in the past, I used extruded fondant for the strings, and I never liked the look.  This time I wanted to use real strings, which meant that extra structure would need to be in place.

Luckily, our couple didn't care a great deal about how many people the cake fed, they were much more interested in a realistic final product.  The cakes are comprised of a 14" and a 12" rounds, but each "tier" is less than 2 inches high.

The neck is made of 1/4" wood, covered in modeling chocolate.  There's a small block of wood at the top and bottom of the banjo to hold the neck and strings.

 For the neck, all the decorations needed to keep a very low profile to keep the strings from damaging them.  I used thin strips of edible image paper for the frets, and gumpaste rolled super thin for the inlay.  I looked at lots of pictures of banjo inlay, and they were ranged from very simple to very ornate.  In the end, we wound up using a standard fret dot with a heart on either side.  I thought it added a nice hint of romance (it was a wedding, after all) but without being too "girly" or over the top.

So, is anyone interested in seeing the structure used to create this cake?  If so, drop back in here next week and I'll talk a little more about how we made the structure and show a few in-process shots of the cake.  If you have any other questions about the banjo cake, leave a comment on this post and I'll try my best to answer it next week.

Tuesday, March 19, 2013

This Ain't Your Mama's Wedding Show Booth

Chattanooga is not a very big "wedding market" according to The Knot and other big wedding sites.  We have to stuff ourselves into Knoxville, Nashville, or Atlanta and that just confuses our brides, especially when you consider each is over a 2-hour drive away!  Luckily, we have two big bridal shows in the spring and the 3rd annual "This Ain't Your Mama's Wedding Show."   We are trying to find some super awesome brides that want very cool cakes!  This is just what we needed!


Since we are looking outside the box, we wanted to try something different with our booth.  That darned Pinterest, it gets me in more trouble!  I found someone had made this type of ombre feather boa background and I had to make it!  I found a great website for cheap and great boas so give them a shot!  The boas already come with a loop on the end and we slid them over a thin clothesline type rope.  Then, I took a small piece of floral wire to bunch up a little of the boa to hide the loop that looked ugly.  We wanted to tie the backdrop to columns or something, but we were on a brick wall.  Even the biggest command adhesive hooks would not hold the weights of all the boas, so we had to buy a stand.  It came from Amazon.om and was only $65 and was called a Photography Backdrop Stand.   We used glitter scrapbook paper for the flags and black construction paper for the letters.  It was a lot easier to haul around than our big signs we normally used.  We really liked the "DIY" look and feel of it!


We also decided to add some rustic style flowers in mason jars and some offbeat flavors for sampling.  Our mango sample was SASSY with some cayenne and since it was St. Patrick's day we made Irish Car Bomb cake.  What is that you ask?  Guinness chocolate cakes, ganache with Jameson whiskey and icing made  with Bailey's Irish Cream.  YUM!

We are very proud to be a part of this show and to be a Chattanooga Wedding Cake vendor, small market or not!

Tuesday, January 8, 2013

Hotlanta Field Trip & Giveaway

Even though we live in a very small town, we are lucky enough to be about 20 minutes from Chattanooga, TN and only about an hour's drive away from Atlanta, GA.  This past weekend we didn't have any cakes on the books, so I decided that a field trip was in order.  You enjoy reading about my baking adventures, so I thought you might enjoy reading about our cake field trip.

CAKE ART
Our first stop of the day was at Cake Art.  You can get the standard Wilton stuff from Michaels or Hobby Lobby around here, and we have one or two small cake shops, but Cake Art is a decorating Mecca!

SO many impression mats to choose from!
A whole aisle of sprinkles!  One of each, please!

YOUR DEKALB FARMER'S MARKET
YDFM is probably the closest thing to experiencing shopping in another country.  This place is a no-frills warehouse piled from floor to ceiling with some of the freshest, most exotic ingredients that I have ever seen.  Row after row of spices, specialty flours, and various sundries from various countries doesn't even start to scratch the surface.  There's also a huge produce section packed with fruits and veggies, some that appear to have been cultivated from other planets.  And then there's their seafood and meat department!  It's the only place I have ever seen where you can buy fresh octopus!!

Photography was not allowed (?!?) But we managed to snap a quick pic!


HIGHLAND BAKERY
If you have ever looked at cakes on the Internet, or watched a Food Network cake competition, then you have probably seen the amazing work of Karen Portaleo from Highland Bakery.  I wasn't sure I was at the right place at first.  I walked in to a very small bakery area with a huge restaurant.  We were hungry, so we decided to grab a table and get some lunch.  Where we were sitting, I could see into the kitchen, and I had convinced myself we were at another Highland Bakery.  But when I asked the waiter, he told me that Karen did indeed work there and that there was a huge baking kitchen behind the bakery counter.  Karen wasn't there, but I did have a great lunch!  Their peanut butter french toast was the bomb!!

TRADER JOES
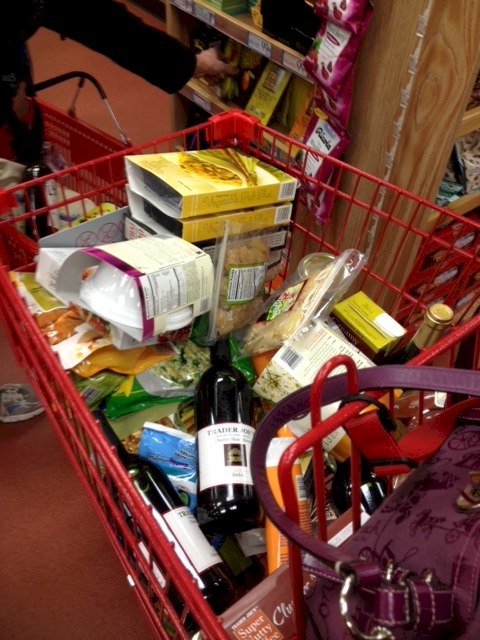
If you have a Trader Joes in your town, consider yourself lucky.  Whenever we get a chance to go to one, we always bring a cooler.  Needless to say, we filled the cooler and then some.  Look at all that loot!

I know it looks like a full buggy, but to be honest, the buggies are really small!

IKEA
We really weren't planning on an Ikea visit, but we were still feeling energetic, so we spent the last of our energy there.  I actually think I made it though there in record time!  Here's a little something I scored that you will be seeing in future cake pics!

Still thinking about painting this guy chrome!

All in all we had a super great day traipsing around the big city. As always, Cake Art was my favorite stop.  I shop online every week for cake supplies, but there's something very cool about seeing the items and holding them in your hand.  Once we got home, I collected our Cake Art haul all together...


There's actually a lot of stuff there!  And since I scored big, I saw no reason why I should leave you guys out!  So... I picked up an extra pack of impression mats to share with one of you guys.  The pack I'm giving away features a chevron pattern, plus some other stuff.  If you're interested in winning, leave a comment on this post and make sure I have a way of contacting you if you win.  You have until midnight (EST) on Sunday January 13th to leave your comment and enter the giveaway.  I will announce the winner on Tuesday January 15th.  Good Luck!

Tuesday, March 13, 2012

This Ain't Your Mama's Review

Cake decorators get very few perks... Occasionally we get a better parking spot while delivering cakes, and I guess we get all the free cake scraps we want!  But this weekend we were invited to visit the This Ain't Your Mama's Wedding and Party Expo.  We love working with brides that think outside the box, so we really wanted to be a vendor, but all the available vendor spots were already taken.  But the coordinator of this event, Ayesha from Homespun Parties and Events was nice enough to invite us to the show as her guests.  And I'm SO glad we attended.

This was really unlike any bridal show we have attended and in a good way.  There were some traditional wedding vendors, but there were lots of artists there actually selling their wares onsite.

We ran into some old friends:
Meghan and Eric from Soli Photography

Rich Smith from Rich Smith Photography

But we also met some new friends too!

The Button Florist
These "floral" arrangements were SO cute!  They were made from antique buttons and upcycled materials, and if the artist, Celia will pardon the pun, were as cute as a button.  These would be so great for a bride that wants to keep her bouquet as a keepsake or maybe even some cool boutonnieres for a steampunk wedding!

Large Kusudamas by The Paper Pimpernel
I have known about Darcee, the artist behind The Paper Pimpernel for some time, but this is the first time we have met.  Darcee takes origami to a whole 'notha level with these beautiful, delicate, paper flowers.  I have a couple of upcoming brides that plan on using her paper flowers and one is looking to have matching edible versions on her cake!  Maybe Darcee can give me some pointers!  Photo appears courtesy of The Paper Pimpernel.

White Lace Headband from Judith Lauren Designs
I knew I would like Jill from Judith Lauren Designs the minute I saw her cute little booth and her awesomely glittered high heel shoes.  Jill makes very affordable bridal jewelry and accessories and they are all available on her Etsy Shop, or she can custom make pieces to suit your needs.  She was very passionate and energetic about her work and I'm sure we'll all be seeing great things for her in the future! 
Picture appears courtesy of Judith Lauren Designs.

If you're in the Chattanooga area look for this show again next year and make plans to attend.  If we're not there as vendors, we'll certainly be back as guests!!

Tuesday, November 15, 2011

Kaben's 3rd Birthday Cake and Stand

Kaben's cake at The Car Barn
To date, we have made all of  Kaben's birthday cakes.  The day I first met his Mom, she described Kaben as a "rock star" and truer words have not been spoken.  Plus, he's a little cutie-patootie to boot!

This year, Kaben wanted a a candy themed birthday party so we set out to design his cake.  But at some point Kaben decided that his favorite toy Tow Mater also needed to make an appearance.

Our instructions here were to make it big and make it busy, but Kaben's Mom trusted us and gave us some flexibility on the design.  I decided right away that the cake needed to have some wonky elements on it, plus I wanted it to have plenty of candy and candy themed elements.

I made lollipops out of fondant and used candy like gummy worms and suckers to make the design fuller and busier.  Oh, and the gummy bears!!  Not only did I use regular gummy bears, but I found these HUGE gummy bears on Amazon!  I placed them just underneath the top tier and used crystal columns and a LED light to back light them!  It's hard to tell in this picture, but they lit up really nicely!!

And speaking of extreme elements, we made a Tow Mater bursting out of the side of the cake and HE TALKED!  How did we do that??  Well, you'll just have to drop back in on Friday and Chaddy will tell you all about it (TEASE!!)

And if that wasn't enough, I even got my Bubbee from My Wood Working Solutions to help out with the cake stand.  He made a custom cake stand for Kaben's cake.  He bought lollipops and encased them in resin for the feet on the stand!  Isn't he brilliant!  You can read more about the stand on his blog, but I did get a closeup of it (below).  Yes, it has lights too!


Thanks for stopping by and make sure you come back on Friday for our Cake sound tutorial!  You're going to love it!!

Tuesday, March 15, 2011

Take a Picture Before It's Done


For some of you this little tip may seem too obvious, but I was amazed at how long it took me to realize it.  Do you ever get a cake order and there's one part of the cake that makes it less marketable to other customers?  Not that there's anything wrong with it, and not that I expect people to only order cakes I have done before.  Take the cake above.  On the left was the finished wedding cake - the couple wanted a splash of their colors (hot pink and green) and a sign language topper.  The cake turned out beautifully and I was very proud of it.

As I was working on it however, at some point I had it all decorated except for the extra color and the topper.  So I pulled out the camera and snapped a few pictures of it in that pre-finished state.  If you're still trying to build your portfolio, this is a good way to get 2 pictures for the price of one!

So don't hesitate taking a photo for you before you finish making it for them!

For the record, this whimsical wedding cake went to Chattanooga's Creative Discovery Museum.

Tuesday, February 8, 2011

Premier Bridal Show in Chattanooga


This weekend Chad and I setup a booth at the Premier Bridal Show in Chattanooga Tennessee.  For 5 hours this 10x10 booth was our home away from home.  The show promoters said there were over 500 registered brides, but we had a steady stream of people ALL day long!

I was happier with our booth than ever before.  With my brother's help we added the 2 new pink scrolly signs and I had posters made of my new logo hanging on each side of the booth.

In previous years, I have brought in crate after crate of full-sized cupcakes.  This year I did much smaller samples in souffle cups.  It was a nice two-bite sample and each one was lidded.  It was nice that everything was sealed and much more sanitary.  And I didn't spend half my time there with rubber gloves on refreshing the cupcake stand!

With every bridal show I do I learn something new each time, which will be nice when I do the next one... in 2 weeks!  Whew!

Tuesday, January 18, 2011

Notre Dame Groom's Cake

This past weekend, I delivered this groom's cake to The Chattanoogan Hotel.  This is the mascot of Notre Dame's Fighting Irish.  I don't know if this fella has a name, but he's far too cute to be mean, right?

I made the logo by taking a graphic from the web and converting to a Cricut Cut file using my Sure Cuts a Lot software.  I broke the logo into 4 parts: navy, yellow, green, and white.  For the navy layers, I cut the entire image, one big blue Irishman (about a foot high).  Then each of the colors got cut and placed on top of the navy layer, just  like a great big jigsaw puzzle.  It made it look like the navy was outlining all the other pieces.

This was by far my largest and most elaborate Cricut project to date.  If you're attempting something like this, my advise is to put all the pieces together and get them just like you want them and then go back and "glue" them down with piping gel or tylose.

ShareThis

Related Posts with Thumbnails