Showing posts with label decorating. Show all posts

Tuesday, April 29, 2014

Ruffle Ribbon Rose Tutorial

Lots of people have made a cake like this, but I'm going to give you a few little instructions and hints. Let's call it a tiny tutorial!

You need a few things: a ribbon cutter ( or not if you want to take 4 times as long), a poking tool (something with a dull end-aka not pointy), and a small knife. I used a gumpaste and Fondarific combination. I love the extra working time that the Fondarific gives me. Now a pasta machine is great! But if you are going to make one of these, don't make the investment.

I rolled the fondant pretty thin and in long pieces. A #4 on the pasta machine. Using my ribbon cutter with a 1-1/2" space, I cut as many strips as I could. I used plenty of cornstarch on the bottom and top of the strips. I then folded the strips in half longways with a slight crease. I then rolled up the strips in nice little pinwheels. Then store them in a ziplock bag until you have a bunch and are ready to put them on the cake.
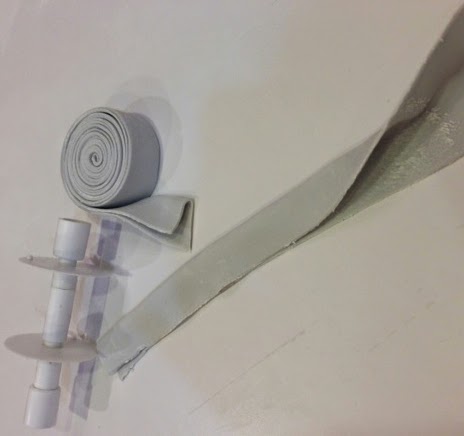

I used a large circle cutter to mark all the "roses" that I was going to need. Then starting on the outside I started applying to the cake using the little tool to slightly adhere it to the cake. I was working on a buttercream cake that does not crust, so it went right on and stayed. You may need to apply gum glue or piping gel to make things stick.


I went back to the strip I just applied and poked it further so it would be more secure and fluffed it at the same time. Now keep going and going......


Once all the roses were done , I started added the fill in pieces. I developed more of a system the longer I did it. I put as long of a strip as you can handle. Having them in rolls helps you handle lots of the material at one time. When I got to the smaller pieces, it was best to make a zig zag Christmas tree sort of thin and then fitting it in the hole. Then go back and attach and fluff.


Lastly, I did use some very small pieces of foam to keep any very tight or heavy areas up and to keep them from being all flat. This was really important on the top of the cake when everything was laying so flat. This was a 12" round cake and it took me about 7 hours to get all the ruffles finished. Please be sure to charge accordingly.

Tuesday, April 8, 2014

Collaborations Can Be A Blast!

I have talked before about the importance of having cake friends.  It's nice to have someone to complain to and to bounce ideas off of, but sometimes you get to collaborate on really cool projects.

Our friends Kimberly and Andrew of Couture Cakes were asked by country music super-station US 101 to do a cake for the Heartstrings for Hope concert benefiting St. Jude.  On these types of cakes there is SO much to do, and they asked us if we would like to help out.  In return, we would be their guests at the concert.


They know of our (OK, Chaddy's) prowess with logos and the cutting machine, so they gave us a list of words and the US 101 logo and we started rolling out modeling chocolate.  I came up with a really cool trick while working on all these millions of letters.  I used strips of parchment paper with some vegetable shortening on it an used that to adhere the paper to the FRONT of the letters.  The spacing is kept in tact.  They were easy to apply to the cake too - just apply a little tylose glue to the back of the letters and place them against the cake.  Hold your hand over the paper and the heat from your hand will release the shortening.  Easy peasy!


We ONLY did the words & logos on this cake...

So here's the cake and it turned out amazingly, don't you think?  Andrew did an absolutely perfect job sculpting each of the artists Which included Randy Houser, Tyler Farr, Kelly Lovelace, Jared Neimann, and Sheryl Crow!  We were also treated to a backstage meet and greet - getting to meet all of those talented artists was almost as much fun as helping out our friends!


Tuesday, September 24, 2013

Edible Feather Tutorial


My friend Kimberly told me a while about that she had made peacock feathers using wafer paper.  I was intrigued, so I immediately ordered a package.  And there it sat, for months and months, until I finally needed to make my Gatsby inspired cake for the recent photo shoot we did.  It was so easy to make I thought I would share with you my loyal readers.


WHAT YOU'LL NEED:

1.  Wafer Paper
2.  Picture of your feather
3.  Parchment paper (for tracing)
4.  Marker
5.  Scissors, Exacto knife, or Razor blade
6.  Cutting board or surface
7.  White wire
8.  Tylose glue / Sassie Sap Glue


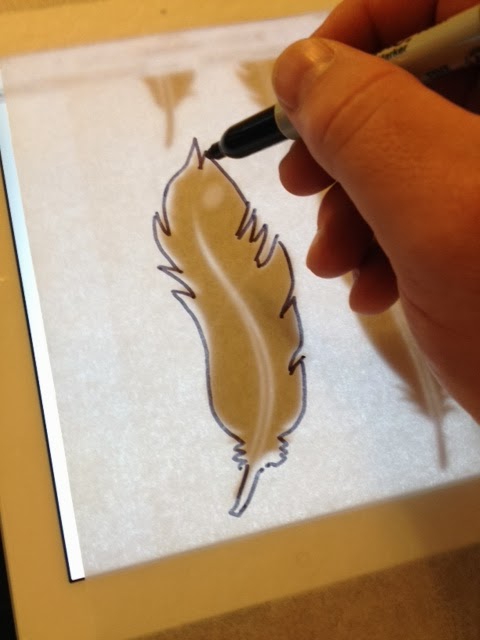
The first thing we need to do is get our feather pattern.  I used this image and enlarged it to the size I wanted on my iPad.  Then I put my parchment paper over it and traced the basic shape of the feather with my marker.


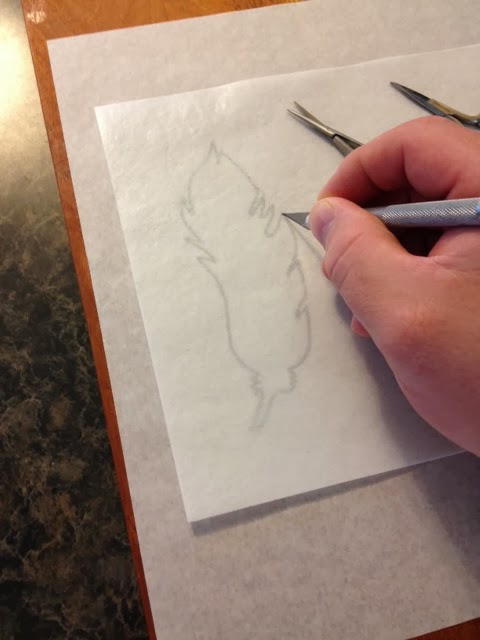
Now that we have an image to cut, just place your wafer paper over the parchment paper.  You can see right through it!  Just cut it gently with your Exacto knife on the cutting board.  The wafer paper cuts easily and with a light hand you won't even cut through the parchment paper.


Pop out your feather and place it back on the cutting board.

Don't draw on YOUR feather!

I made these lines on the wafer paper with a pen, but these are for illustration purposes only.  These lines just represent how you will cut the blades of the feather.


These spring loaded sewing scissors work pretty well, they make tiny cuts, but I found it a little hard to get the cuts deep enough into the feather.


A very sharp Exacto knife goes more quickly and allows you to vary your cuts.  Keep cutting the blades of the feather until your done with both sides.  If you get a couple of jagged edges, it's OK - it's a bird feather!


Now it's time to ruffle some feathers!  Just thumb through the blades to separate them a little.  More if you really want a rustic look!


Now your feather is almost finished!  To put on the cake I used some white wire to go the length of the feather (with some left over to insert) and I adhered it with a little Sassie Sap sugar glue or some tylose glue.

If you enjoyed the tutorial, leave me a comment here and let me know - and don't forget to stop back in next week!

FULL DISCLOSURE:  As a member of the Amazon Affiliate program, I receive a small commission if you buy a product from the links on my blog.  I actually own the products I recommend and all thoughts and opinions are my own. 

Tuesday, June 4, 2013

Banjo Cake Armature Design


Last week I showed you guys the awesome banjo cake I made for Rachel and Daniel's wedding.  They were thrilled with the cake; I even heard from the bridal planner that they wouldn't allow the cake to be cut!  They took the whole thing home with them without a scratch on it!  That's the way I like to think all my cakes go over.  I HATE seeing pictures of my cakes after they have been fed upon!!

Anyhoo, back to the design of  banjo armature.  I wanted this cake to look as much like a banjo as possible and as little like a cake as possible.  Even though it would mean more inedible pieces, I wanted the neck to be "floating", I wanted to use real guitar strings, and I didn't want a visible cake board.


In the picture above, I have removed the neck from the armature and screwed 6 small eye screws into the bottom of the banjo.  These will hold the strings.  The bottom cake is om the armature.  I included the thickness of the cake board into my design so that the banjo would keep it's scale and since it was the same size as the cake (14"), you would never know there was a cake board.  Even though the cake actually only measures 1.25 inches thick, I decided to put in some supports because I didn't want ANY shifting or sinking.  The cake above has it's basic decoration already done, which was a block modeling chocolate top with a wood grain modeling chocolate wrap around the sides.

This is the 2nd tier of the banjo, which is a 12 " cake.  It is sitting on a very thin cardboard round.  I cut out the holes for the armature.  Once it was on the cake I had to fill in the bottom with just a smidge of modeling chocolate to fully round out the bottom.  From there, it got a similar coating as the bottom tier.  White on the top with a gray wrap around the sides.  The neck could then be attached and then the details could be added.  Here's one more shot of the completed cake, just in case you missed it last week!


Have a great week!


Tuesday, April 12, 2011

Some of my First Cakes

A few weeks back I blogged about how I got started into cake decorating and how I wound up where I am today making a living doing something I truly enjoy.  Your comments were all so sweet with many of you expressing that you shared the same dream.

Since I did my buttercream smoothing tutorial I get maybe an e-mail a week from someone who has tried my method and still not happy with the way their cakes look.  I always tell them to keep practicing and keep decorating.  Just like any other artist, you will develop your own methods and your own sense of style over time.  And your cakes WILL get better!

So why am I saying all of this?  Well... I was going through some old photos the other night when I ran across some of the cakes I did when I was first starting out.  Chad and I looked through them and snickered and giggled at each one.  But, I was doing the best I could do at the time and I was really proud of them.

So for the novice bakers out there that see my current cakes and think "Wow, I could never do that", I wanted you to see that I didn't start out doing 5-tiered cakes or flawless buttercream.  Everyone else can just sit back and laugh like Chad and I did!!

Click on the picture for an even better look!


I know the firefly cake was one I recreated (I use the term very loosely) from the Whimsical Bakehouse book.  The rest I probably saw in a Woman's Day magazine or some such place.  That purple two-tiered cake was my Wilton final cake!  These were all giveaways, so luckily none of them should ever wind up on Cake Wrecks!  LOL!

Thanks for visiting!!

Tuesday, March 29, 2011

A Few Of My Favorite Tools!

I had a fun conversation with a fellow bakery owner today and it inspired me to blog about my favorite tools.  Not to mention that I had NO cakes last week.  We spent the week working on taxes but you really don't want to hear about that do you!?!  Most of you that follow this blog know that I LOVE my metal scraper that enables me to get my buttercream smooth as well as my Cricut cake machine (most of the time).  What you might not know is the little things that help me make pretty cakes every week.

One tool is a sewing gauge that I use when marking tiered cakes.  For instance if you are stacking a 9" and 6" round, once your 9" is cold you can basically center a 6" cardboard circle or cake pan on the top.  Then use your sewing gauge to get your 1.5" on all sides of your board.  Since the tool is so light it's also good for leaning up against the side of the chilled cake to mark something you need.  The little arrow that slides up and down is very handy too!

ACE 1" Food Barrel Extruder
One of the other favorite things is my large Polymer Express Clay Gun.  It's an extruder gun that is easy to load, easy on your hand, holds a lot of fondant and is easy to clean.  Did I mention that it's very cool too?  There are small fondant extruders, which are fine if you are just a hobbyist, but if you are going to make a lot of cakes, spend a few extra dollars and you won't regret it.  The three circle die is cool because if you twist it slightly it looks just like rope.  Trying to make a fondant rope that looks even and smooth is not an easy task without one of these fantastic little tools.  I love this site in general because of all the cool stuff you can't find anywhere else, like some of their great impression mats.

What are some of your favorite tools and why?

ShareThis

Related Posts with Thumbnails