Showing posts with label tutorial. Show all posts

Tuesday, September 1, 2015

Bottle Cap Cake Tutorial

A bottle cap is a really good place to start working with carved cake.  You don't have to use a pound cake, but if your cake is not firm then you need to use a buttercream that is all butter or ganache.  Those will firm up nicely and make the carving easy.   For this cake,  we baked three layers, a 14", 16" and 18".  I didn't carve much to get to this point.  I really just filled in with a lot of buttercream (as you can see below).  It's easier this way because you don't have all of the soft cut edges to deal with.

I've used a piece of cardboard that is covered on both sides with packing tape.  This will allow you to wipe it off a keep it from getting soaked with buttercream.  I just make a shape by folding a piece of paper in half and draw a J shape.  When you cut it, it should be a mirror of your J, therefore being even and identical on both sides.  Don't get the "caves" to close together.  The thin piece of cake that will separate them will be weaker the smaller you make it. You can spend hours figuring out the exact space in between each indention so they are all equally spaced or you can wing it and end up with a backside, as we see here.  Just remember where the back is so you don't accidently put it in the front. 


It's a little hard to see, but I've wrapped a piece of masking tape around my knife as a guide so I don't cut too deep. It's not going to stop you from cutting too deep, it's just there as a visual reference. Now this is the deepest you are going to cut only at the bottom layer and then taper up from there. You want the back wall to be straight-ish.


You have some room for boo boos here.  You are going to fill in with a coat of buttercream so if you cut too deep, fill it up with buttercream.  You are going to want to use a bag of buttercream and pipe some icing into these caves.  Your fingers are going to be the best tools here, but you can also cut a small piece of flexible material like stencil plastic.  Don't drive yourself too crazy filling these into be perfect.  Get a crumb coat on and chill.  Then add a second coat so that your fondant has a nice base to go onto.  Icing inside of the caves will take you longer than carving them out.  If you can, use some Elite  or Fondarific fondant for this project.  You need a long time work time to get the fondant into the caves and you need a lot of stretch.

Once you get your fondant applied, you can airbrush or dry brush as darker shade of the fondant inside of the caves to give the illusion of more shadow.  Create a template of your favorite brand of soda or beer.  Print two copies, one to cut up and one for spacing.  Use modeling chocolate and cut out your logo.  Arrange all of the cut pieces on top of a print out of the logo so the spacing is perfect.  Put Crisco on one side of a piece of wax paper and press it to the front (top) of the cut letters.  You should be able to transport the letters from the table onto the top of the bottle cap ensuring the spacing is perfect.   I like to use a wet brush a attach the pieces individually, but you could dampen your top side before you place the cut logo pieces on it.  cover the top of your cap.  Press the pieces down and slowly peal away the wax paper.  Poof!  Bottle cap!


Tuesday, August 18, 2015

Tip Toe Through the Trees TUTORIAL

Why is making really pretty trees out of sugar so hard?  I'm not judging others efforts at all because it's hard!  My advice is to make evergreens/Christmas trees!  They are really easy!  Our friends were making a cake for a charity and they needed trees of  a tall variety.  This is a picture tutorial of our efforts.  Some were better than others but I hope you can take something away from my experiments.


We always started with a center support and heavy floral wire from Wal-Mart.  We twisted them all around and then hot glued the crap out of the joints so they are secured and won't slide down and have more stability.

We added lots of brown modeling chocolate for the trunks and branches.  You can score lines with a knife to get some texture. For the tree above we piped tiny leaves all over the branches.   Don't try to pipe all the leaves on a particular branch at one time.  Do a couple of rows and let them dry before the next bunch.  This will keep all the icing from just falling off the wire due to the weight.  

We have a lot of branches to begin with but once we covered them all with leaves, the tree still looked very sparse.  We decided to try to make some additional branches and attach them, once dried, by inserting into the modeling chocolate.  This didn't work very well :(  We did add some of them once the trees were in place and weren't going to move around at all. 

Next we attempted a weeping willow type tree.  We learned on the first tree that it's best to cover the wire branches with brown floral tape.  This was good to give the leaves a thicker branch to hold on to and also if some brown shows through the leaves that's way better than silver wire. 
Same leaf application as before, just pipe a lot of leaves over and over.....an over.  There is still a really weird trunk ending up top.  I should figure a better trunk structure going forward for this odd look.
This tree reminded me of the twisting tree called "the womping willow" in the Harry Potter movies.  Here I tried to fix the weird top trunk problem by tapering the tree into large branches.  I also added a few more since adding branches after doesn't work so well.
Believe it or not, this is a tiny leaf cutter I used here.  I did not like the look so I gave up pretty quickly.
So in the interest of not loosing my mind, I tried this "look".  If I made large balls of fondant instead of these flat blobs, they would have been much to heavy for the structure I built.  I could make the structure much heavier and try that look next time.  For texture, I banded several toothpicks together with the floral tape and twisted it all over for lots of leaf fluff!

These trees took me hours to make and I want to emphasize that in case you decide to make a forest!  I hope you have picked up a trick or two for your trees!


Tuesday, July 7, 2015

Cornhole Groom's Cake Photo Tutorial


Whether you call it cornhole, bean bag toss, or Baggo, people are playing this toss game everywhere - tailgate parties,family picnics, and even weddings.  So I guess when a client asked for one as a groom's cake I shouldn't have been surprised.  And since it's basically a sheet cake on an incline, they're actually pretty easy to make.


We'll start with a board to fit our cake (a 12x18), a larger board for the cake to rest on (17 1/2 x 25 1/2) and a small foam wedge to give us our height (8 1/4 x 9 - 2" high).  Start by using the 12x18 cake board to determine where you want your cake to land on the larger board.  I have marked mine on the image above with some temporary masking tape.


Dry fit all your pieces together to make sure they all fit the way you want.  Make sure to mark the placement of your styrofoam wedge.  It should hold the top board flush against the styrofoam, while being centered across the board.  Once we start securing things down there's no going back!!


Normally, styrofoam and hot glue don't mix very well, but I didn't have any extra "gluing chocolate"so I put some down on the board and gave it a couple of seconds to cool down before I plonked down the styrofoam wedge.  Let it dry and make sure the wedge is very secure on that bottom board.


We don't want that old foam wedge to be seen, so the next step is to cut some black modeling chocolate and put it on all 3 sides using piping gel.  We now have the base to place our cake on!


OK, so now the cake is on our 12x18 board and has been iced smooth.  Place it on the board using your masking tape guides and make sure everything is sitting nice and flush.  Once you like what you see, put a couple dowels through the cake, board, styrofoam,  and bottom board.  This will add stability and keep your cake firmly in place.


Now we just simply finish decorating the cake, and that part can be as simple or complex as you like.  I put modeling chocolate (MC) panels on all sides of the cake, but I put a thin layer of black MC on top.  then I covered that with a regular piece of modeling chocolate, making sure my top extended over the edge of the sides, just for a realistic effect.  Use a cookie cutter to gingerly cut out your bean bag hole, and the black from underneath will look just like a hole.  Now just decorate with your particular theme or team until you've got it just the way you want it.  Don't forget to make a bean bag!!

Tuesday, March 3, 2015

New Realistic Cake Guitar Strings - Mini Tutorial


Remember the guitar cake we did a few months ago?  Sometimes the best ideas hit you when you're in the weeds.  We were SO running out of time to finish this cake and I was going to do something that would not have been so pretty.  I'll give you the short version, which is still kinda long!  Chad came up with a great idea to use bamboo skewers to hold the strings.   Read on for a mini tutorial on how we did this.


 We drilled the tiniest of holes in the skewer and tied fishing line in a double knot so it wouldn't slip through.  We measured all the skewers to just fit above the fondant after it was tapped into the gator board/drum below.  Next time I would do a better job of cutting these more uniformly.


Once you have all the skewers cut and your fishing line attached (leave it long on the "neck" end) start hammering them into place at the bottom of the guitar.  If you do them once at a time they'll be easier to manage.  An assistant will help hold the loose strings off the cake.


I did my best to hide the skewers, but I was on a tight timeline but I would conceal them better next time. probably using fondant or food markers.


On the neck end, each of your skewers will be a different height, so you'll need to hammer in and measure each skewer individually.  This will also be the time you measure your fishing line and cut it just a bit longer than you need.  Go ahead and drill your skewer hole and tie your fishing line in a knot on the skewer.


Here's where the magic all comes together.  Start pushing the skewer back into it's hole.  If you notice the string is going to be too long, give the skewer a turn or two to tighten the string.  As it goes into the cake, the string will tighten.  You won't be able to tune it to the correct key, but it will hold tight enough to look really good.  Using a thick modeling chocolate bar at the base of the neck will give the strings something to bite into and help keep them in place. We then put some fondant tuning pegs over the holes to hide the skewers.

We used real guitar string on the banjo, but know that we have figured this out, it will be our go to method.  I will say that when we moved the cake the strings got looser because the flex of the very long cake board but then got tight again as soon as we laid it on the display table.  I'm lucky the saggy, traveling strings didn't mess up my paint.

Hope this helps - if you have any questions, feel free to  lave us a comment.

Tuesday, January 6, 2015

Border Knot Wedding Cake

We were asked by a very good friend to make a cake for his employee. The company was buying it and gifting it to the couple.  Wow! That's a nice gift!  They were going for an Art Deco theme and wanted to carry that through with the cake.   The knot fabric effect was the most challenging part of the whole thing.  I've even made a little video about it and posted that on our Instagram page.  I found it a little easier to work on a square cake dummy that was turned on it's side.  That way, the pieces were measured correctly and dry fit perfectly before we attached them. They would have stretched and deformed if we worked with them horizontally for the extended period of time that I needed.   The flower ball separator was styrofoam covered in fondant.  I didn't want to build a structure just for that tier so it was easier that way.

The etched lines and jewels on the top tier were kind of a nod to "The Caketress" and her designs.  The lines are easy to do as long as you use a tool that won't cut the fondant, so a dull wooden clay tool works great.  The jewels were done out of isomalt, which is sugar and that was a mistake.  They did a little bubbling or something due to the moisture of the refrigerator.  Next time I would mold them with melted chocolate and then paint silver as normal.  It takes a bunch of them so the time to apply them all was about two hours for that one area.

For the vertical stripes we just used a texture mat and embossed the fondant, then we cut them.  When doing any stripes and strips of fondant, it's better to chill the fondant a little before applying it so that it won't loose it's shape.  The flowers are basic, meaning we cut them, press in a flower veiner and let dry in a cup shaped form.  Once dry, we used a little royal icing and added a sugar pearl for more opulence.  We enjoyed getting to make a cake with lots of texture and jewels!

See our Flipagram video below!

A video posted by Jenniffer White (@cupadee) on

Tuesday, November 4, 2014

Ruffles and Lace Wedding

My area of the country follows trends, but about two years behind New York.  Currently we have a lot of brides wanting two main colors, but both neutrals.  Shades of ivory with white and shades of grey with cream both seem to be very trendy. Khaki, tan, ivory and champagne are the hardest colors to make in my opinion.  I've had art class, but I see.med to have forgotten that lesson.  if you just use the ivory color, it's too yellow.  Adding a little brown coloring in you icing makes a weird color, but it's not tan.  If you are short on time, know this:  GOLDEN YELLOW + PURPLE = TAN.  You can add some pink for more champagne of green for more of a khaki, but starting out with a nice tan instead of  a weird yellow is key.  I could give you many great articles on coloring, but here is one great one with links to other great ones.  Don't get mad at me if I send you down a wormhole of learning!

This is talking about royal icing, but we all know it's just the same to make fondant.  If you are coloring real butter-buttercream, take in to account that it is already pale yellow.  What I like to do is make a "color concentrate".  In this instance, I made a cup of a really dark khaki.  Then you can make a formula that is more controllable like "1 TBL color concentrate mixed with 1 LB buttercream".  This is handy because we often guess how much colored icing we need for a cake.  If we make too much, we are stuck with a color we may not need again for a long time (mix it into black!) or we run short and can't match the original shade.  You can also freeze leftover concentrate for later uses or just throw it away and you have only wasted a little.

I have been talking about color because there is not much exciting to say about this cake.  Sorry "my bride" if you are reading this but in the cake world this was not new or exciting.  It's classy and pretty just not AWESOME.  I made this cake before, so that was my "inspiration" but we changed the base color and broach color.  The advice for a fellow baker is to let your lace pieces chill before you un-mold them and maybe again before you apply them to the cake.  If you are pressing a soft piece of fondant firmly, you will loose some of the detail due to squishing.  I love Fondarific or these pieces because they get firm very quickly in the cooler.  Also, don't overfill the mold or the lace will be thick and that's just not attractive :)  Now go make some tan icing!


Tuesday, September 2, 2014

The Grill Master Cake w/ Coal Mini Tutorial

Happy Labor Day!  We hope everyone had some down time to relax and grill some yummy foods.  Segue into a grill cake! See what I did there? So subtle....

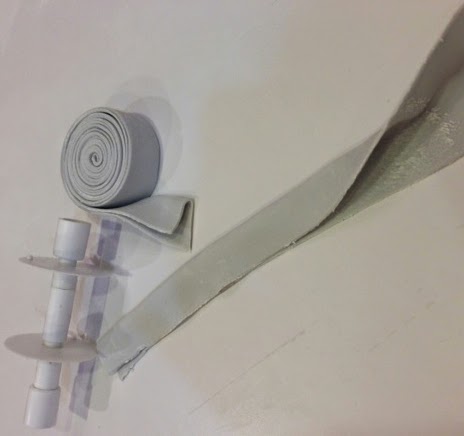
A sweet bride gave us some artistic freedom and the basics that she wanted:  gray, grill master on front, and meats on the grill.  The easy part is the simple gray buttercream round with two fondant ribbons on top and bottom.  If you don't have to use fondant, people will love just buttercream. Remember that with a cake like this, you don't have to put any effort is smoothing the top since you're just covering it up.  We added a gray THICK (1/2" ish) piece all around the top.  It's what the grate is sitting on.  This way, like the cigar box we did a few weeks ago, we didn't have to carve into the cake to get the inset look.  We needed a place for our coals and 1/2" was plenty.

We used these new flat Jet-Puffed Chocolate Brownie Marshmallows for the coals.  We airbrushed the marshmallows black.  It didn't take much color.  If you don't have an airbrush, buy a Preval Sprayer or buy a Wilton can of black spray.  We then mixed about one cup of powdered sugar with about a tablespoon of cocoa powder and teaspoon of black powdered food coloring.  Once mixed, these will give you  good looking "charcoal and ashes"!  We all want that!


We arranged the coals all flat and added heavy ash in the middle fading out to just a little on the outside.  We then added a little yellow, orange and red disco dust/edible glitter.  I wasn't crazy about the glitter, but time was ticking and there was no time for experimentation.  We did not have time/money in the budget for an edible grate, so we used Wooden dowels, hot glued all the pieces and painted them with silver spray paint.  A small saw would be best to get pretty, not squished ends. We used wire cutters and it made them ugly.  Next time we will know better.

Lastly we made no-bake oatmeal/ peanut butter / chocolate cookies for the hamburgers.  We used the most popular recipe on Food Network.com for ours.  We pressed in a skewer and airbrushed the black lines since we already had it out.  The could be painted on with a brush just as easily.  The hot dogs are modeling chocolate with the same technique for the lines.  We used a toothpick to make the details on the sides.   I hope this project seems easy enough for anyone to give it a try.  I promise it's not hard and is lots of fun!

If you want to see a few in-process of the marshmallow coals, hit Read More.

Happy Grilling!


Tuesday, August 26, 2014

Mini Kitchen Tour

I have had many public and private requests from a lot of you asking for a video tour of my baking kitchen.  Well, it's been a long time coming, but I finally had a slow week in the bakery where Chad and I could finish the video.  I hope the extra information I have provided afterward will be worth the delay.


To follow up on our mini kitchen tour video, we are listing some of the main items that we have in our commercial kitchen.  These items are exactly what we have or are as close as possible because things change in eight years :)

We spent quite a bit of time making an Amazon store with categories and descriptions of how we used the item.  There is a commercial kitchen category that lists many items that we will show in the longer video tour later.  Full disclosure, we will make a few pennies if you buy from our pretty pink Amazon shop!  So shop away!

OUR AMAZON STORE 

http://astore.amazon.com/cuadeca-20


Restaurant Equippers is THE best place online for restaurant supplies.  We found that our local restaurant supply buys some items from these guys, marks them up and sells them! When we bought the giant commercial fridge, they only charged $80 to ship it!  Now, they don't bring it in and set it up, but that's what strong friends are for!

TABLES
Big Work able with mixers on it
Drawer for 30" wide tables
Two work tables that have custom laminate top over both 
Drawers  for 24"wide tables 
3 Compartment Sink  
Faucet
Cooling rack (this isn't the one I have, but if I was buying it again this would be the one!
Reach-in Fridge
Icing buckets
Ingredient bins

IKEA can be very inexpensive, if you get the right items.  Buying cabinets is kind of complicated, so it's best if you can take a few hours and go into the store.  The legs, drawers, self closers, and doors are all purchased separately.  The sizes on the cabinets are not exactly what I have, but you will get the idea. This list is so time consuming that I didn't add to it by measuring things too!

CABINETS
Hand sink cabinet (two doors)
Fondant cabinet. One long skinny drawer on top with two big drawers below
Cake box cabinet.  When we used this, we actually turned it upside down so we had a solid top.  Also we bought a bunch of extra shelves.
Hooks that hang on the shelves below and the wire shelves from Lowe's
Wall Shelves
Accessories for the shelves are plentiful  I like this box because it's great for storing washed icing tips and couplers.

LOWES
Wire shelves which we use in the pantry and for storage in the kitchen

We have made a much longer, more complete,  "sit on the floor and explain our organizing" kind of video.  If there is interest in seeing it, I will bribe Chaddy to get it ready.  Just leave us a comment if you want more!

Tuesday, July 22, 2014

Easy to Make Chinese Takeout Box Cake


I had to make these Chinese takeout box treats for a larger cake recently (coming soon!) and they were actually pretty easy to make!  Want to make your own?

I started with a couple of clean takeout boxes from my favorite Chinese restaurant.  We went there for dinner one night and I just asked them for a couple of extras.  They didn't even charge for them, so that's a bonus!

OK, we're going to use the boxes for 2 reasons - to mold the cereal treats and to make the patterns for the outside of the box, so treat it carefully!

The boxes are wax-coated, but I still gave it a good spray with pan spray so the RKTs wouldn't stick.  Then just pour in the cereal treats, let them come almost to the top (leave maybe 1/2 an inch) and then close the box so that it keeps it's shape nicely while it dries.

Once the cereal treats have set up, you'll want to coat the sides to smooth things out.  In this case I used royal icing.  While that's drying we can make our patterns.

To make your patterns, start by taking out the wire handle.  It was a little difficult to do without messing up the box, but keep at it and you'll get it.  Once the handle is out, the box unfolds nicely.  I used a piece of card stock to draw out the panels around the box, including the top flaps, but not the very bottom.  I then used those patterns to cut each side piece out of white modeling chocolate.  Once you have all your pieces, you can start assembling your box!

I used a little tylose glue on the royal icing start putting on the panels, just make sure you save the overlapping flaps until last.  Now you can start putting in the food!  Use whatever you want for food, but my extruded fondant noodles really did look the most convincing, and I had a blast making cute little noodle loops coming out of the box!  Add your desired logos using edible images and your almost done!

Almost done, why just almost?  Well, at this point you can be done. but my "food" wasn't looking saucy enough until I hit it with a little edible lacquer.  I was really surprised at how that little bit of shine really brought a lot of realism to the piece!

FULL DISCLOSURE:  As a member of the Amazon Affiliate program, I receive a small commission if you buy a product from the links on my blog.  I actually own the products I recommend and all thoughts and opinions are my own.

Tuesday, April 29, 2014

Ruffle Ribbon Rose Tutorial

Lots of people have made a cake like this, but I'm going to give you a few little instructions and hints. Let's call it a tiny tutorial!

You need a few things: a ribbon cutter ( or not if you want to take 4 times as long), a poking tool (something with a dull end-aka not pointy), and a small knife. I used a gumpaste and Fondarific combination. I love the extra working time that the Fondarific gives me. Now a pasta machine is great! But if you are going to make one of these, don't make the investment.

I rolled the fondant pretty thin and in long pieces. A #4 on the pasta machine. Using my ribbon cutter with a 1-1/2" space, I cut as many strips as I could. I used plenty of cornstarch on the bottom and top of the strips. I then folded the strips in half longways with a slight crease. I then rolled up the strips in nice little pinwheels. Then store them in a ziplock bag until you have a bunch and are ready to put them on the cake.


I used a large circle cutter to mark all the "roses" that I was going to need. Then starting on the outside I started applying to the cake using the little tool to slightly adhere it to the cake. I was working on a buttercream cake that does not crust, so it went right on and stayed. You may need to apply gum glue or piping gel to make things stick.


I went back to the strip I just applied and poked it further so it would be more secure and fluffed it at the same time. Now keep going and going......


Once all the roses were done , I started added the fill in pieces. I developed more of a system the longer I did it. I put as long of a strip as you can handle. Having them in rolls helps you handle lots of the material at one time. When I got to the smaller pieces, it was best to make a zig zag Christmas tree sort of thin and then fitting it in the hole. Then go back and attach and fluff.


Lastly, I did use some very small pieces of foam to keep any very tight or heavy areas up and to keep them from being all flat. This was really important on the top of the cake when everything was laying so flat. This was a 12" round cake and it took me about 7 hours to get all the ruffles finished. Please be sure to charge accordingly.

Tuesday, March 18, 2014

Stencilled Buttercream Cake

There is a private girls school in Chattanooga, Girls Prepatory School or GPS, and we have been making the rounds there lately.  We were asked to make a cake for a "Chapel Talk" event.  A senior student is asked to give a talk, during chapel (seeing a theme?) and then host a little tea party kind of event.  We were given colors of Navy and pink and we came up with this cake.  What is funny about it to me, is that the design would have worked when I was in high school, many years ago.  Preppy has not gone out of style since the 80's.  Polo shirts, pearls, bows in your hair and monograms have always been in style in our town.  Is that just a Southern thing?   Perhaps, but I think we will check back in ten years from now and see if it's still "in".  Maybe moon boots and hoverboards will be in?

This was a very easy cake to make so I won't pretend otherwise, but I will give you a few helpful hints.  First, when you are using buttercream icing and then stenciling on top with more buttercream icing, cold is your best friend.  I made the oval plaque by applying the middle letter, chilling the plaque and repeating the process.  The boo boo here is that the top "F" is slightly thicker than the other two letters.  You "should" look at the thickness closely before removing the stencil otherwise you are stuck with the decoration or you have to start all over.  I guess my patience was short this day. :)
   
I did have a little problem with the bottom tier stencil, but this is a design that you can pipe a little to fix the blemishes.  Also, use Fondarific for your pearls.  It will chill up and hold the shape so the pearls don't get distorted when removing from the mold or applying to the cake.  Sometimes I will put the pearls on as I take them out and other times I have to wait so I will make a bunch, then chill and apply.  If you see a cake with distored pearls, the decorator either didn't use the right product or hurried the process too much.  You can use modeling chocolate also, but the Fondarific "wedding white" matches my all butter-buttercream perfectly.  I also add whitener and a drop of purple (to counter act the yellow) to the outside layer of buttercream to brighten it.  It's still not bright white.

Lastly, making the color navy is not as easy as you would think.  This is a great chart for coloring fondant, but I think it also applies to buttercream.  Please know that colored buttercream gets darker as it sits, so make it 24 hours in advance so you can see the final color.
 
Here is a coloring chart for royal icing, but again it's a good general chart


And lastly, I found this to be so very interesting!  A chart on what happens to leftover colors when you add ivory or black.  Super good reading!  http://www.sweetsugarbelle.com/2012/04/my-ramblings-on-icing-color-and-some-easter-cookies/

I hope you get to make or receive a timeless cake this week! 

Items I used to create this cake: 


FULL DISCLOSURE:  As a member of the Amazon Affiliate program, I receive a small commission if you buy a product from the links on my blog.  I actually own the products I recommend and all thoughts and opinions are my own.

Tuesday, January 28, 2014

Taking Care of Display Cakes


This post is a baby lesson in dummy cakes and how to repair them. I really liked this cake when I made it, but about a year later it had a little accident. I was storing/displaying it on a silver cake stand on top of a refrigerator. Next to the refrigerator was a cooling rack on wheels. One day I moved the rack and the stand was apparently being held by the rack because it the cake went flying across the room! My first hint is to put little pieces of shelf liner under each each foot or the entire stand. Every time you open the fridge, the cake stands moves a little bit so avoid the problem with shelf liner!

I use to cover cake dummies with piping gel to attach the fondant securely. My cake friend Kimberly told me to use Crisco to attach the fondant. When you are done with the display cake, you can soak it in hot water and reuse the styrofoam dummy! That is tip two! Since I had used Crisco, when the cake hit the ground, the fondant completely came off the top tier. Totally gone! Naked! There was also a big hunk out of the deer tier.

The cake was in good shape before the accident, so instead of trashing it, I decided to do some fixing! I recovered the top tier and then added the ruffles. I think I have to make an entire ruffle cake soon! I was going to leave it, but then I felt like I needed more height so I added the topper. Just some gumpaste and a bit of floral wire.

For the deer tier, I measured the thickness of the fondant still on the cake and rolled some fresh fondant. I cut a nice straight line for the bottom and then pressed it up against the cake. Basically this made an impression on the fresh fondant so I knew where to cut the patch piece. It then fit right in. I just blended it with my finger and it really wasn't noticeable. I added a few ruffles to hide some imperfections as well as some gumpaste flowers, pinecones and berries for a more wintery feel. Hide those boo boos with flowers!

Next tip, when adding flowers or something to a very hard display cake, you can add a good size piece of fresh fondant and attach it with gum glue or water. This will give you something to poke in to and hold your new additions. It this isn't feasible, because you can't hide the big piece of fondant, use a drill with a small bit to pre drill holes. You may have to use a really small bit first and work up to a bigger size. That will give you a nice hole to poke flowers into.

I am glad that I loved on the cake instead of trashing it because I think I like it better now. Maybe I was just tired of it :) My last tip is for dusting old cakes. If the cake is very dusty, take it outside and use a hair dryer on cool, an airbrush, or just a clean large paint brush and dust off the big part of the dust. If you just have a little dust left, use a clean paper towel soaked with PGA or vodka and wipe it down. If this doesn't get it clean enough, use a very clean dish rag that is wet but rung out well. Wipe off all the dirt or discoloration that you can't this way. It will make the cake gooey because of the water, but it will dry out and your display will look much better!

Tuesday, December 10, 2013

Mini Gingerbread House Cutter Review

So I recently saw this cookie cutter online and I just had to order it immediately.  I could hardly wait for it to arrive so I could get to baking. It was just so darned cute!!

Well, the cutter came in and I got to baking. The picture to your left was my final results.  The final houses were very cute and got LOTS of attention to the parties I took them to.

If you're looking to make your own mini gingerbread houses, I do have some tips on what worked well for me.

First of all, these little suckers take a lot of time, so don't offer to make (or sell) a lot of these without making sure you have enough time.  If I were pressed into selling these, I think they would be at least $8 per house.

I used the gingerbread recipe printed on the cutter package, and I found that it worked best if you rolled the dough nice and thin.  The recipe they provide held up well, didn't spread too much, an was pretty tasty.  Once the cookies come out of the oven make sure to run knife across all the pieces while they're still hot.  It will save you some grief in the next step.

Once the cookies were baked and cooled, we found that the pieces still weren't exactly the same size and it made the houses go together a little wonky.  What we finally did was hold the 2 opposing pieces (front and back, right wall and left wall, left roof and right roof) together and then used a microplane grater to file down the 2 pieces just to make sure they were the same size.  And for the 2 wall pieces (left and right) we actually found that they were too long for the house to go together just the way we wanted.  So we filed about 3/4 of an inch off of the walls.  That allowed all the pieces to fit together and it allowed the roof to have the overhang that we liked better.

Photo of cutter from Good Cook

We used royal icing to put the houses together and we found that things worked well to fit the front/back and left/right walls together first.  We used a piping bag to pipe inside the house, but expect to get a little on the outside of the house too.  Once the walls have started to setup, then you can glue on the roof pieces.  Once they are all together, let them sit and get nice and dry before decorating.

Now I have an entire bakery full of dragees and sprinkles, but if I had it to do over I would make sure I got some mini candies lined up when decorating.  And don't forget the luster dust and the disco dust (as if you would!!).

Overall, these were fun, albeit time-consuming to make.  These little houses won't fi well on a standard cupcake, you'll need to make jumbo cupcakes if you are going to use them as toppers.  But they are cute and big enough for a snack all by themselves.

Tuesday, November 5, 2013

Khaki Flower Sanding Sugar Cake

As you all very well may know, I am known for getting my buttercream nice and smooth.  It's a skill I have developed over time - it certainly didn't happen overnight.  I get questions from people all the time that want a solution for covering some of those beginning boo-boos without using fondant.  I have found that sanding sugar fits this bill quite nicely.  It's relatively inexpensive, it goes on fairly easy, and it will go a long way to covering up some of those small mistakes in your buttercream.  It gives a really nice effect too; I fins myself using this a lot for winter weddings.

I actually used the sanding sugar here because this is a dummy cake.  I wanted to showcase something besides fondant to my brides, so I started covering the tiers with royal icing.  I wasn't very happy with the look, so out came the sanding sugar.  One note: when applying this, it can get messy fast.  I recommend sitting your cake inside a large sheet pan as you put the sanding sugar on - it will catch the "runoff" and you can scoop it up and use it again.

Tuesday, September 24, 2013

Edible Feather Tutorial


My friend Kimberly told me a while about that she had made peacock feathers using wafer paper.  I was intrigued, so I immediately ordered a package.  And there it sat, for months and months, until I finally needed to make my Gatsby inspired cake for the recent photo shoot we did.  It was so easy to make I thought I would share with you my loyal readers.


WHAT YOU'LL NEED:

1.  Wafer Paper
2.  Picture of your feather
3.  Parchment paper (for tracing)
4.  Marker
5.  Scissors, Exacto knife, or Razor blade
6.  Cutting board or surface
7.  White wire
8.  Tylose glue / Sassie Sap Glue


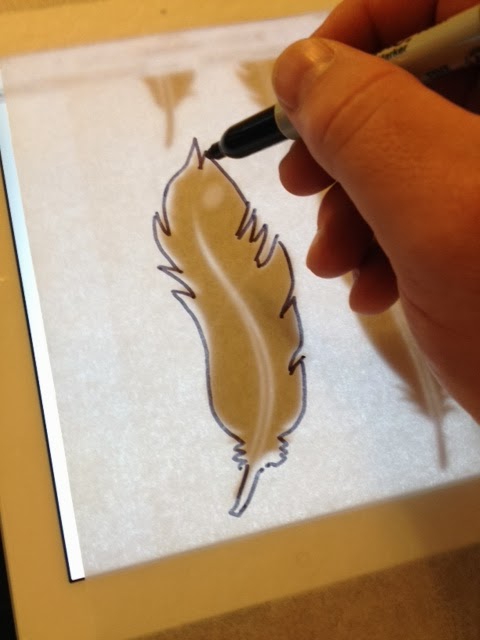
The first thing we need to do is get our feather pattern.  I used this image and enlarged it to the size I wanted on my iPad.  Then I put my parchment paper over it and traced the basic shape of the feather with my marker.


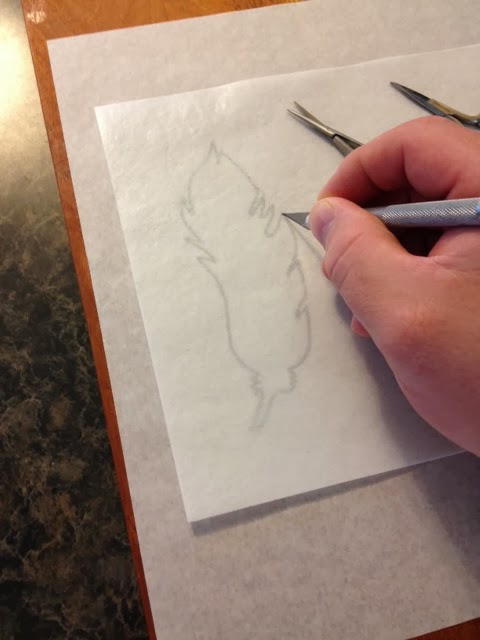
Now that we have an image to cut, just place your wafer paper over the parchment paper.  You can see right through it!  Just cut it gently with your Exacto knife on the cutting board.  The wafer paper cuts easily and with a light hand you won't even cut through the parchment paper.


Pop out your feather and place it back on the cutting board.

Don't draw on YOUR feather!

I made these lines on the wafer paper with a pen, but these are for illustration purposes only.  These lines just represent how you will cut the blades of the feather.


These spring loaded sewing scissors work pretty well, they make tiny cuts, but I found it a little hard to get the cuts deep enough into the feather.


A very sharp Exacto knife goes more quickly and allows you to vary your cuts.  Keep cutting the blades of the feather until your done with both sides.  If you get a couple of jagged edges, it's OK - it's a bird feather!


Now it's time to ruffle some feathers!  Just thumb through the blades to separate them a little.  More if you really want a rustic look!


Now your feather is almost finished!  To put on the cake I used some white wire to go the length of the feather (with some left over to insert) and I adhered it with a little Sassie Sap sugar glue or some tylose glue.

If you enjoyed the tutorial, leave me a comment here and let me know - and don't forget to stop back in next week!

FULL DISCLOSURE:  As a member of the Amazon Affiliate program, I receive a small commission if you buy a product from the links on my blog.  I actually own the products I recommend and all thoughts and opinions are my own. 

ShareThis

Related Posts with Thumbnails