Showing posts with label wedding cake. Show all posts

Tuesday, June 23, 2015

Our Cross Country Cake Adventures

 A few months ago I was approached with a rather odd request... make my nephew's wedding cake.  Now I know that upon first read that doesn't seem terribly odd, but let me finish... his wedding was going to be in New Hampshire, and I live WAYYY down south in GA.  Yeah, see?  But Sean and his fiance Kirsten were such a cute couple that I just couldn't turn them down.

Delivering a fully decorated wedding cake 17 hours and and little over a 1000 miles away can be a daunting task and honestly one that I didn't feel I (nor my cake) was up to.  So several months ago I started formulating a plan to actually make the cake there.  The venue where the wedding was held was an absolutely gorgeous working orchard named Allyson's Orchard.  I spoke to Fran, the venue manager about my dilemma, and she graciously offered me their kitchen space to work on the cake all week long.  The kitchen had the essentials, oven, sink, and refrigeration, but any other tools I needed I had to bring with me!  GULP!

So I went back to the drawing board, because everything we were bringing (Chaddy and I, a weeks+ supply of clothing, and all the components we needed to make a cake had to fit in our Honda CRV.  It's not a compact car mind you, but it's no stretch limo either!  So I made the decision to bake the cakes and make the icing before we left and freeze them.  That way, the only "major" appliance I would need to bring would be a Kitchenaid mixer to re-whip the icing.  I would place all the wrapped frozen layers in our big marine cooler along with some disposable ice packs (the kind I get when I order chocolate) and we would just stack, fill, ice, and decorate on site.  Theo couple had chosen a mud cake, which is very dense, so I really did feel that the frozen layers would hold up to the drive.  I also began the process of making the gumpaste flowers and wrapping them to thwart the nastiest, kickiest delivery driver.


Well, Sunday morning came and we packed everything up in the cooler, along with our 2 suitcases, and our Rubbermaid tote of kitchen goodies and we left the sweltering Georgia heat on our way to New Hampshire.  We left late because we were up late the night before, so we made it to Frederick, MD (my sister and the groom's Mom's home) really late Sunday night.  I was somewhat worried about the contents of the cooler, but the outside felt cold, so I decided to not risk opening the lid and letting any cold out and just let it ride.  We visited with my sister for a few minutes and hopped in bed.

We awoke (late) the next morning and after a quick shower and breakfast, we were back on the road to New Hampshire.  We drove at a good clip, made a few stops for food anf fuel along the way, and reached our hotel late Monday evening.  I thought I had never been SO tired of being in the car!  We stayed in Keene, NH and was a pleasant surprise it was!  We were within walking distance to downtown and we explored it pretty extensively during our off times.  But I digress...

Tuesday I called Fran at Allyson's orchard and she agreed to meet us and show us the kitchen.  It was a very nice catering space and I knew it would work well, as long as everything had fared well in the cooler (which had STILL not been opened since Sunday morning at this point).  We got the cooler inside, opened it, and believe it or not, everything was still VERY cold.  Those disposable ice packs were still mostly frozen.  The cake gods had indeed smiled upon the work I was trying to do.

I made gumpaste blueberries!
We pulled out the layers and let them thaw a little more while we unpacked our kitchen and got setup for the week.  Over the course of the next few days we worked on the cake a little each day, just like normal, stacking, filling, making the textured bands, and coloring those gumpaste flowers.  When we left the orchard on Thursday the cake was all done and we had the whole day Friday to spend with the rest of the family. who had now joined us at the same hotel in Keene.  It was like a mini family reunion.

I made an extra trip over to the venue on Saturday to set the cake out in the venue space (just a few steps away from the kitchen space I had been using) so that the caterer's would have all the cooler / kitchen space they needed.  A quick trip back to the hotel for a freshen and a change and it was ceremony time!

Now I go to a lot of weddings, but we're there while the linens are going on and the DJ is setting up; We rarely get to see ANY of the wedding, and especially not the ceremony.  It was nice to get to witness all the love and all the pieces of the puzzle fit together so nicely.  Sean and Kirsten had a beautiful ceremony outside by the lake and then the reception with a crazy good BBQ dinner.

When you start adding up gas, mileage, and all the other expenses, this was definitely the "most expensive" wedding cake I have ever made, but I wouldn't have changed it for the world. The new Mr. and Mrs. Seymour loved it, and I loved seeing the smiles on their faces all throughout the night.

And even though I like to preach that other decorators shouldn't take orders they don't know how to do, the lesson to be learned is that it's OK to stretch your wings and go outside your comfort zone on some occasions, just as long as you have a good game plan!

A very special Thanks to Fran and the entire staff at Alyson's Orchard for extending their hospitality, sharing their beautiful facility, and making my task much easier!

Tuesday, June 9, 2015

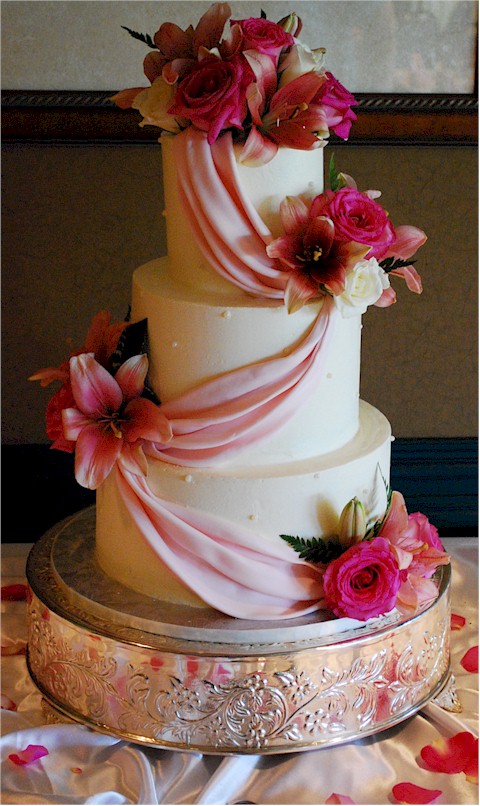
Wedding Cakes with Fresh Flowers


No matter how much a cake decorator wants to make/sell gumpaste flowers, many brides only want fresh flowers.  I have found that most of the time that it's not about the price, but the a overall look.  Fresh flowers are just soften the entire look of the cake.  

The logistics of fresh flowers on wedding cakes can be tricky.  A wedding cake should not be at a wedding too early.  If the venue is air conditioned, I recommend not delivering a cake earlier than two hours before the reception.  Most often, the florist has already completed their set up by the time you arrive with the cake.  That leaves you at the mercy of the florist.  Did they leave you enough flowers?  Are they the right kind that the bride wanted?  Do you know how to arrange them?  These are all very real world problems that I have experienced MANY times.  In fact, I had a bad feeling once this year and gathered flowers and herbs and brought them with me.  I had plenty for the grooms cake but the bride completely forgot the succulents for her wedding cake and they were the entire decoration on the cake!  They were giving mint julip cups with succulent cuttings as wedding favors.  With permission, we had to take a few apart and wash them really well just to get something on the cake.  Honestly, it was not how I wanted to leave the cake, but that's all we could do.  I should have trusted my spidey senses and brought some succulents too! 


Tuesday, October 28, 2014

Day of the Dead Wedding Cake

I made this wedding cake back in March... MARCH!  You have no idea how hard it was to sit on these pictures so that I could save them for this Halloween post!  NO IDEA!!

This couple was a baker's dream couple.  Super nice, easy to work with, and enjoyed thinking WAY outside the box.  This whole wedding was Day of the Dead themed, which is a celebration and remembrance for loved ones that have passed on.  It is a huge celebration in Mexico and other countries.

I had such a fun time making this cake.  And I think the best part of it all was during the delivery, someone walked into the reception site and yelled "Holy Sh*t, is that the cake?!"  When the wedding cake in question is purple and lime green with dancing sombrero-ed skeletons and a huge skull tier I think that's the best reaction you can hope for!

What are you doing for Halloween?  We are going out with some friends and we are all dressing up like characters from the Wizard of Oz.  Doesn't that sound like a hoot?

Tuesday, October 21, 2014

Wedding Cake with a Twist...that I don't like!


Can I vent here?  Really vent because you are reading my blog, so it's OK right?  I have to say this cake just drove me crazy!  I don't like the twist.  I didn't want to do the quarter twist.  What is the point of the twist?  Where is the front?  How do I place it at the venue?  What direction should I install the monogram topper? OK, now that's out of my sys... no!  WHY?  If the cake was too "normal, we could have done a more daring, offbeat cake without making it look like I was drunk and riding the tilt-a-whirl when I was stacking it!
 
Are you new to cake making or client pleasing?  PUT ON YOUR BIG GIRL PANTIES and make what they want.  Then start a blog and complain a little to keep your sanity...well a little sanity.  I have a good eye and good taste.  I was paid well for a long time to use those talents in the retail world.  Not all people have those things and I've come to accept that.  I don't think this cake is tacky or ugly, it just goes against my nature of symmetry. But I have been and will be asked to make tacky cakes.  I have done some turned some down.  I'm an artist, but also a business person.  Momma has to pay the bills! If you can make a product and still lay your business card down right next to it because you made that product the best it could be done, then do it.  If you would be so ashamed for people to know you made "that" and would never make it again, then don't make it in the first place.  Learn skills today that will let you steer a customer to a better option that will suit you both.  That may include you making another design cheaper to encourage the customer to pick the thing you want to make  (or overpricing the item you don't want to do, but my honesty gets in the way).  Sometimes you need to give options because of you don't want to tarnish "your brand" or you simply don't have the skills to make a certain design or the customers budget does not agree with their first choice.  You need the ability to adapt and "roll with the punches" whether that means making a cake you don't like or coming up with a better plan.  I hope all your projects this week are ones that you love!

Tuesday, April 10, 2012

Tennessee Riverplace Wedding and Toppers

When I met with this happy young couple, they were very sure of the cake they wanted.  They wanted the look and the whimsy of a wonky cake, but they didn't want to use triangular risers and they wanted each tier to maintain it's rectangular shape (no cutting the base/top at an angle.  It was a bit of a challenge, but I decided creating an angled well in the cake below was the best way to accomplish this.

The rest of the cake was fairly easy, and as you can see I decorated it with some scroll piping, some gumpaste tulips, a fondant ribbon, and gray gumpaste bows that I textured to give a more realistic fabric feeling.

I delivered this to the Tennessee Riverplace, which is the beautiful location where they had the reception.

Click to Enlarge
But take a look at this topper the couple picked out!  Isn't it just the cutest?  They got it from Etsy, but I am not sure of the seller.  They were SO cute that they just had to have their own special photo session!


Even though their groom's cake was a simple, budget-friendly design, they also had a specialty topper made for it.  Unfortunately, I don't know this Etsy seller either.

Now, they didn't explain their design to me, but I'd like to think it stems from the episode of Friends where Phoebe explains that "Lobsters mate for life" and that Ross and Rachel are each others lobsters.  I'm not sure if lobsters actually do mate for life, but I can certainly appreciate the sentiment.

As always, thank you for stopping by, and I'll see you back here next week.  If you have any questions, please leave a comment and I will reply to it using Blogger's new(ish) reply feature!

Tuesday, February 7, 2012

Buttercream Inscription Wedding Cake

I know that I'm not alone in this, but one of the things I dislike the most about decorating cakes is writing on them!  I'll do most anything to get out of it, gumpaste plaques, edible images, etc.

But when I met with this couple they wanted a verse from the Song of Solomon piped on their cake.  So I had to the 'ol noodle crankin'... and here's a technique I came up with worked very well.

First I printed out the verse using the computer and then flipped it over so I could see it in reverse.  I know there are ways to do that on the computer, but I didn't have the time to figure it out on my new PC!  Next I taped it to the back of a baking sheet and then taped a piece of cellophane very tightly over the paper.

Now I use a tip 1 to pipe over the the verse in reverse.  I pop the baking sheet in the freezer for 5 minutes.  Then I removed the cellophane with the words still on them and very carefully flipped it over and placed it (very straightly) on the cake.  Then you can carefully remove the cellophane with the words left behind in just the right place.  I wanted my words to stand out a little more, so I piped over the words that were already there.  I placed them in the chiller and then used a small paintbrush to even out the lines.

As you can see from the picture below, it turned out quite nicely!


Tuesday, November 29, 2011

Bare Branch Wedding Cake

After the wind and rain this weekend, the branches on this cake look much like the branches on the trees in my yard!  Seriously, we just raked the yard a couple of weeks ago, and after this weekend it needs it again!

Nonetheless, we had a great time making this simple elegant cake.  I iced the cake smooth and made the branches out of modeling chocolate.  The ribbons are also modeling chocolate.

Now that the trees have lost their leaves that means that winter is just around the corner.  In my area at least, wedding business slows down a lot after Thanksgiving and usually until after the New Year.  I still have a few cakes on the books, but nothing major.  I do a few things to generate some extra income, but I honestly appreciate the break.  It give me time to catch up on paperwork and begin preparing my taxes, but it also gives me some time to spend with family and friends.

To the other bakers out there, do you see a holiday slump also?  If so, do you embrace it, or find other ways to generate holiday income?

Friday, October 7, 2011

Green & Brown Wedding Cake

As you read this, I'll be traveling to Nashville to attend a food blogger seminar put on by Food Blog Forum.  I guess technically I am a "food blogger" as I do blog about food, but I still feel a little isolated, because I'm certainly not the traditional food blogger.  But I always enjoy meeting new people, and the topics they discuss at the seminar are all very applicable.  I am especially looking forward to the food stylists panel.

Speaking of food styling, take the photo of this cake here.  It was the prettiest shade of green and brown.  I even took it outside to get some of that sweet, sweet natural lighting.  But no matter what I tried, I just couldn't get my colors represented properly in my picture.  It seems like any chocolate accents on my cake always come out very black looking.

It's something I hope I can ask at Food Blog Forum this weekend.  Hopefully I'll give you all the lowdown on Tuesday (or maybe Friday)!

Have  great weekend!!  You can follow the action real-time on Twitter with hashtag #FBFNash!

Tuesday, August 2, 2011

Rhinestones and Gold

I made this wedding cake a couple of weeks ago for a lovely couple at the Fairyland Club.  This is another in the "bling" series that have been all the rage with my brides these days.

I had great time making this cake, as this was my first experience with using these foam separators.  They worked well, I just covered them with fondant and painted them with pearl dust.  Luckily for me, I have found that Wedding White Fondarific matches my buttercream almost exactly.  It comes in very handy when I need to mix elements on a cake.

The rest of the cake is buttercream, except for the golden curls, which I also made from Fondarific that I extruded and then painted gold after they were placed on the cake.

The bling on this cake was all provided by the bride.  She bought the 5-row rhinestones and the rhinestone buckles (the center of each tier) while she and her fiance were visiting in New York.  It was the first thing they purchased for their wedding.

GIVEAWAY UPDATE:   Oh yeah, today's the day we announce the winner(s) of our Marshmallow giveaway.  We didn't get over 100 new "likes" on Facebook, but we decided to give away 2 tins anyway.  Congratulations to Maria and Jenna!  I will get your marshmallows in the mail within a week!

Friday, April 22, 2011

Orchid Wedding Cake

I do lots of wedding cakes where i decorate with swirls and/or curls, but this bride brought me a photo of a cake that had, for lack of a better term... slashes.  They were very different and created a really cool look.  I thought the cake turned out great!

During our consultation, the bride said she wanted orchids on the cake.  That's what I sketched out and that's what I was planning on seeing at the wedding and I even discussed it with the florist before the wedding.  But when I arrived, the florist had other flowers.  The florist and I quickly scoured the facility and gathered the few remaining orchids from all the arrangements.  We used a few rose petals to add an extra little splash of color.

The lesson here is that sometimes no matter how much pre-planning you do, sometimes you just have to roll with the punches and make the best of things even when ideal conditions are not present.

Have an awesome weekend and Happy Easter to all!

Tuesday, March 15, 2011

Take a Picture Before It's Done


For some of you this little tip may seem too obvious, but I was amazed at how long it took me to realize it.  Do you ever get a cake order and there's one part of the cake that makes it less marketable to other customers?  Not that there's anything wrong with it, and not that I expect people to only order cakes I have done before.  Take the cake above.  On the left was the finished wedding cake - the couple wanted a splash of their colors (hot pink and green) and a sign language topper.  The cake turned out beautifully and I was very proud of it.

As I was working on it however, at some point I had it all decorated except for the extra color and the topper.  So I pulled out the camera and snapped a few pictures of it in that pre-finished state.  If you're still trying to build your portfolio, this is a good way to get 2 pictures for the price of one!

So don't hesitate taking a photo for you before you finish making it for them!

For the record, this whimsical wedding cake went to Chattanooga's Creative Discovery Museum.

Tuesday, January 25, 2011

Going Green with Wedding Cakes

In blog posts past, I have written about how much fresh flowers can affect the final vision of the cake.  So I decided to do a little "before and after" shot to show you what a huge impact they can have.  This could also serve as a example of how proper lighting can affect your pictures, but I digress (Grrrrr....).

The florals for this cake were provided by Helen Humphrey from Humphrey's Flowers.  She made the topper using two different types of orchids and fiddlehead ferns, which I just adore.  To put the fiddleheads in the cake, I simply snipped the ends and inserted a toothpick and then inserted the toothpick into the cake.

Our cranberry splash of color is just satin ribbon.  Remember my ribbon tip: wrap ribbon around a buttercream cake twice and it will keep the buttercream from seeping through and making the ribbon look greasy.

Tuesday, December 14, 2010

Whimsical Pink Wedding Cake

Believe it or not, this is a wedding cake!  This whimsical cake was another wedding cake I delivered to Trevitt Hall in Dalton, GA.  They have a quaint little reception space and they're always ready for a party!

As you can see, my bride here wasn't afraid to think outside the box and leave "traditional" wedding cakes in the dust!  This fun little number is decorated with fun fondant swirls, fantasy flowers, and a snazzy monogram.  Notice the bling on the bows?  That's some clip-on earrings the bride provided to give the cake a little extra sparkle.  I don't think I could have created as sparkly that was still edible!

As always, thanks for stopping by!  If you haven't finished up your Christmas shopping, there's only 11 more days until Christmas!!

Tuesday, December 7, 2010

Lace Recreation Wedding Cake

I did this cake a few weeks ago and I really enjoyed doing it.  So much so that I am planning on doing a display cake in a similar fashion.

This bride wanted the ornate lacework on her dress recreated on her cake. She provided me with a scan of the lace pattern.  We printed it out and then traced it on copy paper.  From that black and white drawing, we could scan it in and resize it to fit the cake.

Once it was the right size, I went to work with my Sugar Veil icing tracing that lacework over and over.

My brother even made a new custom cake stand to place this cake on!  The bride liked it so much, she just decided that she would purchase it as a keepsake.  How sweet is that?

Friday, November 26, 2010

Autumn Flowers Wedding

Hello everyone!  I hope you all had a very Happy Thanksgiving and are resting comfortably instead of fighting the masses for those Black Friday deals.

This wedding cake reminds me of Thanksgiving and fall.  The cake gallery on my website is full of wedding cakes, but there's not a lot of fall themed weddings on there.

This cake, is fairly simple, but getting the separators just right to allow space for the flowers was a bit of a challenge.  It was just a matter of measuring.  Like the old carpenters say, "Measure twice, cut once"!

I did use my Cricut Cake to cut my monogram letters (as always).

The flowers were provided by the always amazing Amanda of Divine Designs by Amanda.  Her florals are always SO beautiful!

Have a great weekend and enjoy some leftover turkey!!

Tuesday, October 19, 2010

Trees and Leaves... Well it is that time!

I just love it when we get to make a non traditional wedding cake!  My bride was so fantastic and let me take inspiration from another cake, an invitation, and a save the date card.

It was one of those cakes that would have been pretty if I stopped at the first stage, which was the trees.  It would have been prettier if I stopped at the next stage which was the curly vines.  That was by far the most time consuming.  Getting the little chocolate fondant snakes thin enough while staying even.  I still don't know why I didn't get my clay gun out?!  The one thing that made life easier was that after stacking I put the cake in the cooler for several hours while I worked on other projects.  When I brought it out the condensation made it just the right amount of sticky!  The trees and vines stuck on perfectly.  It was a shame when it dried up and I had to go back to attaching with water or piping gel.  I had it good for a while!

Back to the cake, I then added the leaves and it was prettier....and I could have stopped...but no!  The "Save the date" cards had Autumn colored dots so I added a few.  That is what made the cake for me!  Pop pop pop...dot dot dot!  I used the little circle cutter from Polymer Clay Express.  These will be worth every cent!  I love that site!  The impression mats are good, not to mention the extruder guns.  I liked everything about the cake except for the delivery which was 90 minutes one way and the last 2 1/2 miles was all on a gravel road that was not at all cake friendly!  It was called Laurelwood and it was a beautiful location once we got there!

Friday, September 17, 2010

Rose Petal Cake

A long time ago, when I was a "baby learner" as my Mom would say, a bride brought me a picture of a cake that she said was Kevin Costner's wedding cake.  It was the first cake that I said to myself and the bride "Hmmm, so I wonder how they did that?".  So I decided to decorate a two tier cake dummy (Styrofoam) to see if I could make her happy as well as make something that I was proud of presenting.  So I set out and covered the dummy cake in fondant (which you don't have to do on the real cake because it's just too much fondant!).  I made a couple of different patterns, cut them out with an Exacto knife and then "ruffled" the edges with a ball tool (fondant was laying on soft foam).  They didn't really go above the cake line too much so I didn't have a big problem with floppy fondant.  I did add some tylose so that it would hold it's shape better. 

After I repeated that a million times, I cut more petals freehand to make it more organic (I gave up on the pattern, it was too uniform) and then painted the edges with gold luster dust paint mixture.  I tried painting them first on my practice cake, but it made more of a mess and when I had to move them around for function it would leave the dust on other pieces.  Around the top and lip of the cake I used sanding sugar to make a pretty finish.  The one change the bride made that I don't think I would have is that she especially wanted the cake to be one continuous shape without any indentions like a normal tiered cake.  The bottom of this cake was a 20" round.   Normally you would do a 20/16/12/8/6 type combination, but she wanted 20/18/16/14/12/10/8/6.  Extra petals where placed in the 1" brim on all the tiers to help it look more gradual.

To this day, it was the tallest stacked (no space between layers) cake I have made.  I used a step ladder to put it together and it had a little sway to it.  Now I know I should have put more dowels through the center to sturdy it up.  But it was straight and lasted through the reception that went on until 3am!   This was also the first cake that the event staff, at the Chattanoogan Hotel in this case, asked me how to cut it!  My answer was "I guess get the step ladder back out and start at the top!"  

I have seen this style of cake done in a lot of publications since I made this one.  Most are in chocolate that is applied to trasfer sheets and curved to fit the layers.  A lot of people call it a "rose petal" cake.  To me it will always be a "cabbage leaf" cake! 

Thanks to Beasley Photography of Ringgold Georgia for the great picture!


Tuesday, September 7, 2010

Chocolate Lovebirds Topper

I did this cake a while back and I wasn't as thrilled with it as I wanted to be.  The couple wanted a bird silhouette on top of the cake.  I cut at least 4 different sets of birds out of modeling chocolate, but they all just looked so... FLAT!  I guess that's just how it works with silhouettes, huh?

The rest of the cake is pretty simple - square cake with buttercream, piped vine design on the chocolate layers, and piped dots on the middle tier.

I finished it off with a fondant ribbon border and some gumpaste calla lillies.

I hope everyone had a wonderful Labor Day weekend!

Tuesday, August 24, 2010

Pink Pleated Swags

This weekend I delivered a cake to the Cleveland Country Club.  The bride and groom were super great to work with!  They decided to go DIY with their florals; didn't they do the best job?

When I arrived at the venue, they had the flowers for the cake all ready for me.  I arranged them on the cake and then the groom popped in and gave his approval.  And then the photographers ran in and wanted to take pictures of ME placing flowers on the cake.  I relented and let them, as I'm sure such photos won't make it to the final album!!

Well, I'm keeping it short and sweet this week.  Make sure to keep voting for Icing Smiles in the Pepsi Refresh Project so you can win that coveted autographed Cake Wrecks book (see last post)!  The winner will be announced on Friday!!!

Have a great week and good luck!!

Friday, July 23, 2010

Every Girl Needs a Pair of Little Black Separators

Cake structure is SO important.  I hope to take Mike McCrary's class on it this year!  For a simple, but very tall, round cake it can still be pretty tricky.  This cake was made with :

2 layers of 11" round cake
1" thick 9" circle of Styrofoam
4 layers of 9" round cake (with 9" cardboard circle in the middle)
1" thick 7" circle of Styrofoam
2 layers of 8" round cake
2 layers of 5" round cake

Most all cakes that I make are 3 layers thick and about 5 1/2" tall.  I don't really care for the look of squatty cakes, I like'm nice and tall.  This one was done this way because the bride wanted a tall cake, but didn't need to feed a lot of guests.  Also, it's a very modern look that she really liked.  I am always so proud when a bride is brave enough to do something so different and bold!

The ribbon, bows and black separations are fondant, everything else it buttercream.  I don't know how other bakers do the separators between layers, I guess I could have "Googled it"!  I just covered the styro with piping gel and then fondant.  Please let me know what you use.  I have only done this look twice, so I'm sure I have much to learn.  The silver sparkly things were very pretty hair clips that the bride purchased. 

I like real wood for the base cake board because there isn't any flex to it.  My icing is all butter and when it's hard and  the cake board flexes, it will crack the icing sometimes.  Even when I use wood, I usually put an extra board with a piece of shelf liner under a very heavy cake until I get to the venue and place it on the display table.  For support purposes, I used cardboard, covered top and bottom so they don't get  soaked in butter, for all of the cake boards.  The bottom board is two drums put together so that supports could go through them for even better stability.  95% of the time, I travel with my cakes fully stacked.  This one, I should have left the top two tier off until I got there, but you know what they say about hindsight!

I used a lot of straws, skewers, and one big wooden sharpened dowel through the whole cake.  I held it by the top of the dowel the entire trip, hand cramping and all.  The force of the cake when we were going up or down a hill was so strong that I was really glad that I put a "handle" so I could keep it level.  I put a level on each layer and it was perfect, until it was done :( .  I should have put even more than 12 supports into the bottom layer.  Instead of taking it all apart, I sharpened a wooden dowel in my pencil sharpener, cut it the length to only get to the bottom cake board of the big blue tier.  I tapped this dowel in from underneath and when I got it in, I took it out and replaced it with a non sharpened dowel of the same length.  What this did was give extra support from the bottom up to help out a slightly leaning cake.  Sometimes the answer doesn't always come from the top!   I hope sometime in the future this tidbit of knowledge comes in handy!

ShareThis

Related Posts with Thumbnails