Showing posts with label swag. Show all posts

Tuesday, December 31, 2013

Domed Wedding Cake with Lace Doilies

Sometimes we are lucky enough to have a bride that really has a vision. They know they want a cake to blend into all the reception decor as well as the venue. For this particular event the venue was the Tivoli Theater in Chattanooga, TN. There are dark red curtains, gold and silver fixtures and lots of pretty marble. The bride chose darker shades of orange and purple to accent her Fall wedding.

It is really a challenge to add a lot of color to a bridal cake while ensuring it doesn't look like a fancy birthday cake. A baker can add tons of tonal details and the cake rarely looks busy, but color really changes things.  The "easy" part of this cake was the bottom stencil and the drop strings. For the bottom tier we used the "princess lace" stencil from Designer Stencils. This is the largest design in the set.

My tip here is that we air brushed the gold while the stencil was still on and in place. We also cheated a little and used a little swag marker for all the drop strings. It keeps things so consistent and easy. The cake is all buttercream with a little fondant for accents.

There is a cake all over Pinterest that shows a beautiful cake with a domed top tier and the same lace doily design. When the bride presented me the picture, I thought "holy moly that is a lot of intricate piping!" and therefore a bunch of money. She was on a budget and I wanted to help. I got so lucky and found the the lace was all done with a SugarVeil mat and SugarVeil.

I found the same mat on Etsy for a lot less money that Sugar Veil was charging. It worked great! After I removed the lace, I dry brushed it with gold luster dust and immediately applied it to the dome. It really did cut down the work while still looking like we had done a lot of hand work. I was really happy with the final product and the Bride loved it too!

Tuesday, January 29, 2013

Megan vs Morgan - A Tale of On Site Repair

So only a couple of weeks ago I was telling you about my cake emergency kit and about all the things I did to make sure everything is perfect before I leave the shop.  You all remember that right?  Well, it would seem I jinxed myself.

I made this sweet 16 cake this past weekend.  It looks great right?  Except somewhere between reading the order and cutting the letters for the cake, some how Morgan's cake became "Megan's" cake.  I don't know where the mix up happened, and that's the point of this post - none of that really matters when you get to the event and something's wrong with the cake.

So I can tell you to read through those orders thoroughly multiple times, but the more important lesson is how I fixed it on site.

As soon as the mother told me the name was wrong, I started thinking of ways to fix things before she even finished her sentence.  I told her very confidently that we would take care of it and make it right.  The venue was an hours drive (round trip) so that was my LAST option.  I had also cut a second set of name letters for the back of the cake.  The cake was against a wall, so I removed the back set of letters.  I had covered the cake with sanding sugar to give it a frosted effect and I had also sprinkled the cake board with it too.  I took a couple of pinches and sprinkled it where the letters had been .  The back now looked great.

OK, so letters I took off are now what I have to work with to fix the front.  I  cut the "e" and fashioned it into an "o".  That worked well.  And then there's that extra "n".  Cut it at just the right place and it becomes an "r".  Alright, now I have the letters I need.  From there I swapped the old "e" with the new "o" and moved the "gan" over just a smidge to fit in that "r".

All that smooshing and moving took a little of my silver luster dust off some of the letters.  They looked a little mottled.  I didn't have any extra silver luster dust in my kit, but I had my small bottle of PGA, a small paint brush, and some (now) extra silver letters that weren't going to be used.  I put some PGA on the brushed and scrubbed the extra silver letters to collect of that precious silver dust.  Then I used this to paint over the letters, which evened things out pretty nicely.

So how did it turn out?


Not too bad, huh?

Now I fully realize that luck and ingenuity was on my side that day.  Things could have turned sour very quickly and these types of situations should certainly be the exception and not the rule.  But it's SO important to know what can go wrong, and what you would do if it did.

As always, I appreciate each of you that stop by to read my little 'ol blog - Have a great week!

... and Happy Birthday MORGAN!
 

Tuesday, November 27, 2012

Fondant Swag Wedding Cake

Thank goodness a week of no cakes!  We have been needing a weekend off for a long time.  So nothing to excited to share with you this week so let me apologize ahead of time.  Easy cake but funny story.

This buttercream covered cake was supposed to be very simple, and it was, just not the delivery.  For the swags and pearl borders we used wedding white Fondarific painted with white sparkle luster dust.  You know the pearls take a lot longer than you would think, especially when you are going all the way around a 20" round cake.  I rolled the wide strips out and layed them over a three dowels.  Just form the fondant around them and then pull the dowel out the side.  Make sure the swags are stuck on the butercream so all their weight is distributed. The Fondarific is great about staying flexible and not drying out or getting cracky.  Also, the wedding white color matches my French buttercream perfectly.  I've tried using toothpicks to hold some of the weight, but they do more damage than good. 

I wasn't supposed to make anything to go where the swags met, but it didn't look great, so I added some ribbon roses.  We added fresh peonies onsite and it looked prettier at the end.  We didn't get a good picture because we pulled into the parking lot on two wheels.  On our wedding contract I list the bride's address and the venue's address on the same page.  I make the forms, fill them in, and read them all the time.  We were in a real hurry and I asked Chad to enter the venue address in Garmin.  We were freaking out when we got to our destination and it was a subdivision.  He entered the wrong address!  Once the planner called we could at least tell her we were on the way and would be there in 15 minutes.  The ceremony was still going on in the church, but that was way too close for me. 

Lesson learned!  Just because the cake is easy, that doesn't mean the rest of it will be :)

Tuesday, June 26, 2012

Peach Monogram Eyelet Wedding Cake

Are you other decorators out there getting lots of requests for peach and coral wedding cakes this season?  They must be popular colors, because almost every couple I meet with has one of those colors in their mind.

This couple wanted some touches of that peach color in their wedding cake, and they wanted that eyelet lace look also.  For this look, Fondarific made this cake possible.  It's my go-to fondant when I need to cut shapes out without worrying about it stretching or deforming.  But it still has to be pliable enough to wrap around a cake without cracking or getting elephant skin.

Any cake that also features mine and Chaddy's initials also holds a special place in my heart.  Sometimes I wish that I was doing cakes when Chad and I got married, but then again, how could I have ever chosen a design??

Tuesday, January 24, 2012

Super Bling Rhinestone Wedding Cake w/ Stand

2012 is continuing to bring in the bling, and I have to tell you, I really like it!  The more it sparkles, the bigger I smile!  I think there's just something about that sparkle, that brilliant jeweled fire that just catches a woman's eye and warms her heart!

With that being said, it's no wonder it's a popular design for wedding cakes.  In this cake we used rhinestones, as well as brooches and the topper that the bride provided to bring some extra pizazz and bling to this cake.  The rest of the cake we kept understated, with tone-on-tone bows, pearls, and fondant swags.

A few months ago I got a tremendous deal on some 24-row rhinestones from Bead & Trim.  I finally decide that they would malke for a beautiful cake stand!  So I called up my brother at My Woodworking Solutions and we set out to design a stand.  Luckily, he finished it just days before this cake was to be delivered .  I know this picture doesn't do it justice, but it really does sparkle!  It's like sitting your cake on top of a disco ball!  And it is designed really well also.  The stand as you see it is in 3 pieces; a top, the main middle bling piece, and the bottom.  Since the rhinestones are expensive this gives you the opportunity to use the stand with multiple (lower cost) tops and bottoms to get a variety of effects.  He came up with the idea and I really liked it!  I'm not sure if he offering this stand for sale, but if you're interested, hit him up on Etsy!

Friday, December 9, 2011

Wedding at Barnsley Gardens

We delivered this cake to Barnsley Gardens recently, and even though I'm not a huge fan of the turned stack square cakes, but this was was really pretty.

The standouts on this cake are the swirly border on the bottom and the gathered "fabric" fondant band around the top tier.

I have been to Cake Wrecks enough to know that any cake that contains decorations with a head and a trailing tail could be confused as something... unseemly and certainly un-wedding like.

So as soon as Chad arrived home from work I asked him to look in the cooler at this cake and tell me what he thought.  He looked at it and said it looked great.  He said my borders didn't look like little swimmers at all.  Whew!  Thank goodness!

Do you ever find yourself working on a cake and thinking about some of the Cake Wrecks style pitfalls you should avoid?

Tuesday, December 6, 2011

Glitter Monogram Wedding

This is one of those cakes where I curse at my lack of photography skills.  This cake was SO pretty and elegant, but the picture just don't do it justice.  Let's start with the bottom tier!

I have had lots of requests lately for pleated fabric look swags, and I am finally getting the hang of them.  The bow and brooch matched the bride's dress.  I really like it when I can incorporate elements from the dress into the cake.

The next tier up looks plain in the picture, but if you click and get a bigger look, you might be able to tell that the whole tier was done in a tone-on-tone hounds tooth pattern.  The bride was a big Alabama fan and we thought this would be a great way to present that element elegantly on her cake.  I used a stencil on the cake and the effect was really nice, but not so much in the pictures!

The next tier up is just fondant stripes.  Not much to see here ;-)

The top tier I was the most proud of.  The bride wanted a glitter monogram.  I again used a buttercream stencil to make the initial monogram and then with the stencil still on, I sprinkled on the glitter dust.  If you can tell in the close-up picture, the glitter did run a little, but the effect was really awesome.

Much more awesome than this picture would lead you to believe  huff! :(

Tuesday, April 19, 2011

Gold Egyptian Display Cake

I really like doing display cakes.  It's one of the few times that I get to create any cake I want!  And since the "cake" is actually styrofoam, I don't feel so compelled to use all edible materials on the cake.

I was walking through the hobby store when I came across this cute little peacock feather wreath.  I made a comment about how it would make a really cute cake stand.  Before I left the store I already had all the details worked out in my head and bought a few things too boot!

I covered the tiers in fondant and then airbrushed them gold.  I made some fondant in some of those peacock colors and used them for draping and the border.  Then I topped and placed the peacock feathers all around. The jewels are actually a pair of earrings that I ordered super cheap online.  They arrived the day I was working on the cake and when I opened them, they were already broken!  Even though I couldn't wear them as earrings, they still looked great as my swag connectors!

Just goes to show that cake inspiration can come from the darnedest places!

PS - Happy Birthday to the best mother-in-law a girl could ever hope to have!  Have an awesome birthday Trish!

Tuesday, August 24, 2010

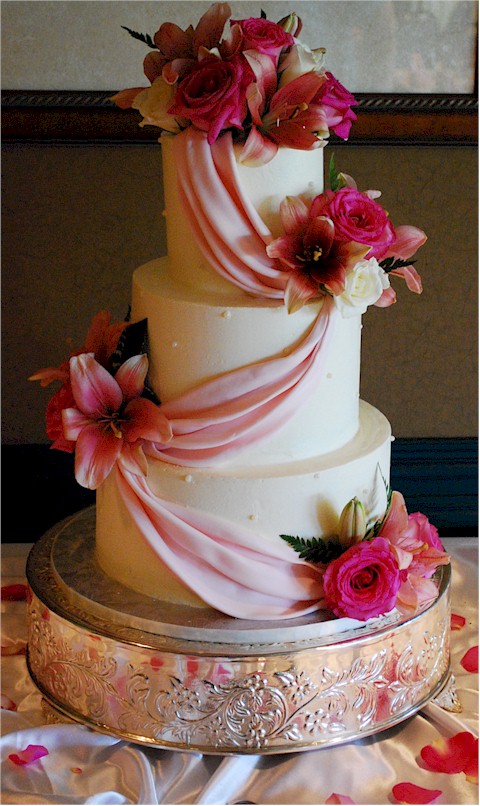
Pink Pleated Swags

This weekend I delivered a cake to the Cleveland Country Club.  The bride and groom were super great to work with!  They decided to go DIY with their florals; didn't they do the best job?

When I arrived at the venue, they had the flowers for the cake all ready for me.  I arranged them on the cake and then the groom popped in and gave his approval.  And then the photographers ran in and wanted to take pictures of ME placing flowers on the cake.  I relented and let them, as I'm sure such photos won't make it to the final album!!

Well, I'm keeping it short and sweet this week.  Make sure to keep voting for Icing Smiles in the Pepsi Refresh Project so you can win that coveted autographed Cake Wrecks book (see last post)!  The winner will be announced on Friday!!!

Have a great week and good luck!!

ShareThis

Related Posts with Thumbnails