Showing posts with label fashion. Show all posts

Tuesday, February 3, 2015

Pleated Fondant Wedding Cake

We have done a few cakes like this, but I do have a little advice and "new thoughts" on the technique of the pleated fondant.  I've noticed on some of the FB cake groups I'm in that a lot of people ask how to do this look.  Many people are doing a version of it by cutting several angled pieces of fondant and layering them on top of each other.  It's a much flatter look.   There is nothing wrong with that version, but it's not the same as trying to make the fondant look like pleated fabric.  If you are brought a picture like this cake but don't make it the same way, out of one piece of fondant, the look will be very different.  BEFORE you sign a contract saying you will do it , try it on a cake dummy so that you can prove to the bride and yourself that you can get the same look.   If you are a customer and you aren't SURE your baker can do something, offer to pay for a small trial run, like a top tier size. 

This cake was made using 3" styrofoam  cake dummies in between the tiers.  I painted all the flowers with an airbrush ahead of arranging them.  The flowers we stuck in if they had wire, but most were "glued" in place with royal icing.  My advice here is use as many different size flowers as you can so that you don't have blank spaces.  I  have been known to make a few roses petals and squeeze them in when the are soft so it looks very full.  We also airbrushed the dickens out of this cake when it was all stacked and ready to go!  My bride wanted a pearl finish so she got it!


Anytime you have a tier of cake floating above flowers you have to deal with hiding the edges of the cake boards.  For me, ribbon is the answer because it is not heavy and you can pull it tight so it doesn't sag.  Buttercream borders can fall off due to gravity, as can fondant pearl borders if they are large.  Have you ever noticed that when the bakers in Europe make this type of cake, they still have a larger cake board under each tier?  So a 6" cake would have an 8" cake board, then a 10" cake and 12" board, etc.   I don't like the look myself, but it sure would be easier! 


*I owe you a close up picture.  I accidently deleted it :(

Tuesday, September 9, 2014

Gray Tux Groom's Cake

When I have a consultation with a couple, I never know how involved the groom will be.  I have had grooms come in with their own sketches and I have had groom's that put their head on the table to take a nap.  No matter how involved they get, sometimes they just can't come up with a good idea for the groom's cake.

This tuxedo themed groom's cake is a great option for that groom that is having trouble coming up with a great idea for his cake.

This 2-tiered cake was buttercream with minimal fondant accents and made to coordinate with the wedding party's colors.


Isn't that little bow tie the cutest?

Tuesday, February 25, 2014

Bat Mitzvah Fashion Cake

We were so fortunate to be asked to make cake for a Bar Mitzvah and a Bat Mitzvah a little white back.  Today, I want to tell you about the Bat Mitzvah cake.  When I sat down with the family the birthday girl was the first to tell me her vision.  She had it all planned out with pictures and everything.  She brought an inspiration picture from Pink Cake Box and their great artist Ann Heap.  She wanted to remove a lot of the extra "stuff" on the cake like candy that made it more juvenile.  We were also dealing with a budget, so when I was asked to shave a few dollars off of the cake, we removed a company logo and the tissue on the bottom tier.  We were going to have the lid raised a bit with big pieces of fondant tissue coming out.  I was happy with the change because it kept the cake more streamlined.  We already had two tiers with tissue, and that was plenty.

As far as technique for this cake the overall tip is to use modeling chocolate, the kind you make, not the pre-made stuff.  The hatbox was one large cake with four tiers.  I used a grapefruit spoon (which I don't know why I own...) to make the channel for the black tissue.  As normal, make it deeper than you want it to be.  A layer of buttercream and fondant will fill it back in to some degree, so dig a little more out.  I covered that whole tier in white fondant and then added the pink modeling chocolate on top of that.  I I was doing it again today, I would have made one big band of modeling chocolate for the sides or done individual stripes all the way around without any fondant under neath.

The blue box and orange bag are really straightforward.  My tip on those would be to fill in any uneven space with buttercream so that the modeling chocolate doesn't sink in at all.  Corners are notorious for doing that.   I have a pet peeve about droopy corners on all cakes, but that's for another day.  To make the tissue, I got some fondant/gumpaste mix rolled really thin in the pasta machine and cut squares out.  I scrunched them, my technical term...trademark pending.... and fluffed them.  I let them dry a couple of days and didn't put the pieces on the cake until  the morning of the party.  That way the moisture in the fridge didn't make them droopy.  No one wants droopy tissue!

The handbag was a "cheater" handbag. We used edible images for all the print.  I made it the size to fit one full page of print for the front and one for the back.  HA!  It didn't outwit me this time!  Did you know that REAL bags have upside down print on the backside because it's all one piece of leather?  I made sure I was accurate for this birthday girl because she would have known!  For all the tan pieces, I used a stitching tool and it made a big difference in the overal look and detail of the cake.

I was happy with the cake, even though I could have added SO much more to it (makeup, jewelry, etc.) but when we got it to the venue that was decorated beautifully, it fit in just perfect!  The staff at The Chattanoogan Hotel were all coming up and taking pictures and that is a real compliment since they see cakes all the time.

Tuesday, August 27, 2013

A Tale of Two Shoes....

There are a lot of shoe box cake tutorials out there, so I won't bore you with another.  I do want to give you a few helpful hints I learned on the first, wait...actually second shoe I have ever made.  How have we gone this long and never made a shoe cake?  Just lucky?  Nah....just kidding it was fun.  I was instructed by the buyer that I could change the shoe a little (thank goodness) and add a red sole to the shoe bottom.  Oh those pretty, sexy shoes!
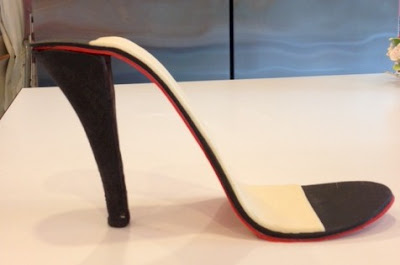
Bad Shoe
My first attempt - Everything was way too thick!  Don't do this!!


 The first thing I did was to buy a shoe kit from Jennifer Dontz.  I guess that is pretty lazy or spoiled of me but it sure did make things a bit easier.  Really, the styrofoam form was the biggest help, but I'm sure it could be done with a posterboard form or something else the shoe tutorials advise.  The shoe in my inspiration  picture had a black sole and a cream insole.  Now I had to add a third layer to this and still make it look delicate.  My first attempt was bad, just bad (see below!).  It was too thick and looked silly when you look at it from the side.  I decided to get my pasta machine out to get things nice and thin.  I rolled all three layers of gumpaste (50/50 mix) as thin as I could on the cream and red, but a little thicker on the black.  I put the three layers together and gave it a little roll and cut out the sole.  I did go back and paint the little bit of red showing on the sides so it would look more seamless. Easy squeezy!

Bad Shoe 2
This is WAY too thick and not delicate at all.  The pasta roller helped!

The ankle strap in the inspiration picture was crazy!  It was sticking way up it the air!  I really could not make it happen and I hate that.  I told the customer up front that I probably could not duplicate the crazy straps so the pressure wasn't crazy like if he expected it.  I tried putting a wire in the straps, but thin wire was too wimpy and thick wire was too bulky for the look of the straps I needed.  In the end, my straps were just gumpaste with no wires.  I used some rhinestones from the scrap booking department that already had glue dots.  Handy!  No one was going to eat the shoe so why not?

To hold the straps in a gravity defying position, I poked two sets of skewers in either side of the styrofoam mold.  Then I took a long piece of scotch tape and wrapped around each set of skewers.  This gave the straps something to rest on while drying.  I let the shoe set up for a couple days before the straps and then for another six days with the straps installed.

For traveling with the shoe, I got a 10x10 box, cut the top off and put a 10" square cake board in the box for stability.  Since I use grippy/shelf liner under everything, I added a good piece on the cake board.  I left the shoe on the form and put it on the cake board/shelf liner and anchored it down by gently hammering (with my baby hammer) with 2" pieces of strong floral wire (Wal-Mart type).  I didn't want to ruin my expensive piece of styrofoam ;)

 A very sweet friend of ours gave us a glorious recommendation to his good friend.  Unfortunately he doesn't realize that we really only make wedding cakes.  I just felt like I had to make this shoe box cake.   We were given a picture to follow very closely.  I wish I knew the original cake artist.  If you do, please let me know so that I can credit them.

Tuesday, August 20, 2013

My First Shoe Box Cake


A very sweet friend of ours gave us a glorious recommendation to his good friend.  Unfortunately he didn't realize that we really only make wedding cakes.  But still I just felt like I had to make this shoe box cake.   We were given a picture to follow very closely.  I wish I knew the original cake artist.  If you do, please let me know so that I can credit her.

I know that prices can vary greatly by zip code and baker so I don't talk about it much.  For this cake, I charged $250, which is my minimum order price.  After I told him the price, the customer said he called the original cake artist and she wanted $850 for the cake and that a local bakery had quoted $150.  He said the $850 lady was "crazy" for wanting that much.  His words, not mine.  Even later he told me that he didn't think the $150 baker would be able to replicate it with great detail.  After looking at her previous work he didn't have confidence in her abilities.  So the extra $100 I was charging was for an "insurance policy" that he would not be disappointed.  As we all know, you get what you pay for!

I baked  three layers of 9 x 13" and cut a couple of inches off to make it more shoe boxy.  It was white/chocolate/white cake with raspberry buttercream.  Yum!  The whole cake was paneled with modeling chocolate.

For the signature on the side of the box, my client wanted the birthday girl's name in a very similar style of the original shoes.  I couldn't find a suitable Louboutin font online, but Chaddy did use an app to recreate it to the best of our abilities.  The app is called Adobe Ideas, and is a free app.

The font with the signature was so small there was no way I could pipe it and I didn't want to mix mediums, so we wound up printing out an edible image to cover the entire side of the box.  We did a lot of test swatches on paper to find a color that was an exact match to the box color.  BUT!  It darkened over night!  So let that be a lesson to us all!  Luckily, since I covered the entire side of the box with the image, you could hardly even tell!

Stop back in next week and I'm going to talk a little more about that sexy shoe and what went into the making of it!!

ShareThis

Related Posts with Thumbnails

