Tuesday, November 5, 2013

Khaki Flower Sanding Sugar Cake

As you all very well may know, I am known for getting my buttercream nice and smooth.  It's a skill I have developed over time - it certainly didn't happen overnight.  I get questions from people all the time that want a solution for covering some of those beginning boo-boos without using fondant.  I have found that sanding sugar fits this bill quite nicely.  It's relatively inexpensive, it goes on fairly easy, and it will go a long way to covering up some of those small mistakes in your buttercream.  It gives a really nice effect too; I fins myself using this a lot for winter weddings.

I actually used the sanding sugar here because this is a dummy cake.  I wanted to showcase something besides fondant to my brides, so I started covering the tiers with royal icing.  I wasn't very happy with the look, so out came the sanding sugar.  One note: when applying this, it can get messy fast.  I recommend sitting your cake inside a large sheet pan as you put the sanding sugar on - it will catch the "runoff" and you can scoop it up and use it again.

Tuesday, October 29, 2013

Cutie Vampire Halloween Cake

I have mentioned many times before on this blog that I sometimes get my cake inspiration from the strangest of places.   When I saw this vampire kitchen timer on Pinterest a while back, I thought he was so cute that I knew I would use him as cake inspiration one day.

Fast forward a few months and I get a call from my friend Amanda.  Her daughter birthday was coming up, and she wanted a scary Halloween cake, even though her birthday was in early spring.  But I still remembered my cute little vampire time and I recreated him in modeling as best I could using chocolate.  He needed a few pumpkins and some black ribbon roses to complete his look.

For the scary mouths on the bottom tier, I started by molding crazy mouths to get a good size approximation.  Then I scooped out a little cake and put in a little red fondant.  Then I just out the lips over the hole I had made and inserted fangs, tongues, blood, etc.  It looked very cool once I was finished.

And I have held on to this little vamp's photo since then, knowing that it would be the star of my Halloween post!  So, what are you doing for Halloween?  Dressing up?  Handing out treats?  Or tricks???


Tuesday, October 22, 2013

New Life to Old Dummy Cakes

The life of a cake decorator is all about learning.  Learning new skills, new techniques, new ways to overcome obstacles.  At some point, every cake decorator will learn that purple fondant is horrible about fading.  And they'll also learn that decorating dummy cakes can sometimes be harder than decorating a real cake.

Take this cake for example.  I made it some time ago and initially it was the most beautiful shade of lavender.  But only a few months later it had faded to almost white, with just the faintest hint of purple.

Dummy cakes use styrofoam and can be costly, so you really want to get the most mileage out of them as you possibly can.  I wasn't quite ready to trash this cute little cake, so I used petal dusts in several shades of purple to give it what I thought was a nice watercolor effect.

I took it to a small bridal show soon after its renovation and one future bride just had a fit over it.  She called out to her future husband and said "Hey honey, come here and look at this awesome tie-dyed wedding cake!"  Hey, who am I to argue? 

Tuesday, October 15, 2013

Rustic Burlap Cake

As a cake decorator, every client you meet will have a budget.  Big budgets can easy and fun to work with, but that doesn't mean that limited budgets can't be fun too.  A client with a limited budget can still get an elegant, gorgeous cake, but it might require just a little but of resourcefulness on your part.

Take this cake for example.  This cake is so pretty, and so elegant, and it's available to my clients a my base price, which is $3.75 a serving.

This buttercream beauty is anything but plain, and the burlap ribbon and flowers give it that rustic feel that's all the rage these days.

Tuesday, October 8, 2013

Buzzy Bee Birthday Cake

It's been a while since I have done a birthday cake, but when I got a call from a previous client recently with a request for her daughter's 1st birthday I just couldn't say no.  I based my design on a napkin the client provided me.

I know that most people don't like fondant (especially one-year olds) so I did most of the cake in buttercream using only fondant for the beehive and the cake's accents.

I really enjoyed making the bees the most.  I used stamens for their little antennae and used my wafer paper again to make their little wings.  I just thought they were SO cute!

Tuesday, October 1, 2013

Woodgrain Buttercream Wedding

One of the most often heard comments I get during bridal consultations is "I don't want fondant."  The problem is that most of the inspiration photos they bring me are fondant.  There's the odd occasion where I have to tell them no, but more often than not I can come up with some way of replicating the design in buttercream.

When I met with this couple they brought an inspiration cake that was buttercream with lots of lines in it.  It was supposed to be wood grain, but I didn't think it was woodgrain enough.  I discussed it with the couple and we decided to make it wavier, with some knotholes so that no one would wonder.  It was a design I had only done in fondant before.

Here's a closeup of the final effect.  Pretty convincing, huh?  I started with my standard buttercream recipe.  Once it was nice and chilled, I started by cutting in my knotholes with a small sharp knife.  Once they were finished, then I started cutting in the lines around the knot holes first and then moved outward.  Nothing fancy, just happy little lines.

In these photos, I used some silk flowers I keep around the bakery, but the cake received fresh flowers when we delivered it to the venue, which was DeBarge Vineyards.  It was a lovely venue and this rustic wedding cake fit in well sitting on a wine barrel with the vineyards in the background.

Tuesday, September 24, 2013

Edible Feather Tutorial


My friend Kimberly told me a while about that she had made peacock feathers using wafer paper.  I was intrigued, so I immediately ordered a package.  And there it sat, for months and months, until I finally needed to make my Gatsby inspired cake for the recent photo shoot we did.  It was so easy to make I thought I would share with you my loyal readers.


WHAT YOU'LL NEED:

1.  Wafer Paper
2.  Picture of your feather
3.  Parchment paper (for tracing)
4.  Marker
5.  Scissors, Exacto knife, or Razor blade
6.  Cutting board or surface
7.  White wire
8.  Tylose glue / Sassie Sap Glue


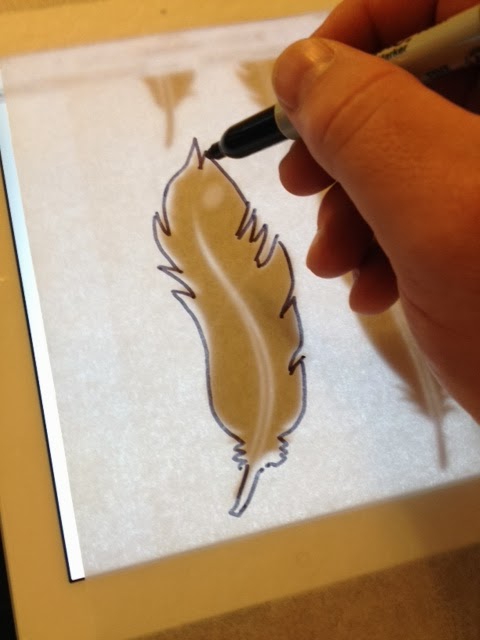
The first thing we need to do is get our feather pattern.  I used this image and enlarged it to the size I wanted on my iPad.  Then I put my parchment paper over it and traced the basic shape of the feather with my marker.


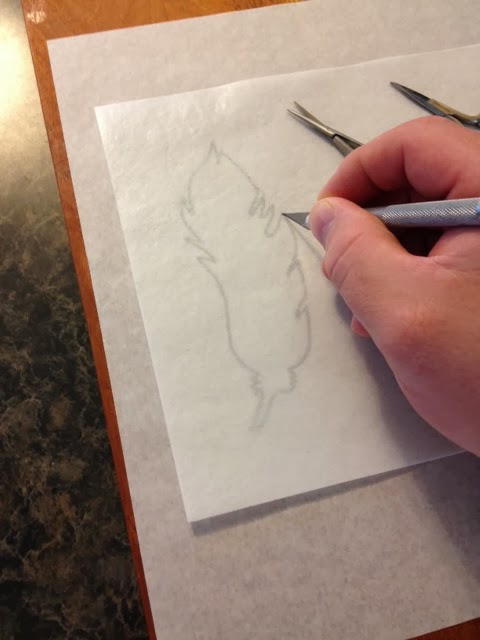
Now that we have an image to cut, just place your wafer paper over the parchment paper.  You can see right through it!  Just cut it gently with your Exacto knife on the cutting board.  The wafer paper cuts easily and with a light hand you won't even cut through the parchment paper.


Pop out your feather and place it back on the cutting board.

Don't draw on YOUR feather!

I made these lines on the wafer paper with a pen, but these are for illustration purposes only.  These lines just represent how you will cut the blades of the feather.


These spring loaded sewing scissors work pretty well, they make tiny cuts, but I found it a little hard to get the cuts deep enough into the feather.


A very sharp Exacto knife goes more quickly and allows you to vary your cuts.  Keep cutting the blades of the feather until your done with both sides.  If you get a couple of jagged edges, it's OK - it's a bird feather!


Now it's time to ruffle some feathers!  Just thumb through the blades to separate them a little.  More if you really want a rustic look!


Now your feather is almost finished!  To put on the cake I used some white wire to go the length of the feather (with some left over to insert) and I adhered it with a little Sassie Sap sugar glue or some tylose glue.

If you enjoyed the tutorial, leave me a comment here and let me know - and don't forget to stop back in next week!

FULL DISCLOSURE:  As a member of the Amazon Affiliate program, I receive a small commission if you buy a product from the links on my blog.  I actually own the products I recommend and all thoughts and opinions are my own. 

Tuesday, September 17, 2013

Art Deco / Gatsby Wedding Cake

This the other cake I made for the wedding photo shoot I was involved with a few weeks ago.  You see, when you have all these people together with their time invested, it really doesn't take that much more to get a second (or third) look and feel using mostly the same props.  The bride changes dresses and makeup, switch out the flowers, and voilĂ !  Different (looking) photo shoot!

One of the "looks" we were going for was a Great Gatsby / Art Deco wedding look.  I could have used the bird cage cake I made, but I had some extra time and I wanted to some great pictures of another cake for my portfolio as well.

I didn't really get to finish this cake like I wanted to, but I wasn't ashamed to bring it either.

I really liked the way the white stenciling over the gold tier turned out.  The tier being entirely gold was just too much!  Stenciling white over still left a very impactful statement. And I thought it went very well with Amanda's bridal bouquet, don't you?

My favorite part of this cake were the edible feathers we made!  What's that you say?  Edible Feathers??  Yep!  And they're actually easier than you would think to make them.

Drop back in next week and I'll have a tutorial ready for you on how you can make your own edible feathers.

Tuesday, September 10, 2013

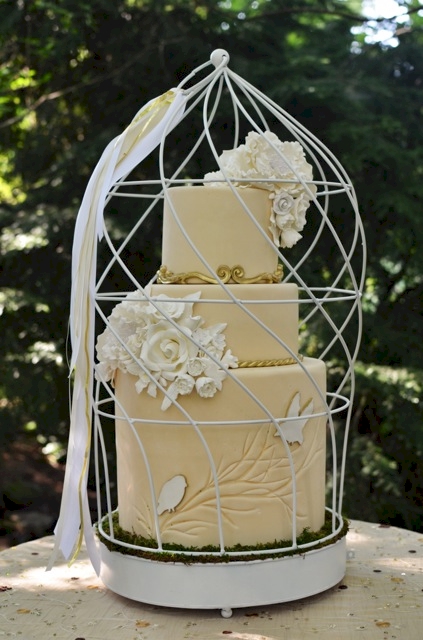
Bird Cage Woodland Wedding Cake

I have always been obsessed with birds.  I have have had them as pets and I spend a small fortune keeping food for almost every type of bird in my yard at home.  So it shouldn't be terribly surprising that I have and idea in my head for a cake inside a bird cage.  I don't know if it's something I have seen somewhere before, (I'm sure someone has done it) but it has always just been an image that struck me as... romantic.

When my friend Daisy Moffatt was designing her "Garden Fantasy Wedding" photo shoot I really had full control on what the cake looked like.  And it just so happened that the weekend before the shoot I ran across this bird cage at Home Goods (that store gets me into SO much trouble).  I immediately texted a picture of the cage to my friend (and florist for the shoot) Amanda and said "What do you think of a cake inside here?"  Her response was "Go for it!"

The cage was initially colored a silver/black metallic color and as I played with my dummy tiers inside the cage I decided that it would need a coat of paint to better go with my vision.  Krylon spray paint to the rescue!

I cut some birdie silhouettes using my Cricut and made sure they were thicker so that I could edge them in metallic gold luster dust.  The rest of the cake is just covered in fondant with branches that I carved into the fondant using my sculpting knife, some gumpaste flowers, and some scroll molds painted metallic gold.

Once it was put together i thought that it still needed a punch of color so I covered the bottom of the cage (which was leveled with a piece of foam with some moss.

I was very pleased with it once the whole vision came together.  Above is a picture that Chaddy took during the shoot while Daisy was off photographing the bride - I'm sure her pictures came out better!

Tuesday, September 3, 2013

Photo Shoot for ...

I was reading a blog a while back and the author said that if you want to be part of a photo shoot then you should make it happen.  Pick your favorite vendors, a great concept, and a great location.  This has been a slower year for wedding vendors in my area, so there have been a few of these shoots taking place.  A great couple of friends of ours decided to come up with a concept and I was lucky enough to be invited.  They gave us plenty of time and lots of artistic freedom.  I think that was a big plus because no artist wants to be given a big list of rules when they are making something for fun.  Our theme was to be "garden" so that was pretty easy.   Amanda, with Divine Designs by Amanda, did all the flowers and the table setting.  She worked with White Table on the linens and chair sashes.  Chad took these pictures but Daisy Moffatt was the official photographer.  And it all went down at the lovely Black Fox Farms.  The plan is to submit the pictures to blogs, magazines, websites and to add to our portfolio.  I am really fortunate to get to work with such a great group of people.  I can't wait to show you more pictures in the weeks to come.


ShareThis

Related Posts with Thumbnails