Tuesday, March 31, 2015

Easter Cakes and Spending Time with Family

When I was very young I knew an older lady that made cute chocolates by painting those plastic molds with colored chocolate and then filling them up. They were so "fancy"!

She got me so interested in it and it really sparked my love of pretty sweets. We have a very sweet niece that came to visit from Portland, Oregon. She wanted to make a cake and I found a simple design that a 14 year old and I could make in a few hours. I baked some layers and made the buttercream early that morning. We tried some different fillings, made fruity pebbles treats for the little stumps, made chocolate icing, filled, iced, and airbrushed. We made some grass, flowers, butterflies, a bunny and a cute fluffy bunny butt!

We had a great time and made a bunch of dishes. This would be a really cute design for someone that is learning and wants to try a cake with lots of wiggle room for error. I hope you are inspired to try even part of this Springtime cake with a special younger family member. You never know what desire you may spark in them!

HAPPY EASTER!

Tuesday, March 24, 2015

Our 6th Blogiversary!

I just realized it's been six years since I started my little blog!  Time sure does fly when you're having fun, right?  It's a time I like to look back and see what's happened over the past year and what the next year might bring.

While I've consistently blogged over the past year, I will admit that I have read less blogs over the past year.  And I have seen decent stats as far as readers are concerned, but I've seen less comments over the past year.  I love hearing what you guys have to say, but if you don't comment I certainly won't hold it against you!  Are blogs going by the wayside in favor or Facebook?  Am I missing any good new blogs?  If so, please let me know in the comments.

Remember the Millennium Falcon cake we did last fall?  Well recently it sort of went viral, well at least as viral as anything we've done before.  It was featured on some really cool geek sites like BoingBoing, Wired Italy, Laughing Squid, and a bunch of other sites that I have to use Google Translate to read!  It's been fun to see all the new hits from these other sites, but going viral doesn't put coins the coffers.

As far as my outlook on 2015, I want this year to be all about rebranding.  I have started working on a new and improved website, and today I contacted a designer about creating new logos for the business.  I need something that fits my business better and can double as a watermark.  I really do dislike watermarks, but I've had my photos stolen in the past, and with photo sharing all the rage on sites like Pinterest, I've decided it's become a necessary evil.

So look forward to seeing some new branding here soon, and don't forget to post any cool new cake blogs in the comments that you think I should check out!

Tuesday, March 17, 2015

Libby Swirl Birthday

Every baker is given pictures from their customers and asked to reproduce them and it happen most of the time.  It happens to the most famous cake people!  It's not a knock on your abilities, so don't take it that way.  Customers get on Pintrest and Google to start their wheels turning but get their hearts set on a certain design.  It stinks because if they are willing to give you some freedom they may get a better cake.  All cake designers are sitting on a pile of designs that really want to create.  Sometimes my job is trying to convince someone that I can take their ideas and customize it to fit the event even better.  Some cake designers just say "no, I won't reproduce another bakers work".  I don't get that since almost no design is an "original" and is certainly not copyrighted.  I do try hard to mention the person or company IF I KNOW IT, but often I don't and I don't have hours to research.  

Some customers will not let you change anything from the picture they provide you.  If you were to really push them to change the cake, you may lose the sale.  If you are a baker, my advice is to make sure you advise them, especially on the contract, that anytime two people make the same thing, they will not come out the same.  Even when I am supposed to make a cake that I've already made before it will come out different.  If you are a customer, be sure you understand that we are not "copy machines".  Your baker may not have the same abilities as your picture from a magazine.  It's not wrong to ask your baker to see a picture of a cake similar to the cake you are wanting.  If you want a stadium cake, you should look at other cakes that would require the use of blueprints and need to be to scale.  It's not apples to apples but it's better than blindly trusting.

   As you may have guessed, a customer asked me to make an exact copy of another bakers work.  I did just that but a made a "cleaner" and more finished version of the original.  This design is super simple so if you haven't tried it, Google a tutorial and give it a try!

Tuesday, March 10, 2015

Safari Animal Birthday Cake

We create so few birthday cakes these days that when we get to make one, we tend to go a little overboard.   The cake is really a basic design to be a backdrop for the real stars, the animals.  I added a small piece of styrofoam to lift the top tier so I could have a place to hang the vines.   It really is best for the sake of stability.

We marbled a little fondant for the waterfall  and disguised the source with fondant rocks.  As a side note, if you want some AWESOME looking candy rocks and boulders that are solid chocolate covered in a candy she'll, check out Nuts.com.  I love these people, their almond flour and their cute packaging.
 

There are a million animal tutorials out there, so I can't add much new in that department.   The most important thing to remember is to add tylose to your fondant and let it sit up a while. This step will make your animals not  be droopy or melty looking.   Another tip is to add a little "makeup" to your animals. A little touch of blush will make your animals "come to life"!  Also, if you get the basic way of making an animal, you can search Etsy for an "elephant" and take some inspiration from a greeting card, stuffed animal or most anything.  If you are selling a cake with animals, you should allow about two hours to make each animal.  I'm just saying, don't start the animals at 8pm the night before the cake is due.  Happy animal making!

Tuesday, March 3, 2015

New Realistic Cake Guitar Strings - Mini Tutorial


Remember the guitar cake we did a few months ago?  Sometimes the best ideas hit you when you're in the weeds.  We were SO running out of time to finish this cake and I was going to do something that would not have been so pretty.  I'll give you the short version, which is still kinda long!  Chad came up with a great idea to use bamboo skewers to hold the strings.   Read on for a mini tutorial on how we did this.


 We drilled the tiniest of holes in the skewer and tied fishing line in a double knot so it wouldn't slip through.  We measured all the skewers to just fit above the fondant after it was tapped into the gator board/drum below.  Next time I would do a better job of cutting these more uniformly.


Once you have all the skewers cut and your fishing line attached (leave it long on the "neck" end) start hammering them into place at the bottom of the guitar.  If you do them once at a time they'll be easier to manage.  An assistant will help hold the loose strings off the cake.


I did my best to hide the skewers, but I was on a tight timeline but I would conceal them better next time. probably using fondant or food markers.


On the neck end, each of your skewers will be a different height, so you'll need to hammer in and measure each skewer individually.  This will also be the time you measure your fishing line and cut it just a bit longer than you need.  Go ahead and drill your skewer hole and tie your fishing line in a knot on the skewer.


Here's where the magic all comes together.  Start pushing the skewer back into it's hole.  If you notice the string is going to be too long, give the skewer a turn or two to tighten the string.  As it goes into the cake, the string will tighten.  You won't be able to tune it to the correct key, but it will hold tight enough to look really good.  Using a thick modeling chocolate bar at the base of the neck will give the strings something to bite into and help keep them in place. We then put some fondant tuning pegs over the holes to hide the skewers.

We used real guitar string on the banjo, but know that we have figured this out, it will be our go to method.  I will say that when we moved the cake the strings got looser because the flex of the very long cake board but then got tight again as soon as we laid it on the display table.  I'm lucky the saggy, traveling strings didn't mess up my paint.

Hope this helps - if you have any questions, feel free to  lave us a comment.

Tuesday, February 24, 2015

Equestrian Bat Mitzvah Cake

We've been lucky to make some fun Bat-Mitzvah cakes lately!  They are way more fun than birthday cakes because they are MORE!  They are bigger, sparkly and more sophisticated than most birthday cakes.  Our birthday girl is a fantastic equestrian and took her favorite theme into her party.  I wish we had picture of the fantastic barn they decorated and used for the party.  It made me want to be the birthday girl!
  
It's hard to tell but each tier is an oval shaped tier. We did not taper the tiers inward but we did angle the tops of each.  The cake was buttercream with modeling chocolate cut outs.  We found the silhouettes off a background website and Chad converted them to use in the Cricut.  We printed out a couple of pages of edible images for the pennant flags.  The riding hat on top was hard only because I had to come up with something to go under it so that it wouldn't sit flat.  That was a customer request.  The pink, coral,blue and navy was very pretty in the barn and the cake looked great there.  Looking at it now, I would liked to have had more color on the cake as a whole, but I don't take liberties with the conditions of the contract. I know it's not always ideal, but I would hate to add stress to a family the day before an event.

That's when it's
great to have longtime customers that can trust you enough to change the design when needed. The blue ribbon, hat and riding crap were all made from fondant with a little tylose to firm things up.  I hope you can draw some inspiration from our little cake!

Tuesday, February 17, 2015

Valentine's Party

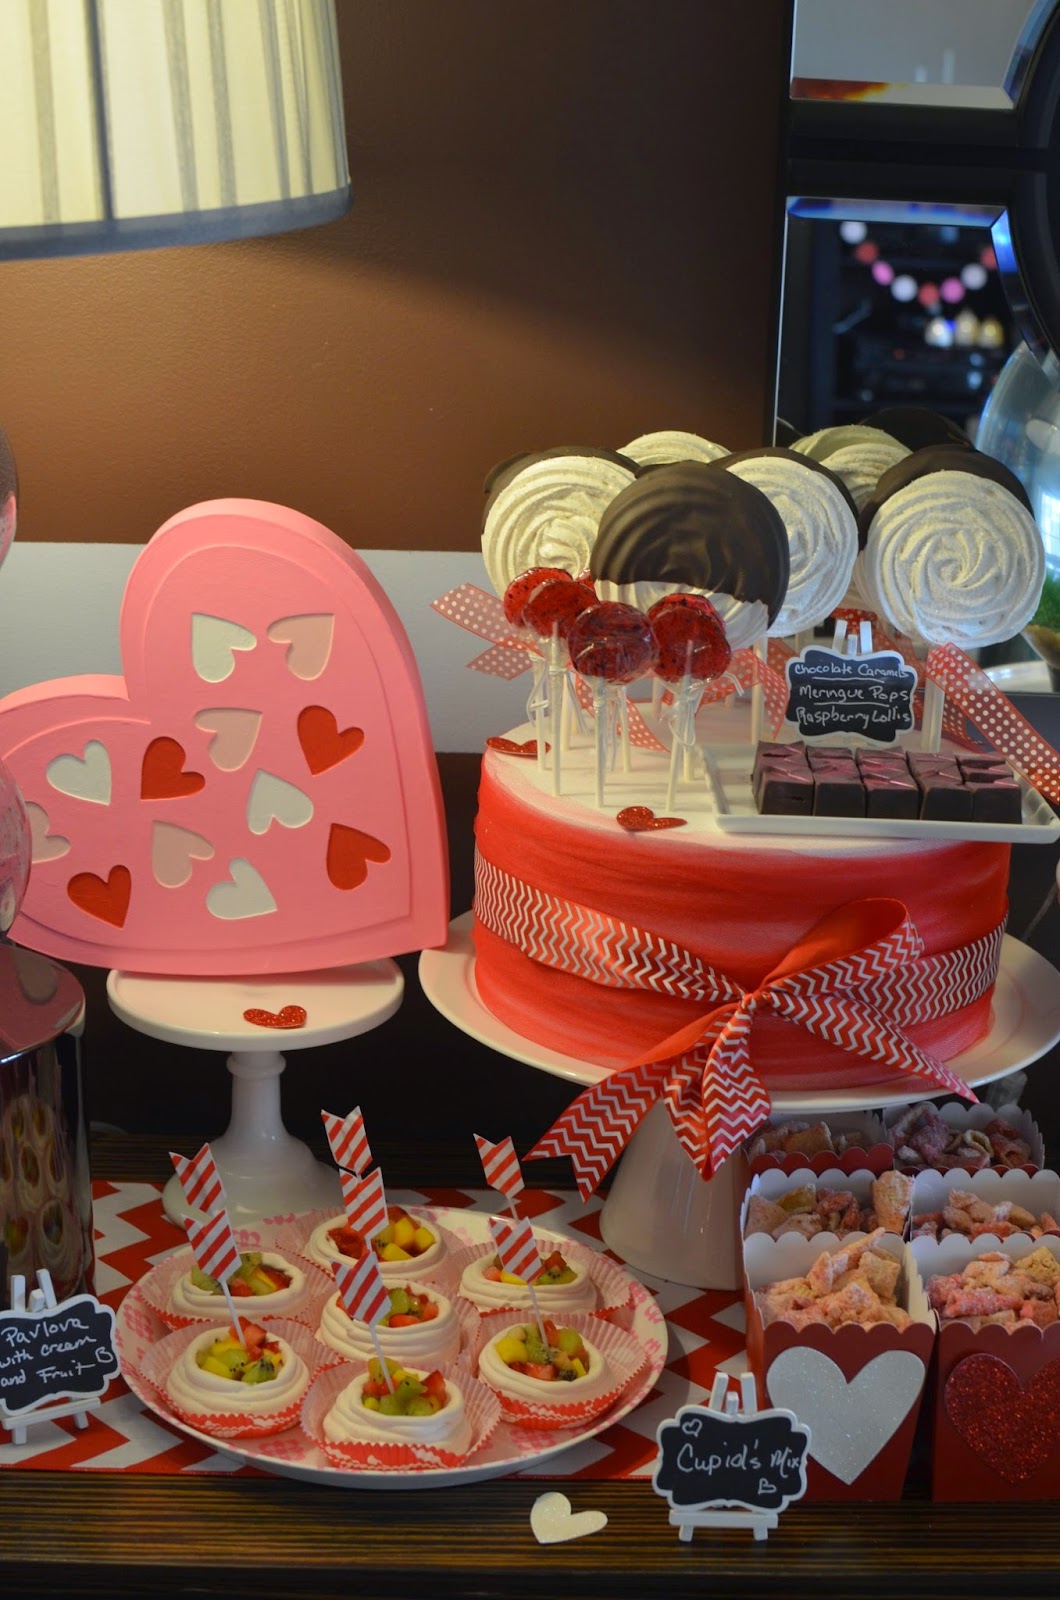
Happy (belated) Valentine's Day! We just had our third annual Valentines's party for our trivia team. It's a small group of super great people. It is a good time of the year for me to bake new things and have a good time trying new recipes. We make a dinner, appetizers and lots of desserts. The desserts included white chocolate pots de creme with strawberry compote, tiramisu, cheesecake balls, bourbon caramels, strawberry pavlovas, peanut butter fudge, and on and on.

The cutest idea by far was one I found on Bakerella's site!  I fell in love with these tiny cookies on tiny stands! Sqeeeeeee! By far those cookies, as well as the other cookies, took more time than everything else combined. I used the cookie and icing recipe she recommended and they were pretty good, but I'll keep looking for THE recipe. I hope you guys take some inspiration from these and make them for someone super special. My guests ended up taking the stands home and giving them to others to brighten their day (and hopefully never be eaten).


Tuesday, February 10, 2015

Worley Rustic Wedding


Barn weddings are everywhere!  If they are not as popular in your area, you are a little lucky.  Don't get me wrong, they are pretty in a rustic or fancy rustic (trademark pending) and make for nice pictures.  Most are not air conditioned, which means fondant icing is the best idea so that sawdust doesn't stick to the buttercream.  Some brides just won't do fondant, so here we have a buttercream cake in a barn. Pretty!  We added the little gold dots with a paint brush that I cut to be a flat circle. I know it's super hard to tell, but the bottom tier had lines scored in it, a little like a tree pattern.  The pendent banners were purchased on Etsy and the flowers were real.  The result was rustic, pretty and tasty!  


Tuesday, February 3, 2015

Pleated Fondant Wedding Cake

We have done a few cakes like this, but I do have a little advice and "new thoughts" on the technique of the pleated fondant.  I've noticed on some of the FB cake groups I'm in that a lot of people ask how to do this look.  Many people are doing a version of it by cutting several angled pieces of fondant and layering them on top of each other.  It's a much flatter look.   There is nothing wrong with that version, but it's not the same as trying to make the fondant look like pleated fabric.  If you are brought a picture like this cake but don't make it the same way, out of one piece of fondant, the look will be very different.  BEFORE you sign a contract saying you will do it , try it on a cake dummy so that you can prove to the bride and yourself that you can get the same look.   If you are a customer and you aren't SURE your baker can do something, offer to pay for a small trial run, like a top tier size. 

This cake was made using 3" styrofoam  cake dummies in between the tiers.  I painted all the flowers with an airbrush ahead of arranging them.  The flowers we stuck in if they had wire, but most were "glued" in place with royal icing.  My advice here is use as many different size flowers as you can so that you don't have blank spaces.  I  have been known to make a few roses petals and squeeze them in when the are soft so it looks very full.  We also airbrushed the dickens out of this cake when it was all stacked and ready to go!  My bride wanted a pearl finish so she got it!


Anytime you have a tier of cake floating above flowers you have to deal with hiding the edges of the cake boards.  For me, ribbon is the answer because it is not heavy and you can pull it tight so it doesn't sag.  Buttercream borders can fall off due to gravity, as can fondant pearl borders if they are large.  Have you ever noticed that when the bakers in Europe make this type of cake, they still have a larger cake board under each tier?  So a 6" cake would have an 8" cake board, then a 10" cake and 12" board, etc.   I don't like the look myself, but it sure would be easier! 


*I owe you a close up picture.  I accidently deleted it :(

Tuesday, January 27, 2015

3D Acoustic Guitar Groom's Cake


     We have made three musical instruments to date.  A simple acoustic guitar, a fantastic banjo, and this cake.  The bride was limited on her budget, so to cut costs/labor we didn't make any type of armature for this cake.  The neck is entirely made out of cereal treats and then "faked out" by using black fondant to represent the underside of the neck.  I like the look of it, especially since I didn't have to do a bunch of woodworking that isn't much fun to me.  The sides of the guitar are buttercream.  The top and neck are all covered in modeling chocolate.


     For the cake board, I did use a power tool and cut 1" thick Gatorboard with a rotozip tool.  Gatorboard is a lot like foamboard, but instead of paper on the outside, it's this really hard surface.  You can't cut it with a box cutter.  I used to use it all the time when I was in visual merchandising.  Look at the letters in a department store and you will see this material.   It was not my most brilliant plan :(  It was messy, bumpy, and not a good structural idea.  I was moving the cake from the cooler to the table and hit the neck cake board on the side of the table.  It was heavier than I expected and I was just trying to hurry too much.  My accident caused the neck of the cake board to break but not come off.  At this point, the cake was carved and iced smooth so moving it to another board would have turned it into a pile of crumbs.  For a solution, we cut a 1/4" piece of plywood about the size of the cake and glued it underneath to brace the original cake board.  It gave me a lot more structural integrity. 


For the strings, well my husband is a damn genius!  We were so running out of time to finish this cake and I was going to do something that would not have been so pretty.  I'll give you the short version and we can follow it up with a little tutorial.  Since the Gatorboard cake board we could stab wooden skewers into it and they would hold in tight.  Chad drilled the tiniest of holes in the skewer and tied fishing line in a knot.  Then with both of us holding it so as to not damage my fancy paint job (heaven forbid we try this before the cake is otherwise done-silly baker).  We used a tall piece of modeling chocolate at the top of the neck to hold the string up so they didn't lay flat on the neck and it held them in the proper order without wiggling around.   We then put the line through another tiny hole in a wooden skewer and hammered it into the cake and board.  The tension was good and the line didn't move.  We then put some trim pieces over the top skewer to hide the skewers. We ran out of time to figure out camouflage for the bottom skewers.  We used real guitar string on the banjo, but know that we have figured this out, it will be our go to method.  I will say that when we moved the cake the strings got looser because the flex of the very long cake board but then got tight again as soon as we laid it on the display table.  I'm lucky the saggy, traveling strings didn't mess up my paint. 

Lastly, my lesson of the day is to paint with colored cocoa butter onto modeling chocolate.  Chef Rubber (http://www.shopchefrubber.com/Cocoa-Butter-Painting-Kit/) has a great kit that will last for a while.  ANYTIME I use an edible marker on modeling chocolate, once the cake comes out of the fridge and has a little condensation, all the details run like Alice Coopers mascara!  Cocoa butter painting takes a little practice, which is what I'm still doing, but once it firms up, the details won't move or get smudged by anything.  I hope you take something helpful away from this because one day you may have to figure out guitar strings on a cake!


ShareThis

Related Posts with Thumbnails